Internet Printing Protocol (IPP) support with the LEADTOOLS Virtual Printer
Take the following steps to create and run a program that prints using the LEADTOOLS Network printer.
1. Make sure you have IIS installed on the machine correctly. And make sure the LEADTOOLS virtual printer web service is configured correctly.
2. Start Visual Studio.
3. Choose File-> New->Project... from the menu.
4. In the New Project dialog box, choose either "Visual C# Projects" or "Visual Basic Projects" in the Projects Type List, and choose "Windows Application" in the Templates List.
5. Type the project name as "LEADTOOLS IPP Demo" in the Project Name field, and then click OK. If desired, type a new location for your project or select a directory using the Browse button, and then click OK.
6. In the "Solution Explorer" window, right-click the "References" folder, and select "Add Reference..." from the context menu. In the "Add Reference" dialog box, select the ".NET" tab and browse to the LEADTOOLS For .NET "<LEADTOOLS_INSTALLDIR>\Bin\Dotnet4\Win32" folder and select the following DLLs:
- Leadtools.dll
- Leadtools.Document.Writer.dll
- Leadtools.Codecs.dll
- Leadtools.WinForms.CommonDialogs.File.dll
- Leadtools.Printer.dll
7. Switch to Form1 code view (right-click Form1 in the solution explorer and then select View Code) and add the following lines at the beginning of the file:
Imports SystemImports System.Drawing.ImagingImports System.TextImports System.DiagnosticsImports System.Windows.FormsImports LeadtoolsImports Leadtools.PrinterImports Leadtools.CodecsImports Leadtools.Document.Writer
using System;using System.Drawing.Imaging;using System.Text;using System.Diagnostics;using System.Windows.Forms;using Leadtools;using Leadtools.Printer;using Leadtools.Codecs;using Leadtools.Document.Writer;
8. Declare the following private variable:
Private WithEvents _printer As Printer private Printer _printer; Add an event handler to the Form1 Load event and code it as follows:
Private Sub Form1_Load(ByVal sender As Object, ByVal e As System.EventArgs)TryDim printerName As String = "LEADTOOLS Printer"If (NotPrinter.IsLeadtoolsPrinter(printerName))ThenDim documentPrinterRegPath As String = "SOFTWARE\LEAD Technologies, Inc.\Printer\"Dim printerInfo As PrinterInfo = New PrinterInfo()printerInfo.ProductName = printerNameprinterInfo.PrinterName = printerNameprinterInfo.RegistryKey = documentPrinterRegPath & printerNameprinterInfo.RootDir = "C:\LEADTOOLS 20\Bin\Common\PrinterDriver\"printerInfo.Url = https://www.leadtools.comprinterInfo.PrinterExe = Application.ExecutablePathPrinter.Install(printerInfo)End If_printer = New Printer(printerName)_printer.EnableNetworkPrinting = True_printer.EnableInternetPrinting = TrueCatch ex As ExceptionMessageBox.Show(Me, ex.Message)End TryEnd Sub
private void Form1_Load(object sender, System.EventArgs e){try{string printerName = "LEADTOOLS Printer";if (!Printer.IsLeadtoolsPrinter(printerName)){string documentPrinterRegPath = @"SOFTWARE\LEAD Technologies, Inc.\Printer\";PrinterInfo printerInfo = new PrinterInfo();printerInfo.ProductName = printerName;printerInfo.PrinterName = printerName;printerInfo.RegistryKey = documentPrinterRegPath + printerName;printerInfo.RootDir = @"C:\LEADTOOLS 20\Bin\Common\PrinterDriver\";printerInfo.Url = https://www.leadtools.com;printerInfo.PrinterExe = Application.ExecutablePath;Printer.Install(printerInfo);}_printer = new Printer(printerName);_printer.EnableNetworkPrinting = true;_printer.EnableInternetPrinting = true;_printer.EmfEvent += new EventHandler<EmfEventArgs>(_printer_EmfEvent);_printer.JobEvent += new EventHandler<JobEventArgs>(_printer_JobEvent);}catch (Exception ex){MessageBox.Show(this, ex.Message);}}
10. Add an event handler to the Emf event and code it as follows:
Private Sub printerTest_EmfEvent(ByVal sender As Object, ByVal e As EmfEventArgs)Handles _printer.EmfEventSystem.IO.File.WriteAllBytes("c:\LEADTOOLS_IMAGE1.emf", e.Stream.ToArray())Dim metaFile As New Metafile(e.Stream)End Sub
void _printer_EmfEvent(object sender, EmfEventArgs e){System.IO.File.WriteAllBytes(@"c:\LEADTOOLS_IMAGE1.emf", e.Stream.ToArray());Metafile metaFile = new Metafile(e.Stream);}
11. Add an event handler to the job info event and code it as follows:
Private Sub _printer_JobEvent(ByVal sender As Object, ByVal e As JobEventArgs) Handles _printer.JobEventDim jobID As Integer = e.JobIDIf e.JobEventState = EventState.JobStart ThenTryMessageBox.Show(String.Format("Job ID: {0}", jobID))Catch ex As ExceptionMessageBox.Show(ex.Message)ThrowEnd TryElseIf e.JobEventState = EventState.JobEnd ThenMessageBox.Show(String.Format("Job {0} was Ended", jobID))Process.Start("mspaint", "c:\LEADTOOLS_IMAGE1.emf")End IfEnd Sub
void _printer_JobEvent(object sender, JobEventArgs e){int jobID = e.JobID;if (e.JobEventState == EventState.JobStart){try{ MessageBox.Show(string.Format("Job ID: {0}", jobID));}catch (Exception ex){MessageBox.Show(ex.Message);throw;}}else if (e.JobEventState == EventState.JobEnd){MessageBox.Show(string.Format("Job 0 was Ended", jobID));Process.Start("mspaint", @"c:\LEADTOOLS_IMAGE1.emf");}}
12. Make sure to share the new printer after installing it.
13. Build, and Run the program to test it.
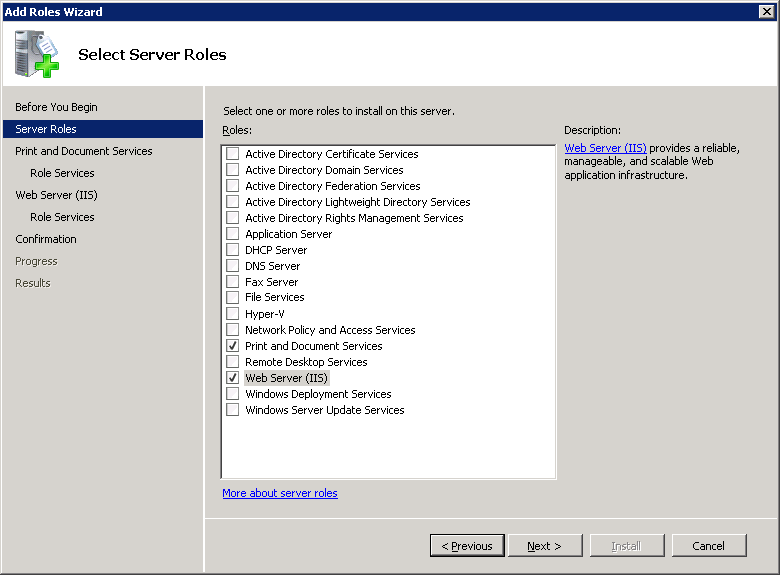
Note1: to Configure Internet printing on a computer running Windows Server 2008, perform the following steps:
1- Run the Server Manager.
2- Select Add Roles.
3- Select the following roles:
- Print and Document Services.
-
Web Server (IIS).

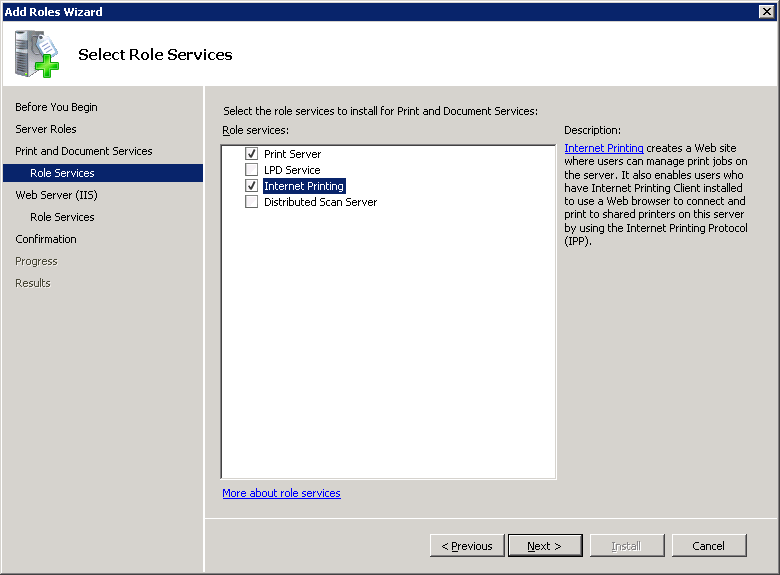
4- In the Roles Services, Select the following services:
- Print Server.
-
Internet Printing.

5- Complete the Installation.
Note2: To install the printer driver on a client computer, perform the following steps:
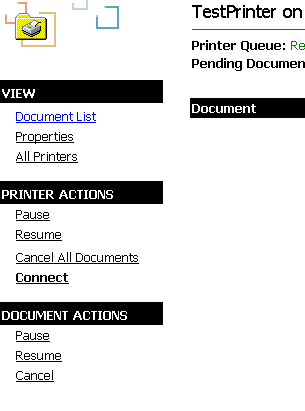
1- Open SERVER_IP/printers in Internet Explorer:

2- When you click “Test Printer” (the Installed Test Printer’s Name), the selected printer page will open.

3- Click the Connect link.
4- Complete the Installation.
Programming with the Virtual Printer Driver Class
© 1991-2020 LEAD Technologies, Inc. All Rights Reserved.
