Creating a Region
A region is an area of interest within an image. An image can have only one region at a time, but the region can be complex, including, for example, multiple noncontiguous shapes.
When an image has a region, the LEADTOOLS classes that modify the pixel values (for example PosterizeCommand) act on the region, rather than the whole image.
In addition, the LEADTOOLS classes and methods that flip, reverse, rotate, shear, or resize an image also transform the region to match the image. For example, if you were to shear an image that had a rectangular region, the region would become a parallelogram.
By default, an image does not have a region. You create a region by calling one or more of the creation methods. Each time you call one of these methods, you specify how the new region is to be added to the existing region (if there is one). The following is a list of the options:
| Value | Description |
|---|---|
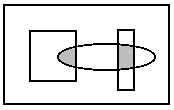
| And | The resulting region includes only the intersection of the existing region and the new one. The |
| following example shows the result, where the rectangles represent the existing region, the | |
| ellipse represents the new one, and the shaded area represents the resulting region. | |
 |
|
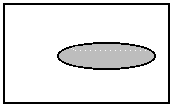
| Set | The resulting region includes only the new region. The existing region, if any, is discarded. The |
| following example shows the result, where the ellipse is the new region and the shaded area is | |
| the resulting region. | |
 |
|
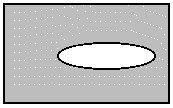
| SetNot | The resulting region includes everything in the image, except the new region. The existing |
| region, if any, is discarded. The following example shows the result, where the ellipse is the | |
| new region and the shaded area is the resulting region. | |
 |
|
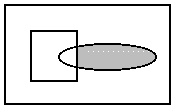
| AndNotImage | The resulting region includes the intersection of the area outside the existing region and the |
| area inside the new region. The following example shows the result, where the rectangle is the | |
| existing region, the ellipse is the new one, and the shaded area is the resulting region. | |
 |
|
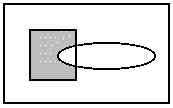
| AndNotRegion | The resulting region includes the intersection of the area inside the existing region and the |
| area outside the new region. The following example shows the result, where the rectangle is the | |
| existing region, the ellipse is the new one, and the shaded area is the resulting region. | |
 |
|
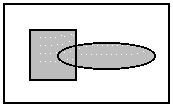
| Or | The resulting region includes the area inside the existing region and the area inside the new |
| region. The following example shows the result, where the rectangle is the existing region, the | |
| ellipse is the new one, and the shaded area is the resulting region. | |
 |
|
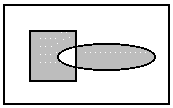
| Xor | The resulting region includes the area inside the existing region and the area inside the new |
| region, except for any areas where the two intersect. The following example shows the result, | |
| where the rectangle is the existing region, the ellipse is the new one, and the shaded area is | |
| the resulting region. | |
 |
LEADTOOLS provides the FrameRegion method for outlining a region, but does not provide any methods for responding to the user's mouse clicks and movements one-by-one. For that purpose, you should use Windows GDI+ to draw lines or shapes in the device context while the user is designing the region. You can then call the appropriate LEADTOOLS method to create the region, and call the FrameRegion command to outline it.
Use AddMagicWandToRegion to set a region based on the color of a specified point. To create a region based on the color of a specified point and a range of tolerance values, use AddBorderToRegion
To create a new curve region, or update an existing region with a curve region, use AddCurveToRegion
Related topics:
- Translating Coordinates for a Region
- Working with the Existing Region
- Saving a Region
- AddColorToRegion
- Leadtools.RasterImage.AddMagicWandToRegion(System.Int32,System.Int32,Leadtools.RasterColor,Leadtools.RasterColor,Leadtools.RasterRegionCombineMode)
- AddColorRgbRangeToRegion
- AddColorHsvRangeToRegion
- AddBorderToRegion
- AddRoundRectangleToRegion
- AddEllipseToRegion
- AddPolygonToRegion
- AddCurveToRegion
- AddBeziersToRegion
- AddGdiDataToRegion
- AddRegionToRegion
- AddMaskToRegion
© 1991-2020 LEAD Technologies, Inc. All Rights Reserved.
