Compare Images with Image Processing - WinForms C#
This tutorial shows how to use image processing techniques to calculate different measures of similarity between two images in a WinForms C# application using the LEADTOOLS SDK.
| Overview | |
|---|---|
| Summary | This tutorial shows how to compare images using image processing in a WinForms C# application. |
| Completion Time | 30 minutes |
| Visual Studio Project | Download tutorial project (12 KB) |
| Platform | Windows WinForms C# Application |
| IDE | Visual Studio 2019, 2022 |
| Development License | Download LEADTOOLS |
Required Knowledge
Get familiar with the basic steps of creating a project by reviewing the Add References and Set a License tutorial, before working on the Compare Images with Image Processing - WinForms C# tutorial.
Create the Project and Add LEADTOOLS References
Start with a copy of the project created in the Add References and Set a License tutorial. If that project is unavailable, follow the steps in that tutorial to create it.
The references needed depend upon the purpose of the project. References can be added by one or the other of the following two methods (but not both).
If using NuGet references, this tutorial requires the following NuGet packages:
Leadtools.Image.ProcessingLeadtools.Viewer.Controls.WinForms
If using local DLL references, the following DLLs are needed.
The DLLs are located at <INSTALL_DIR>\LEADTOOLS23\Bin\Dotnet4\x64:
Leadtools.dllLeadtools.Codecs.dllLeadtools.Codecs.Cmp.dllLeadtools.Codecs.Tif.dllLeadtools.Controls.WinForms.dllLeadtools.ImageProcessing.Color.dllLeadtools.ImageProcessing.Core.dllLeadtools.ImageProcessing.Effects.dll
For a complete list of which DLL files are required for your application, refer to Files to be Included With Your Application.
Set the License File
The License unlocks the features needed for the project. It must be set before any toolkit function is called. For details, including tutorials for different platforms, refer to Setting a Runtime License.
There are two types of runtime licenses:
- Evaluation license, obtained at the time the evaluation toolkit is downloaded. It allows the toolkit to be evaluated.
- Deployment license. If a Deployment license file and developer key are needed, refer to Obtaining a License.
Create the User Interface
With the project created, the references added, and the license set, coding can begin.
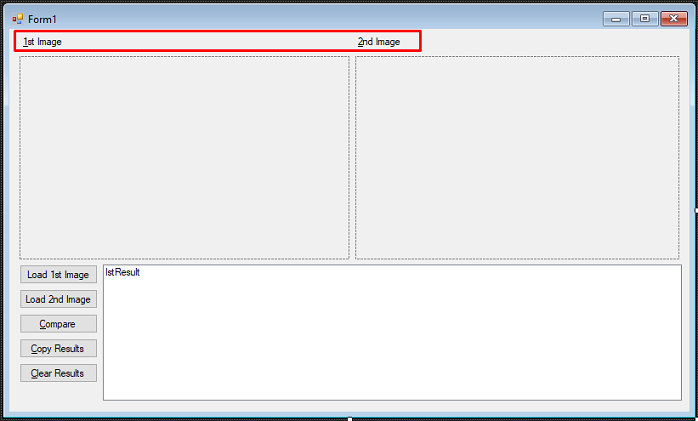
In the Solution Explorer, double-click Form1.cs to display the Designer. Open the Toolbox and add two Labels to the top of Form1, as shown in the screenshot below. Leave the names of the new Labels as they are. Edit their text to where label1's Text property says &1st Image, and label2's Text says &2nd Image.

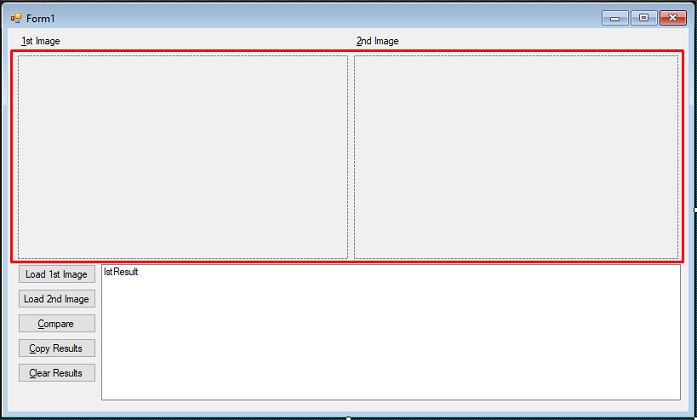
Add two Panels in the middle of the form, as shown below. Keep the default names of the Panels.

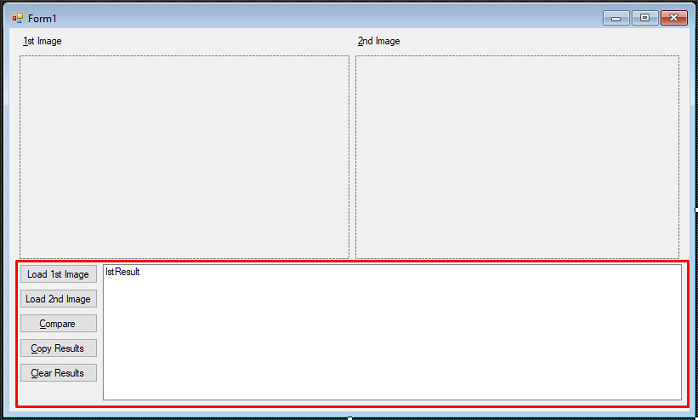
Add five new Buttons to the lower left side of Form1. See the table below for the new Buttons' Name and Text properties.
| Name | Text |
|---|---|
btnLoadFirst |
Load 1st Image |
btnLoadSecond |
Load 2nd Image |
btnCompare |
&Compare |
btnCopy |
&Copy Results |
btnClearList |
&Clear Results |
Add a ListBox to the right of the Buttons as shown below. Name the ListBox lstResult.

Initialize the Image Viewers and Load the Images
With the UI designed, click on Form1 in the designer. Go to the Form1 properties and double-click the Load event to create a Load event handler for the form. This will bring up the code behind the form. Add the using statements below to the top.
using System;using System.Drawing;using System.IO;using System.Windows.Forms;using Leadtools;using Leadtools.Codecs;using Leadtools.Controls;using Leadtools.ImageProcessing;using Leadtools.ImageProcessing.Color;using Leadtools.ImageProcessing.Core;using Leadtools.ImageProcessing.Effects;
Add the following global variables to the Form1 class.
private ImageViewer _viewer1;private ImageViewer _viewer2;private RasterCodecs _codecs;private RasterImage _image1;private RasterImage _image2;
Add the code below to the Form1_Load event handler to initialize the ImageViewer objects.
private void Form1_Load(object sender, EventArgs e){try{_viewer1 = new ImageViewer();_viewer1.Dock = DockStyle.Fill;_viewer1.BackColor = Color.DarkGray;panel1.Controls.Add(_viewer1);_viewer1.BringToFront();_viewer1.Zoom(ControlSizeMode.Fit, 1.0, _viewer1.DefaultZoomOrigin);_viewer2 = new ImageViewer();_viewer2.Dock = DockStyle.Fill;_viewer2.BackColor = Color.DarkGray;panel2.Controls.Add(_viewer2);_viewer2.BringToFront();_viewer2.Zoom(ControlSizeMode.Fit, 1.0, _viewer1.DefaultZoomOrigin);_codecs = new RasterCodecs();}catch (Exception ex){MessageBox.Show(ex.ToString());}}
Using the Solution Explorer, navigate back to the Form1 designer. Double-click on both Load 1st Image and Load 2nd Image Buttons, to create an event handler for each of the two Buttons and to bring up the code behind the form. Add the code below to the respective event handlers to load the two images to compare.
private void btnLoadFirst_Click(object sender, EventArgs e){try{string _filePath = GetFilePath();string _fileName = Path.GetFileName(_filePath);_image1 = _codecs.Load(_filePath);_viewer1.Image = _image1;label1.Text = $"1st Image: {_fileName}";}catch (Exception ex){MessageBox.Show(ex.ToString());}}
private void btnLoadSecond_Click(object sender, EventArgs e){try{string _filePath = GetFilePath();string _fileName = Path.GetFileName(_filePath);_image2 = _codecs.Load(_filePath);_viewer2.Image = _image2;label2.Text = $"2nd Image: {_fileName}";}catch (Exception ex){MessageBox.Show(ex.ToString());}}
Handling Streams
To handle the files using MemoryStream, replace the existing code in the two load button event handlers with the following:
private void btnLoadFirst_Click(object sender, EventArgs e){try{string _filePath = GetFilePath();string _fileName = Path.GetFileName(_filePath);byte[] _fileData = File.ReadAllBytes(_filePath);using (MemoryStream _fileStream = new MemoryStream(_fileData))_image1 = _codecs.Load(_fileStream);_viewer1.Image = _image1;label1.Text = $"1st Image: {_fileName}";}catch (Exception ex){MessageBox.Show(ex.ToString());}}
private void btnLoadSecond_Click(object sender, EventArgs e){try{string _filePath = GetFilePath();string _fileName = Path.GetFileName(_filePath);byte[] _fileData = File.ReadAllBytes(_filePath);using (MemoryStream _fileStream = new MemoryStream(_fileData))_image2 = _codecs.Load(_fileStream);_viewer2.Image = _image2;label2.Text = $"2nd Image: {_fileName}";}catch (Exception ex){MessageBox.Show(ex.ToString());}}
Using Memory Stream will require adding the Leadtools.Codecs.Fax.dll to the project.
Create a new method inside the Form1 class named GetFilePath(). Call this method inside the event handlers shown above. Add the code below to use the OpeFileDialog to select the images you wish to compare.
private string GetFilePath(){string _filePath = null;OpenFileDialog dlg = new OpenFileDialog();dlg.InitialDirectory = @"C:\LEADTOOLS23\Resources\Images";if (dlg.ShowDialog(this) == DialogResult.OK){_filePath = dlg.FileName;}return _filePath;}
Add the Image Compare Code
Navigate back to the Form1 designer, using the Solution Explorer. Double-click on the Compare, Copy Results, and Clear Results Buttons to create their event handlers and bring up the code behind the form.
Add the code below to the btnCompare_Click event handler to run 5 of the 6 image processing algorithms used in this tutorial for image comparison.
private void btnCompare_Click(object sender, EventArgs e){if (_viewer1.Image == null || _viewer2.Image == null){MessageBox.Show("Please load images first");return;}lstResult.Items.Add("************** Comparing... **************");int newItem;// First measure: compare pixel-by-pixel by XOR-ing themusing (RasterImage dstImage = _image2.Clone()){LeadRect rc = new LeadRect(0, 0, _viewer1.Image.Width, _viewer1.Image.Height);CombineCommand combine = new CombineCommand(_image1, rc, new LeadPoint(0, 0),CombineCommandFlags.OperationXor);combine.Run(dstImage);// Identical pixels will result in black after XOR. Next code will calculate black ratio in resulting image// Define a region of all black pixelsdstImage.AddColorToRegion(RasterColor.Black, RasterRegionCombineMode.Set);// Find the area of black region and divide by total image areadouble percentBlack = dstImage.CalculateRegionArea() * 100.0 / (dstImage.Width * dstImage.Height);newItem = lstResult.Items.Add(string.Format("Compare exact pixels: {0:N2}% identical", percentBlack));lstResult.TopIndex = newItem;}// Make grayscale copies to calculate intensity valuesGrayscaleCommand gray = new GrayscaleCommand(8);// Statistics info command will be used throughout to find average values of image pixelsStatisticsInformationCommand stats = new StatisticsInformationCommand(RasterColorChannel.Master, 0, 255);using (RasterImage image2Gray = _image2.Clone())using (RasterImage image1Gray = _image1.Clone()){LeadRect rc = new LeadRect(0, 0, image2Gray.Width, image2Gray.Height);// To get intensity values alone, convert to grayscalegray.Run(image1Gray);gray.Run(image2Gray);// Second measure: Overall intensity valuestats.Run(image1Gray);double intensityAverage1 = stats.Mean;stats.Run(image2Gray);double intensityAverage2 = stats.Mean;double AvgSimilarity = 100.0 - (Math.Abs(intensityAverage2 - intensityAverage1) * 100.0 / 255);newItem = lstResult.Items.Add(string.Format("Overall image intensities: {0:N2}% similar", AvgSimilarity));lstResult.TopIndex = newItem;// Third measure: pixel-wise intensity similarityCombineCommand combine = new CombineCommand(image1Gray, rc, new LeadPoint(0, 0),CombineCommandFlags.AbsoluteDifference);combine.Run(image2Gray);// The image2Gray now has the subtraction result of the 2 image's intensities.// The Mean value will be the average of the intensities differencestats.Run(image2Gray);double pixelsSimilarity = 100.0 - (stats.Mean * 100.0 / 255);newItem = lstResult.Items.Add(string.Format("Corresponding pixels intensities: {0:N2}% similar",pixelsSimilarity));lstResult.TopIndex = newItem;}// Fourth and fifth measures: compare average hue and average saturation// Color seprate to obtain Hue and Saturation planesColorSeparateCommand colorSep = new ColorSeparateCommand(ColorSeparateCommandType.Hsv);colorSep.Run(_image1);colorSep.DestinationImage.Page = 1;stats.Run(colorSep.DestinationImage);// Store average value of first hue planedouble averageHue1 = stats.Mean;// Move from the Hue plane to the Saturation plane, which is in page 2colorSep.DestinationImage.Page = 2;stats.Run(colorSep.DestinationImage);// Store average value of first saturation planedouble averageSat1 = stats.Mean;// Perform color separation of second imagecolorSep.Run(_image2);colorSep.DestinationImage.Page = 1;stats.Run(colorSep.DestinationImage);// Store average value of second image's hue planedouble averageHue2 = stats.Mean;// Move from the Hue plane to the Saturation plane, which is in page 2colorSep.DestinationImage.Page = 2;stats.Run(colorSep.DestinationImage);// Store average value of second image's saturation planedouble averageSat2 = stats.Mean;double HueDiff = Math.Abs(averageHue1 - averageHue2);// If one hue is very high and the other is very low, they're actually// Close to each other because 0 lies next to 255if (HueDiff > 127)HueDiff = Math.Abs(HueDiff - 254);double SatDiff = Math.Abs(averageSat1 - averageSat2);double hueSimilarity = (255 - HueDiff) * 100 / 255.0;double satSimilarity = (255 - SatDiff) * 100 / 255.0;lstResult.Items.Add(string.Format("Average hue values of 2 images: {0:N2}% similar", hueSimilarity));newItem = lstResult.Items.Add(string.Format("Average saturation values of 2 images: {0:N2}% similar",satSimilarity));lstResult.TopIndex = newItem;// 6th measure: fequency content deserves its own functionCompareFrequencyContent(_image1.Clone(), _image2.Clone());}
Add a new method to the Form1 class named CompareFrequencyContent(RasterImage img1, RasterImage img2). Call this method at the end of the btnCompare_Click event handler, as shown above. Add the code below to run the 6th image processing algorithm, which will calculate the frequency content.
public void CompareFrequencyContent(RasterImage img1, RasterImage img2){// Make sure the images are the same sizeif ((img1.Width != img2.Width) || (img1.Height != img2.Height)){SizeCommand sizecommand = new SizeCommand(256, 256, Leadtools.RasterSizeFlags.Bicubic);sizecommand.Run(img1);sizecommand.Run(img2);}// Use the same flags for both images// Include the padding flag so that FFT will work with non power-of-2 size imagesFastFourierTransformCommandFlags fftFlags = FastFourierTransformCommandFlags.FastFourierTransform| FastFourierTransformCommandFlags.Gray | FastFourierTransformCommandFlags.PadOptimally;// The 2 arrays to hold the FFT resultFourierTransformInformation FTArray1 = new FourierTransformInformation(img1, fftFlags);FourierTransformInformation FTArray2 = new FourierTransformInformation(img2, fftFlags);// Apply FFT to first imageFastFourierTransformCommand command = new FastFourierTransformCommand(FTArray1, fftFlags);command.Run(img1);// Apply FFT to second imagecommand.FourierTransformInformation = FTArray2;command.Run(img2);// Summation of difference between each frequency component magnitude and its counterpart from the other imagedouble magDiff = 0;// Summation of the 2 magnitude values from both images for all frequency componentsdouble magSum = 0;int dataLen = FTArray1.Data.Length;unsafe // Fastest way to process is to use the data pointer provided by the command{double* pData1 = (double*)FTArray1.DataPointer;double* pData2 = (double*)FTArray2.DataPointer;for (int i = 0; i < dataLen; ++i){double r1 = *pData1;++pData1;double i1 = *pData1;++pData1;// Magnitude is the square root of the real and imaginary partsdouble mag1 = Math.Sqrt(r1 * r1 + i1 * i1);double r2 = *pData2;++pData2;double i2 = *pData2;++pData2;double mag2 = Math.Sqrt(r2 * r2 + i2 * i2);// Tally the magnitude sumsmagSum += (mag1 + mag2);// Tally the magnitude differencesmagDiff += Math.Abs(mag1 - mag2);}}if (magSum == 0)magSum = 1; // don't divide by zerodouble freqSimilarity = (magSum - magDiff) * 100 / magSum;int newItem = lstResult.Items.Add(string.Format("Frequency content of 2 images: {0:N2}% similar", freqSimilarity));lstResult.TopIndex = newItem;img1.Dispose();img2.Dispose();}
Next, add the code below to the btnCopy_Click event handler to copy the results in the ListBox to your clipboard.
private void btnCopy_Click(object sender, EventArgs e){string listText = "";foreach (string txt in lstResult.Items)listText += txt + Environment.NewLine;if (listText == "")return;Clipboard.Clear();Clipboard.SetText(listText);MessageBox.Show("Results copied to clipboard");}
Lastly, add the code below to the btnClearList_Click event handler to clear the results in the ListBox.
private void btnClearList_Click(object sender, EventArgs e){lstResult.Items.Clear();}
Run the Project
Run the project by pressing F5, or by selecting Debug -> Start Debugging.
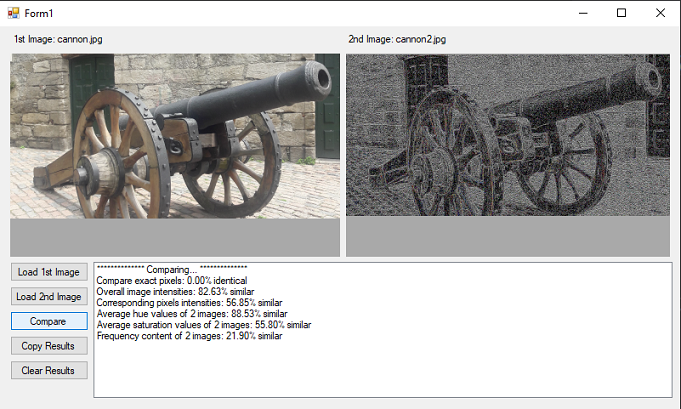
If the steps were followed correctly, the application runs and the form should appear. To test, follow the steps below:
-
Click on Load 1st Image to bring up the OpenFileDialog.
-
Select your first image to load.
-
Repeat the previous steps, but with the Load 2nd Image button.
-
Once you have the 2 images you wish to compare, click the Compare button.

Wrap-up
This tutorial showed how to compare two images using multiple image processing algorithms.
