Implement Annotation Roles and Groups - WinForms C# .NET 6
This tutorial shows how to grant user and group level permissions to create, edit, and remove annotations in a .NET 6 WinForms application using the LEADTOOLS SDK.
| Overview | |
|---|---|
| Summary | This tutorial covers granting user and group level permissions to create, edit, and remove annotations in the Image Viewer. |
| Completion Time | 20 minutes |
| Visual Studio Project | Download tutorial project (5 KB) |
| Platform | C# .NET 6 WinForms Application |
| IDE | Visual Studio 2022 |
| Development License | Download LEADTOOLS |
Required Knowledge
Get familiar with the basic steps of creating a project and working with automated annotations by reviewing the Add References and Set a License and Draw and Edit Annotations on Images tutorials, before working on the Implement Annotation Roles and Groups - WinForms C# .NET 6 tutorial.
Create the Project and Add the LEADTOOLS References
Start with a copy of the project created in the Display Images in an Image Viewer tutorial. If you do not have that project, follow the steps in that tutorial to create it.
The references needed depend upon the purpose of the project. References can be added by one or the other of the following two methods (but not both). For this project, the following references are needed:
If NuGet references are used, this tutorial requires the following NuGet package:
Leadtools.Annotations.WinFormsLeadtools.Viewer.Controls.WinForms
If local DLL references are used, the following DLLs are needed. The DLLs are located at <INSTALL_DIR>\LEADTOOLS23\Bin\net:
Leadtools.dllLeadtools.Annotations.Automation.dllLeadtools.Annotations.Engine.dllLeadtools.Annotations.WinForms.dllLeadtools.Codecs.dllLeadtools.Controls.WinForms.dllLeadtools.Core.dll
For a complete list of which Codec DLLs are required for specific formats, refer to File Format Support.
Set the License File
The License unlocks the features needed for the project. It must be set before any toolkit function is called. For details including tutorials for different platforms, refer to Setting a Runtime License.
There are two types of runtime licenses:
- Evaluation license, obtained at the time the evaluation toolkit is downloaded. It allows the toolkit to be evaluated.
- Deployment license. If a Deployment license file and developer key are needed, refer to Obtaining a License.
Create and Assign Roles Code
With the project created, the references added, and the license set, coding can begin.
Right-click on Form1.cs in the Solution Explorer, and select View Code to bring up the code behind the form. Ensure the using statements below are in the using block at the top.
using System.Text;using Leadtools;using Leadtools.Controls;using Leadtools.Codecs;using Leadtools.Annotations.Automation;using Leadtools.Annotations.WinForms;using Leadtools.Annotations.Engine;
Ensure that the global variables below are added to the Form1 class.
private AnnGroupsRoles groupRoles = new AnnGroupsRoles();private ImageViewer viewer;private ImageViewerAutomationControl automationControl;private AnnAutomationManager annAutomationManager;private AnnAutomation automation;private AutomationManagerHelper managerHelper;
Add the class below to Form1.cs, which will be used to create custom annotation roles.
public sealed class CustomRoles{private CustomRoles() { }public const string Writer = "Writer";}
Add the code below to the Form1() method to create the roles, assign the roles, and set the current user to "Mike".
public Form1(){InitializeComponent();InitLEAD();CreateRoles(groupRoles);AssignRoles(groupRoles);groupRoles.CurrentUser = "Mike";}
Ensure that the below code is added to the Form1_Load event handler.
private void Form1_Load(object sender, EventArgs e){viewer = new ImageViewer();viewer.Dock = DockStyle.Fill;viewer.BackColor = Color.DarkGray;// Initialize Automation Control for Image ViewerautomationControl = new ImageViewerAutomationControl();automationControl.ImageViewer = viewer;RasterCodecs codecs = new RasterCodecs();// Load the main image into the viewer, sets the viewers height and widthviewer.Image = codecs.Load(@"C:\LEADTOOLS23\Resources\Images\Leadtools.pdf");// Initialize the Interactive Mode for the Image ViewerAutomationInteractiveMode automationInteractiveMode = new AutomationInteractiveMode();automationInteractiveMode.AutomationControl = automationControl;// Add the Interactive Mode to the Image Viewerviewer.InteractiveModes.BeginUpdate();viewer.InteractiveModes.Add(automationInteractiveMode);viewer.InteractiveModes.EndUpdate();if (viewer.Image != null){// Create and set up the Automation ManagerannAutomationManager = new AnnAutomationManager();annAutomationManager.RestrictDesigners = true;// Instruct the Manager to create all the default Automation objects.annAutomationManager.CreateDefaultObjects();//Applying the groupRoles to the annAutomationMangerannAutomationManager.GroupsRoles = groupRoles;// Initialize the Manager Helper and create the Toolbar// Add the Toolbar and the Image Viewer to the ControlsmanagerHelper = new AutomationManagerHelper(annAutomationManager);managerHelper.CreateToolBar();Controls.Add(managerHelper.ToolBar);Controls.Add(viewer);// Set up the Automation (it will create the Container as well)automation = new AnnAutomation(annAutomationManager, automationControl);// Set this Automation as the active oneautomation.Active = true;// Set the size of the Container to the size of the Image Viewerautomation.Container.Size = automation.Container.Mapper.SizeToContainerCoordinates(LeadSizeD.Create(viewer.Image.ImageWidth, viewer.Image.ImageHeight));}groupRoles.GenerateRole += new EventHandler(groupsRoles_GenerateRole);}
Create two new methods named CreateRoles(AnnGroupsRoles groupRoles) and AssignRoles(AnnGroupsRoles groupRoles). These two methods are called inside the Form1 method, as shown above. Add the respective code below to create and assign roles.
static void CreateRoles(AnnGroupsRoles groupRoles){AnnRoles editor = new() { AnnRoles.FullControl };AnnRoles writer = new() { CustomRoles.Writer, AnnRoles.ViewAll, AnnRoles.Edit };AnnRoles guest = new() { AnnRoles.ViewAll };groupRoles.GroupRoles.Add("Editor", editor);groupRoles.GroupRoles.Add("Writer", writer);groupRoles.GroupRoles.Add("Guest", guest);}static void AssignRoles(AnnGroupsRoles groupRoles){string user1 = "Mike";string user2 = "Kevin";string user4 = "Jim";groupRoles.GroupUsers.Add("Editor", new List { user1 });groupRoles.GroupUsers.Add("Writer", new List { user2 });groupRoles.GroupUsers.Add("Guest", new List { user4 });}
Add a new event handler named groupsRoles_GenerateRole(object sender, AnnOperationInfoEventArgs e) to ensure the Writer role does not have access to create any annotation object, just the ones listed below. This event handler is initialized in the Form1_Load event, as shown above.
void groupsRoles_GenerateRole(object sender, AnnOperationInfoEventArgs e){if (e.Type == AnnOperationType.CreateObjects || e.Type == AnnOperationType.RenderingObjects || e.Type == AnnOperationType.EditObjects){if (e.AnnObject.Id == AnnObject.SelectObjectId || e.AnnObject.Id == AnnObject.LineObjectId || e.AnnObject.Id == AnnObject.RectangleObjectId || e.AnnObject.Id == AnnObject.EllipseObjectId || e.AnnObject.Id == AnnObject.PolylineObjectId || e.AnnObject.Id == AnnObject.PolygonObjectId || e.AnnObject.Id == AnnObject.CurveObjectId || e.AnnObject.Id == AnnObject.ClosedCurveObjectId || e.AnnObject.Id == AnnObject.PointerObjectId || e.AnnObject.Id == AnnObject.NoteObjectId){e.Role = CustomRoles.Writer;}}}
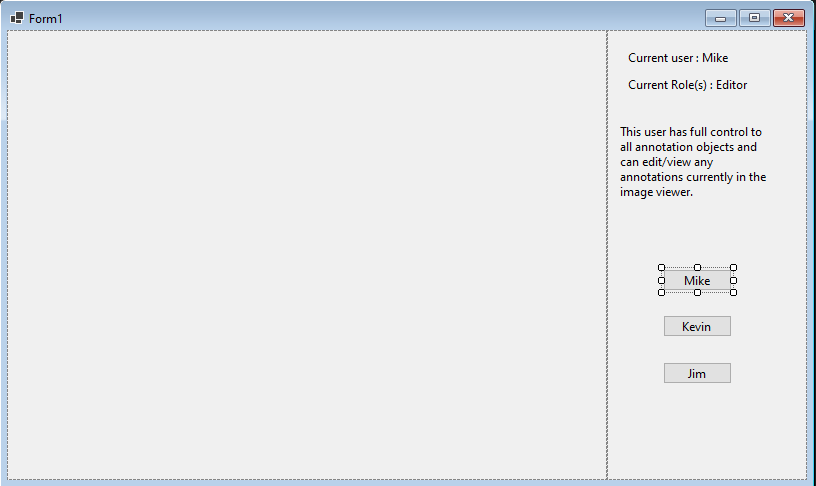
Double-click on Form1.cs to bring up the designer. Add a Panel control to the right side of the form. Inside the panel add the 6 items below:
| Control Type | Name | Text |
|---|---|---|
| Label | currentUser |
Current user: Mike |
| Label | currentRole |
Current role(s): Editor |
| TextBox | textDescription |
This user has full control to all annotation objects and can edit/view any annotations currently in the image viewer. |
| Button | mikeButton |
Mike |
| Button | jimButton |
Jim |
| Button | kevinButton |
Kevin |
This is how the form should now look.

Double-click each of the 3 buttons created above to create their own event handlers. Add the code below to each respective button's click event handlers. The code below will select the correct user based on which is clicked. If there are multiple roles for one user, they would all be displayed in the information section of our designer by appending the string with a string builder. The buttons stop the annotation tool bar, use both of our helper functions to enable/disable certain annotation objects on the toolbar, and then resume/refresh the toolbar to reflect the appropriate role-based changes.
private void mikeButton_Click(object sender, EventArgs e){groupRoles.CurrentUser = "Mike";currentUser.Text = $"Current user : {groupRoles.CurrentUser}";var role = groupRoles.GetUserGroup(groupRoles.CurrentUser);currentRole.Text = $"Current Role(s) : {role[0]}";if (role.Count > 1){var roleString = new StringBuilder();roleString.Append(role[0]);for (int i = 1; i < role.Count; i++){roleString.Append($", {role[i]}");}currentRole.Text = $"Current Role(s) : {roleString}";}textDescription.Text = "This user has full control to all annotation objects and can edit/view any annotations currently in the image viewer.";managerHelper.ToolBar.SuspendLayout();DisableAnnotations(groupRoles.CurrentUser);managerHelper.ToolBar.ResumeLayout();managerHelper.ToolBar.Refresh();}private void jimButton_Click(object sender, EventArgs e){groupRoles.CurrentUser = "Kevin";currentUser.Text = $"Current user : {groupRoles.CurrentUser}";var role = groupRoles.GetUserGroup(groupRoles.CurrentUser);currentRole.Text = $"Current Role(s) : {role[0]}";if (role.Count > 1){var roleString = new StringBuilder();roleString.Append(role[0]);for (int i = 1; i < role.Count; i++){roleString.Append($",{role[i]}");}currentRole.Text = $"Current Role(s) : {roleString}";}textDescription.Text = "This user has access to the first nine annotation objects and the note annotation object. They can edit the annotations objects they put down but not the editors, but they can see all the annotations objects.";managerHelper.ToolBar.SuspendLayout();DisableAnnotations(groupRoles.CurrentUser);managerHelper.ToolBar.ResumeLayout();managerHelper.ToolBar.Refresh();}private void kevinButton_Click(object sender, EventArgs e){groupRoles.CurrentUser = "Jim";currentUser.Text = $"Current user : {groupRoles.CurrentUser}";var role = groupRoles.GetUserGroup(groupRoles.CurrentUser);currentRole.Text = $"Current Role(s) : {role[0]}";if (role.Count > 1){var roleString = new StringBuilder();roleString.Append(role[0]);for (int i = 1; i < role.Count; i++){roleString.Append($",{role[i]}");}currentRole.Text = $"Current Role(s) : {roleString}";}textDescription.Text = "This user only has access in viewing the annotations, they cannot edit any or add any new ones.";managerHelper.ToolBar.SuspendLayout();DisableAnnotations(groupRoles.CurrentUser);managerHelper.ToolBar.ResumeLayout();managerHelper.ToolBar.Refresh();}
Add two new methods to the Form1 class named EnableAnnotations() and DisableAnnotations(string role). The DisableAnnotations method will be called inside the above click events and the EnableAnnotations method will be called inside the DisableAnnotations method, as shown below.
Add the code below to the EnableAnnotations function to enable all the objects on the toolbar regardless of who is the current user.
private void EnableAnnotations(){//Helper function that re-enables all the annotations objectsfor (int i = 0; i < managerHelper.ToolBar.Items.Count; i++){managerHelper.ToolBar.Items[i].Enabled = true;}}
Add the code below to the DisableAnnotations function to allow access to specific objects on the toolbar depending on the role chosen.
private void DisableAnnotations(string role){//We get the group the user is assigned and initially enable all annotations, then disable the specifics//we don't want them allowed to have.var roles = groupRoles.GetUserGroup(groupRoles.CurrentUser);if (roles[0] == "Guest"){for (int i = 0; i < managerHelper.ToolBar.Items.Count; i++){managerHelper.ToolBar.Items[i].Enabled = false;}}if (roles[0] == "Writer"){EnableAnnotations();for (int i = 9; i < managerHelper.ToolBar.Items.Count; i++){managerHelper.ToolBar.Items[i].Enabled = false;}managerHelper.ToolBar.Items[13].Enabled = true;}if (roles[0] == "Editor"){EnableAnnotations();}}
Run the Project
Run the project by pressing F5, or by selecting Debug -> Start Debugging.
If the steps were followed correctly, the application runs and you can draw annotations under the Mike role by default. The Mike role has all the objects unlocked. If you select Kevin or Jim you will see the role assigned and the annotations disabled based on that role.

Wrap-up
This tutorial showed how to create and implement annotation roles and groups. It also showed how to use the AnnRoles and AnnGroupsRoles classes.
