Loading and Saving Images with the LEADTOOLS RasterImageViewer
With the LEADTOOLS WPF Module and Raster Imaging SDK, you can take the following steps to create and run a program in Microsoft Expression Blend that loads and saves an image using the LEADTOOLS ImageViewer.
- Create a Microsoft Expression Blend project and set it up to use LEADTOOLS WPF controls. Make your project Name and Window Title "ImageViewer."
- From the Asset Library
 , under Custom Controls select ImageViewer.
 -
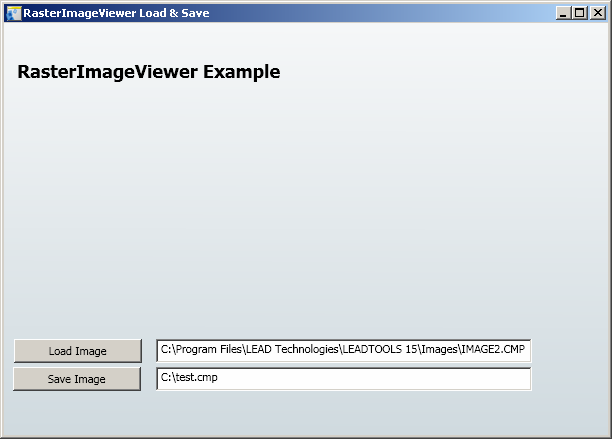
Add elements to the project to create a window with some buttons, text box fields, a label, and a image viewer as described below:
Objects Required
Type Name Purpose Window Window Main window Grid LayoutRoot Grid acts as the container for the objects to be added. Canvas _canvas Sets objects as fixed points in the LayoutRoot. Label _label Displays a description of the window. ImageViewer _viewer LEADTOOLS object to view raster images. Button _load Triggers loading an image event. Button _save Triggers saving a loaded image event. TextBox _savePath Absolute path where image is saved to. TextBox _loadPath Absolute path where the image is loaded from. Expression Blend: Objects and Timeline ImageViewer UI Layout Example 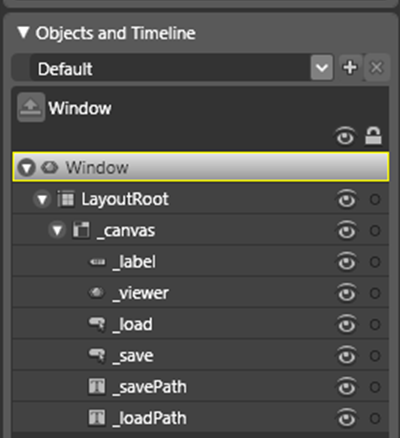
-
Create the trigger event for loading the image.
- Double click on _load (a yellow border will surround the element similar to the Window object in picture above).
- Choose the Properties tab located on the right side of the Expression Blend window. Click on the Events (yellow lightning icon) button. Notice the Click event is at the top of the list.
-
In the text field type up a descriptive name of the method to handle the click event: "_load_Click". Double-click the field to save and exit.

-
Visual Studio will start and will add a method to the C# code used behind the interface.
- The method for _load_Click will be created. Complete it as follows:
C#
private void _load_Click(object sender, RoutedEventArgs e){ using (Leadtools.Codecs.RasterCodecs codecs = new Leadtools.Codecs.RasterCodecs()){ _viewer.Image = codecs.Load(_loadPath.Text, bitsPerPixel, Leadtools.Codecs.CodecsLoadByteOrder.Bgr, pageNumber, pageNumber); }}
-
Create the trigger event for saving the image.
- Double click on _save to select it.
- Choose the Properties tab located on the right side of the Expression Blend window. Click on the Events (yellow lightning icon) button. Notice the Click event is at the top of the list.
- In the text field type up a descriptive name of the method to handle the click event: "_save_Click".
- Double-click the field to save and exit. Visual Studio will start and will add an empty method to the C# code used behind the interface. Complete the method as follows:
C#private void _save_Click(object sender, RoutedEventArgs e){ using (Leadtools.Codecs.RasterCodecs codecs = new Leadtools.Codecs.RasterCodecs()){ codecs.Save(_viewer.Image, _savePath.Text, Leadtools.RasterImageFormat.Cmp, bitsPerPixel); }} - Add the variables used in the methods, at the top of the class Window1.xaml.cs. Refer to Compression Quality Factors and ImageViewer.Save File Constant(s) for acceptable values.
C#
private int bitsPerPixel = 0;private int qualityFactor = 2;private int pageNumber = 1;
- Press F5 to build your application. This will take a few seconds.
Example
[Window1.xaml]
<Windowxmlns="http://schemas.microsoft.com/winfx/2006/xaml/presentation"xmlns:x="http://schemas.microsoft.com/winfx/2006/xaml"xmlns:Leadtools_Windows_Controls="clr-namespace:Leadtools.Controls;assembly=Leadtools.Controls.Wpf"x:Class="ImageViewer.Window1"x:Name="Window"Title="ImageViewer"Width="612" Height="439" Background="#FFFBFBFB" BorderBrush="{x:Null}"><Grid x:Name="LayoutRoot"><Grid.Background><LinearGradientBrush EndPoint="0.498,1.198" StartPoint="0.502,-0.198"><GradientStop Color="#FFFDFDFD" Offset="0"/><GradientStop Color="#FFC8D4DA" Offset="1"/></LinearGradientBrush></Grid.Background><Canvas Margin="8,8,8,12" x:Name="_canvas"><Label x:Name="_label" Width="408" Height="32" Content="ImageViewer Example" FontSize="18" FontStretch="SemiExpanded" FontStyle="Normal" FontWeight="SemiBold" Canvas.Top="24"/><Leadtools_Windows_Controls:ImageViewer Width="360" Height="224" x:Name="_viewer" Canvas.Left="48" Canvas.Top="72" "><Leadtools_Windows_Controls:ImageViewer.BorderBrush><LinearGradientBrush EndPoint="1,0.5" StartPoint="0,0.5"><GradientStop Color="#FF000000" Offset="0"/><GradientStop Color="#FF100000" Offset="1"/></LinearGradientBrush></Leadtools_Windows_Controls:ImageViewer.BorderBrush></Leadtools_Windows_Controls:ImageViewer><Button x:Name="_load" Width="128" Height="24" Content="Load Image" Canvas.Left="2" Canvas.Top="308" Click="_load_Click"/><Button x:Name="_save" Width="128" Height="24" Content="Save Image" Canvas.Left="1" Canvas.Top="336" Click="_save_Click"/><TextBox Height="24" Text="C:\test.cmp" TextWrapping="Wrap" x:Name="_savePath" Width="376" Canvas.Left="144" Canvas.Top="335.862"/><TextBox Text="C:\Users\Public\Documents\LEADTOOLS Images\IMAGE2.CMP" TextWrapping="Wrap" x:Name="_loadPath" Width="376" Height="24" Canvas.Left="144" Canvas.Top="308"/></Canvas></Grid></Window>
Programming Reference
- Adding LEADTOOLS Controls to Microsoft Expression Blend
- Display Images Using Expression Blend
- Creating Image Lists Using Expression Blend
- Link an Image List to an Image Viewer Using Expression Blend
- Add a Magnifying Glass Using Expression Blend
- Adding Bitmap Effects Using Expression Blend
- Working with Images Using Visual Studio
Help Version 19.0.2017.10.27
Products | Support | Contact Us | Copyright Notices © 1991-2017 LEAD Technologies, Inc. All Rights Reserved.
LEADTOOLS Imaging, Medical, and Document
