Individuals and organizations often utilize various types of annotations to mark-up images and documents. But as digital collaboration grows, so does the need for defining and granting user and group level permissions to create, edit, and remove annotations. This blog walks through how to implement and set annotation roles and groups in a .NET 6 WinForms application using LEADTOOLS.
The sample code below shows how to assign users to specific user groups with various permissions. We set up groups for Editors, Writers, and Guests. By doing this, we can limit the permissions in such a way that only Editors have full access to all annotations and also the ability to add, edit, and remove any annotations. Writers only have access to some of the annotations for creation and the ability to edit and remove annotations that they made. Finally we'll allow Guests to only have the ability to view. Permission sets like these serve as a way to prevent a Writer from changing the edits that an Editor made and so on.
Forms Designer
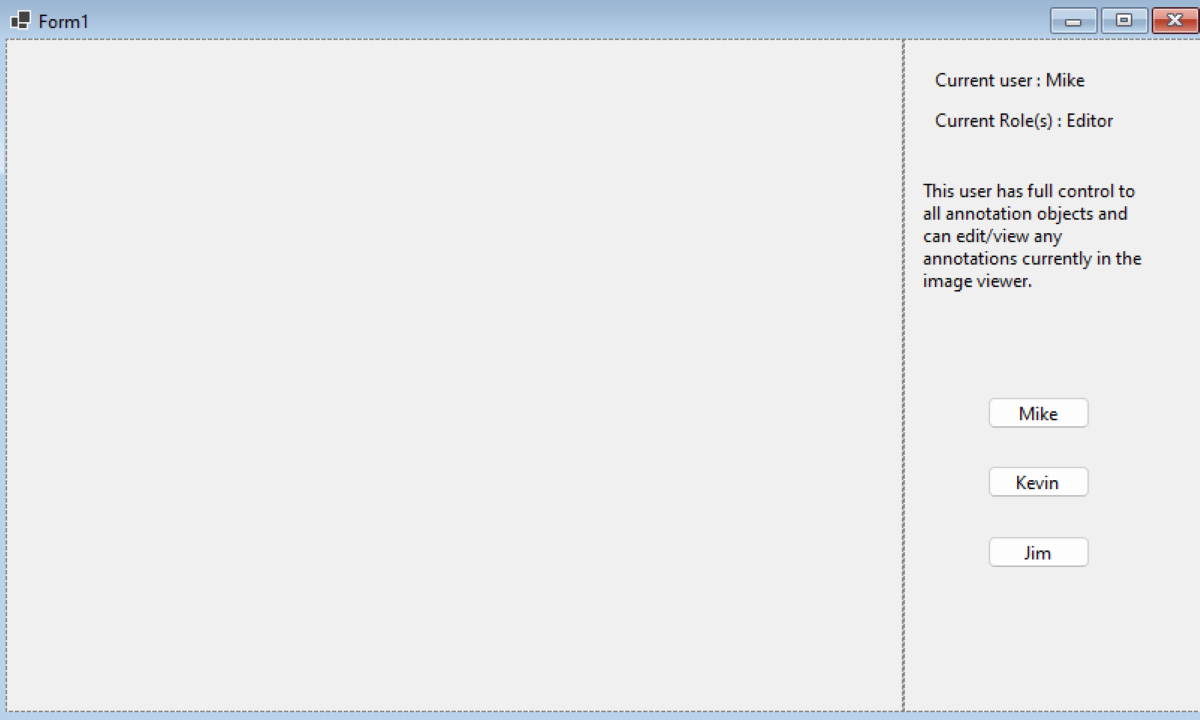
Jumping right in, we start our code by creating a baseplate on the forms designer. This part is completely customizable to your specific needs and use-case. In our example, we have two panels – one for the image viewer and annotations (left) and the other to display information and switch users (right). On that right panel we have three buttons to change the user type. Based on which user is selected, we will display the information at the top.
Form1 and CustomRoles
With the form designer done, let's take a look at the code behind it. At the top levels, we have 2 classes – Form1 (which is the form we just designed) and CustomRoles. The main function of the CustomRoles class is to help create a custom annotation role to assign to one group to which a user will belong.
public sealed class CustomRoles
    {
        private CustomRoles() { }

        public const string Writer = "Writer";
    }
Form1 Class
All the global variables that we will use throughout most of the methods are stated at the top of the class.
private AnnGroupsRoles groupRoles = new AnnGroupsRoles();
private ImageViewer viewer;
private ImageViewerAutomationControl automationControl;
private AnnAutomationManager annAutomationManager;
private AnnAutomation automation;
private AutomationManagerHelper managerHelper;
Form1 class starts with the Form1() method, which triggers our license setting code in the InitLEAD() method, and our AnnGroupRoles generator with the CreateRoles() method. It then assigns those roles with the AssignRoles() method and sets our current user to Mike.
public Form1()
        {
            InitializeComponent();
            InitLEAD();
            CreateRoles(groupRoles);
            AssignRoles(groupRoles);
            groupRoles.CurrentUser = "Mike";
        }
This class is also housing a Form1_load() method that will fire before the form is displayed for the first time. We want to use this method as a setup for the image viewer, annotation objects generator, how the image viewer will behave with annotations, and registering our groupRoles.GenerateRoles property to the event handler groupsRoles_GenerateRole. We have a full tutorial that shows how to Draw and Edit Annotations on Images for the main idea behind this code.
private void Form1_Load(object sender, EventArgs e)
        {
            viewer = new ImageViewer();
            viewer.Dock = DockStyle.Fill;
            viewer.BackColor = Color.DarkGray;

            // Initialize Automation Control for Image Viewer
            automationControl = new ImageViewerAutomationControl();
            automationControl.ImageViewer = viewer;

            RasterCodecs codecs = new RasterCodecs();

            // Load the main image into the viewer, sets the viewers height and width
            viewer.Image = codecs.Load(@"C:\LEADTOOLS22\Resources\Images\Leadtools.pdf");


            // Initialize the Interactive Mode for the Image Viewer
            AutomationInteractiveMode automationInteractiveMode = new AutomationInteractiveMode();
            automationInteractiveMode.AutomationControl = automationControl;

            // Add the Interactive Mode to the Image Viewer
            viewer.InteractiveModes.BeginUpdate();
            viewer.InteractiveModes.Add(automationInteractiveMode);
            viewer.InteractiveModes.EndUpdate();

            if (viewer.Image != null)
            {
                // Create and set up the Automation Manager
                annAutomationManager = new AnnAutomationManager();
                annAutomationManager.RestrictDesigners = true;

                // Instruct the Manager to create all the default Automation objects.
                annAutomationManager.CreateDefaultObjects();

                //Applying the groupRoles to the annAutomationManger
                annAutomationManager.GroupsRoles = groupRoles;

                // Initialize the Manager Helper and create the Toolbar
                // Add the Toolbar and the Image Viewer to the Controls
                managerHelper = new AutomationManagerHelper(annAutomationManager);
                managerHelper.CreateToolBar();
                panel2.Controls.Add(managerHelper.ToolBar);
                panel2.Controls.Add(viewer);
                viewer.BringToFront();

                // Set up the Automation (it will create the Container as well)
                automation = new AnnAutomation(annAutomationManager, automationControl);
                // Set this Automation as the active one
                automation.Active = true;

                // Set the size of the Container to the size of the Image Viewer
                automation.Container.Size = automation.Container.Mapper.SizeToContainerCoordinates(LeadSizeD.Create(viewer.Image.ImageWidth, viewer.Image.ImageHeight));
            }
            groupRoles.GenerateRole += new EventHandler(groupsRoles_GenerateRole);
        }
CustomRoles Class
Now we are going to move over to the two methods that will create and assign the created roles to the user. Using the previously mentioned class, the CreateRoles() method can now create the three roles to assign to the users generated in the AssignRoles() method.
static void CreateRoles(AnnGroupsRoles groupRoles)
        {
            AnnRoles editor = new AnnRoles { AnnRoles.FullControl };
            AnnRoles writer = new AnnRoles { CustomRoles.Writer, AnnRoles.ViewAll, AnnRoles.Edit };
            AnnRoles guest = new AnnRoles { AnnRoles.ViewAll };

            groupRoles.GroupRoles.Add("Editor", editor);
            groupRoles.GroupRoles.Add("Writer", writer);
            groupRoles.GroupRoles.Add("Guest", guest);
        }

        static void AssignRoles(AnnGroupsRoles groupRoles)
        {
            string user1 = "Mike";
            string user2 = "Kevin";
            string user4 = "Jim";

            groupRoles.GroupUsers.Add("Editor", new List { user1 });
            groupRoles.GroupUsers.Add("Writer", new List { user2 });
            groupRoles.GroupUsers.Add("Guest", new List { user4 });
        }
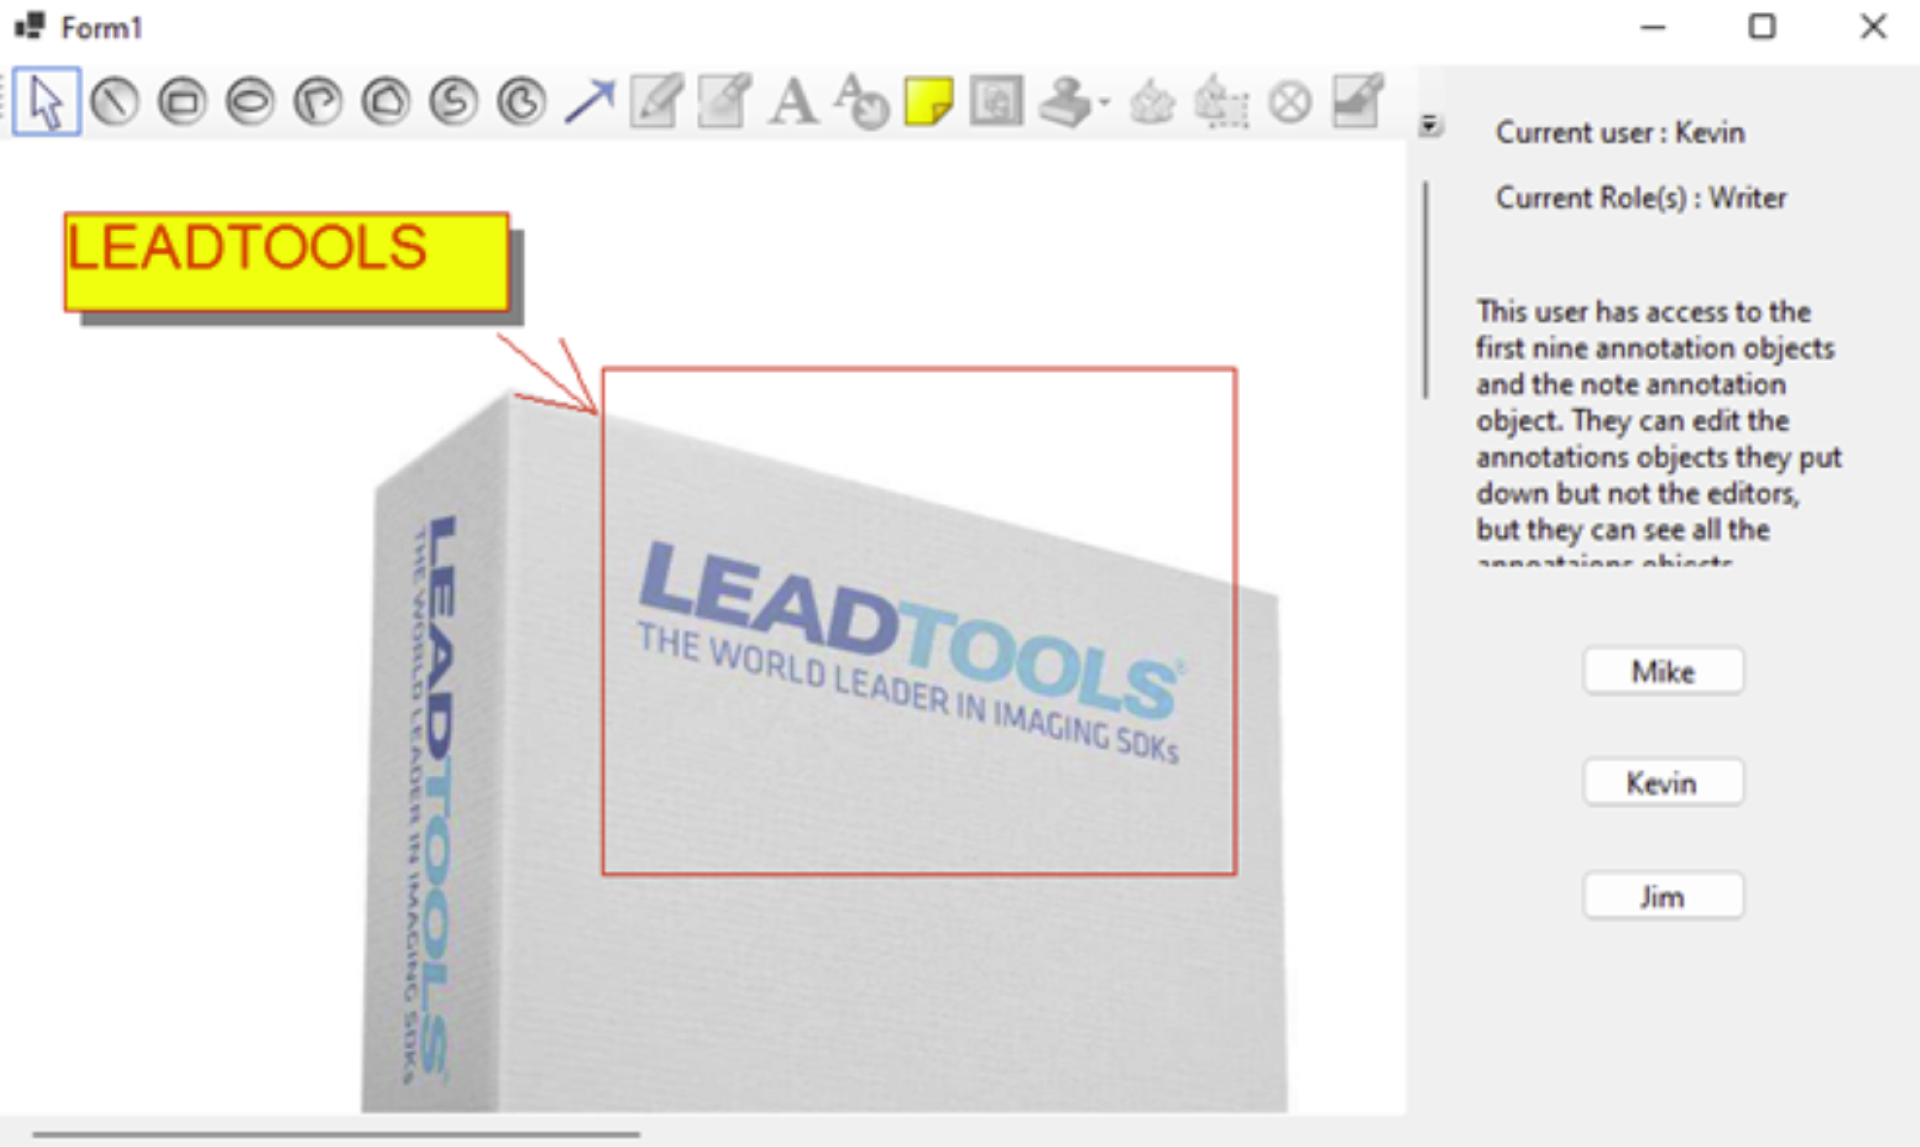
Those roles/users are very important for when our event handler fires. This handler, groupsRoles_GenerateRole, ensures that the Writer role does not have access to create any annotation objects besides the ones specified in the if statement. In this example, they are allowed the first nine line annotation objects in the toolbar and the notes annotation object.
void groupsRoles_GenerateRole(object sender, AnnOperationInfoEventArgs e)
        {
            if (e.Type == AnnOperationType.CreateObjects || e.Type == AnnOperationType.RenderingObjects || e.Type == AnnOperationType.EditObjects)
            {
                if (e.AnnObject.Id == AnnObject.SelectObjectId || e.AnnObject.Id == AnnObject.LineObjectId || e.AnnObject.Id == AnnObject.RectangleObjectId || e.AnnObject.Id == AnnObject.EllipseObjectId || e.AnnObject.Id == AnnObject.PolylineObjectId || e.AnnObject.Id == AnnObject.PolygonObjectId || e.AnnObject.Id == AnnObject.CurveObjectId || e.AnnObject.Id == AnnObject.ClosedCurveObjectId || e.AnnObject.Id == AnnObject.PointerObjectId || e.AnnObject.Id == AnnObject.NoteObjectId)
                {
                    e.Role = CustomRoles.Writer;
                }
            }
        }
Helper Functions
Now all that we have left is two helper functions and our buttons. The buttons will select the the correct user based on which is clicked and if there are multiple roles for one user, they would all be displayed in the information section of our designer by appending the string with a string builder. The buttons also stop the annotation tool bar, use both of our helper functions to enable/disable certain annotation objects on the toolbar, then resumes/refreshes the toolbar to reflect the appropriate role-based changes.
private void button1_Click(object sender, EventArgs e)
        {
            groupRoles.CurrentUser = "Mike";
            label1.Text = $"Current user : {groupRoles.CurrentUser}";
            var role = groupRoles.GetUserGroup(groupRoles.CurrentUser);
            label2.Text = $"Current Role(s) : {role[0]}";
            if (role.Count > 1)
            {
                var roleString = new StringBuilder();
                roleString.Append(role[0]);
                for (int i = 1; i < role.Count; i++)
                {
                    roleString.Append($", {role[i]}");
                }
                label2.Text = $"Current Role(s) : {roleString}";
            }
            textBox1.Text = "This user has full control to all annotation objects and can edit/view any annotations currently in the image viewer.";
            managerHelper.ToolBar.SuspendLayout();
            DisableAnnotations(groupRoles.CurrentUser);
            managerHelper.ToolBar.ResumeLayout();
            managerHelper.ToolBar.Refresh();
        }
The EnableAnnotations() helper function simply enables all the objects on the toolbar regardless of who is the current user. This is called in DisableAnnotations() (funny right?!) helper function to initially give the user access to all the functions, then in the DisableAnnotations() function it takes away access to specific objects on the toolbar depending on the role.
private void EnableAnnaotations()
        {
            //Helper function that re-enables all the annotations objects
            for (int i = 0; i < managerHelper.ToolBar.Items.Count; i++)
            {
                managerHelper.ToolBar.Items[i].Enabled = true;
            }
        }

        private void DisableAnnotations(string role)
        {
            //We get the group the user is assigned and initally enable all annotations, then disable the specifics
            //we don't want them allowed to have.
            var roles = groupRoles.GetUserGroup(groupRoles.CurrentUser);
            if (roles[0] == "Guest")
            {
                for (int i = 0; i < managerHelper.ToolBar.Items.Count; i++)
                {
                    managerHelper.ToolBar.Items[i].Enabled = false;
                }
            }
            if (roles[0] == "Writer")
            {
                EnableAnnaotations();
                for (int i = 9; i < managerHelper.ToolBar.Items.Count; i++)
                {
                    managerHelper.ToolBar.Items[i].Enabled = false;
                }
                managerHelper.ToolBar.Items[13].Enabled = true;
            }
            if (roles[0] == "Editor")
            {
                EnableAnnaotations();
            }
        }
Download Full Project and FREE Evaluation Toolkit!
And there you have it! You can recreate this yourself with our our free evaluation SDK! If you want to download this whole blog project, you can do so using the zip file here: ImplementAnnotationRolesBlogWinformsProject
At any point while you code with LEADTOOLS, help is always readily available through our live chat, extensive documentation, and step-by-step tutorials!
