Let’s jump right in and start coding! The first thing we need to do is create a new JavaScript Metro project in VS2011. Next, we need to add the LEADTOOLS JavaScript files to our HTML (default.html). To add them to the project, I copy them into the ‘js’ folder that is generated when the Visual Studio project is created. It is important we add these files to the project so that they can be included in the application package.
<script type="text/javascript" src="/js/Leadtools.js"></script>
<script type="text/javascript" src="/js/Leadtools.Controls.js"></script>
<script type="text/javascript" src="/js/Leadtools.Annotations.Core.js"></script>
<script type="text/javascript" src="/js/Leadtools.Annotations.Rendering.js"></script>
<script type="text/javascript" src="/js/Leadtools.Annotations.Designers.js"></script>
<script type="text/javascript" src="/js/Leadtools.Annotations.Automation.js"></script>
The next step is to create the actual viewer element and the combobox for selecting the various annotation objects. Adding the viewer is as simple as creating a div and giving it a unique ID. This div will serve as the parent container for the viewer.
<body>
   <p>LEADTOOLS HTML5 SDK in Metro!</p>
   <select id="currentObjectIdSelect"></select>
   <div id="imageViewerDiv" style="width: 600px; height: 600px"></div>
</body>
Let’s switch to the JavaScript code and add what’s needed for initializing the viewer and handling the annotations. The InitViewer function is responsible for creating the viewer and loading our default image. InitAnnotations sets up the LEADTOOLS automated annotation functionality. Just like our Winforms, WPF and Silverlight Annotation SDKs, the HTML5 library provides two basic types of annotation frameworks: automated and non-automated. Non-automated annotations allow you to customize the creation and interaction of annotations. This provides a low-level control to the developer, but also requires that the developer implement most of the behavior-related code. Automated annotations use an ‘automation’ object to control the creation and interaction of annotations. All of the behavior-related code is handled internally, but you are still provided with various options such as the ability to change default properties. Because of its simplicity, automated annotations are the preferred option for most applications written by our customers.
var imageError = function (sender, e) {
   // Get the image element
   var imageElement = e.get_nativeElementEvent().srcElement;
   console.log("Error opening: " + imageElement.src);
};

function InitAnnotations(viewer) {
   // Create an instance of the Automation control object that works with
   // LEADTOOLS ImageViewer.
   // This is also an interactive mode that we need to use
   var imageViewerAutomationControl =
      new Leadtools.Annotations.Automation.ImageViewerAutomationControl(viewer);

   // create and set up the automation manager
   var manager = new Leadtools.Annotations.Automation.AnnAutomationManager();

   //Create the default annotations objects
   manager.createDefaultObjects();

   var currentObjectIdSelect = document.getElementById("currentObjectIdSelect");

   var automationObjCount = manager.get_objects().get_count();
   for (var i = 0; i < automationObjCount; i++) {
      // Get the object
      var automationObj = manager.get_objects().get_item(i);

      // Add its name to the select element
      var name = automationObj.get_name();
      var id = automationObj.get_id();
      currentObjectIdSelect.options[currentObjectIdSelect.options.length] =
         new Option(name, id);
   }

   // Hook to its change event
   currentObjectIdSelect.addEventListener("change", function () {
      // Get the object ID
      var id = parseInt(
         currentObjectIdSelect.options[currentObjectIdSelect.selectedIndex].value);
      // Set it as the current object in the manager
      manager.set_currentObjectId(id);
   });

   // When the current object ID changes, we need to update our select
   manager.add_currentObjectIdChanged(function (sender, e) {
      var currentObjectId = manager.get_currentObjectId();
      for (var i = 0; i < currentObjectIdSelect.options.length; i++) {
         var id = parseInt(currentObjectIdSelect.options[i].value);
         if (id === currentObjectId) {
            currentObjectIdSelect.selectedIndex = i;
            break;
         }
      }
   });

   //Set the viewer interactive mode
   viewer.set_defaultInteractiveMode(imageViewerAutomationControl);

   // set up the automation (will create the container as well)
   var _automation = new Leadtools.Annotations.Automation.AnnAutomation(
      manager, imageViewerAutomationControl);

   // set up this automation as the active one
   _automation.set_active(true);
}

function InitViewer() {
   // Create the viewer
   var createOptions = new Leadtools.Controls.ImageViewerCreateOptions(
      "imageViewerDiv", "myViewer");
   viewer = new Leadtools.Controls.ImageViewer(createOptions);
   viewer.add_imageError(imageError);
   viewer.set_imageUrl("http://demo.leadtools.com/HTML5/images/pngimage.png");

   InitAnnotations(viewer);
}
The last step is to call the InitViewer function. This function should be called from the app.onactivated event which is automatically generated by Visual Studio when a blank project is created.
app.onactivated = function (eventObject) {
   if (eventObject.detail.kind ===
         Windows.ApplicationModel.Activation.ActivationKind.launch) {
      if (eventObject.detail.previousExecutionState !==
            Windows.ApplicationModel.Activation.ApplicationExecutionState.terminated) {
         // TODO: This application has been newly launched. Initialize
         // your application here.
         InitViewer();
      } else {
         // TODO: This application has been reactivated from suspension.
         // Restore application state here.
         InitViewer();
      }
      WinJS.UI.processAll();
   }
};
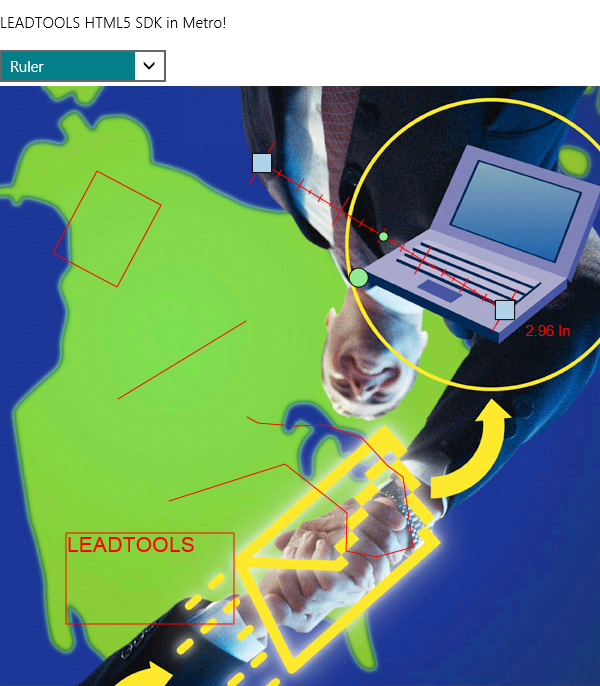
If you run the application, you should see something like the screenshot below. In this example, we populated the combobox with all of the the default annotations objects but the AnnAutomationManager object allows you to customize which objects are available, as well as the ability to create custom annotations. Visit our online HTML5 Annotations demo for a complete example that uses our HTML5 SDK. In the coming weeks, I will be discussing other features of our HTML5 SDK so stay tuned.

The complete project I created in this post can be downloaded here.
Thanks,
Otis Goodwin
