Create a Custom Annotation - WPF C#
This tutorial demonstrates how to create a WPF C# application to create a custom annotation using the LEADTOOLS SDK.
| Overview | |
|---|---|
| Summary | This tutorial demonstrates how to use LEADTOOLS custom annotation technology in a C# WPF application. |
| Completion Time | 45 minutes |
| Visual Studio Project | Download tutorial project (11 KB) |
| Platform | WPF C# Application |
| IDE | Visual Studio 2017, 2019, 2022 |
| Development License | Download LEADTOOLS |
| Try it in another language |
|
Required Knowledge
Before working on the Create a Custom Annotation - WPF C# tutorial, get familiar with the basic steps of creating a project by reviewing the Add References and Set a License tutorial.
Create the Project and Add the LEADTOOLS References
Start with a copy of the project created in the Add References and Set a License tutorial. If you do not have that project, follow the steps in that tutorial to create it.
The references needed depend upon the purpose of the project. References can be added by one or the other of the following two methods (but not both).
If using NuGet references, this tutorial will require the following NuGet packages:
Leadtools.Annotations.WpfLeadtools.Viewer.Controls.Wpf
If using local DLL references, the following DLLs are needed. The DLLs are located at <INSTALL_DIR>\LEADTOOLS23\Bin\Dotnet4\x64:
Leadtools.dllLeadtools.Annotations.Automation.dllLeadtools.Annotations.Designers.dllLeadtools.Annotations.Engine.dllLeadtools.Annotations.Rendering.Wpf.dllLeadtools.Annotations.Wpf.dllLeadtools.Codecs.dllLeadtools.Codecs.Cmp.dllLeadtools.Controls.Wpf.dllLeadtools.Drawing.dll
For a complete list of which Codec DLLs are required for specific formats, refer to File Format Support.
Set the License File
The License unlocks the features needed for the project. It must be set before any toolkit function is called. For details, including tutorials for different platforms, refer to [Setting a Runtime License.
There are two types of runtime licenses:
- Evaluation license, obtained at the time the evaluation toolkit is downloaded. It allows the toolkit to be evaluated.
- Deployment license. If a Deployment license file and developer key are needed, refer to Obtaining a License.
Note
Adding LEADTOOLS NuGet and local references and setting a license are covered in more detail in the Add References and Set a License tutorial.
Setup the MainWindow XAML
With the project created, the references added, and the license set, coding can begin.
In the Solution Explorer, open the MainWindow.xaml file. Add the following XAML code to properly display the UI elements.
<Window x:Class="Custom_Annotation_WPF.MainWindow"xmlns="http://schemas.microsoft.com/winfx/2006/xaml/presentation"xmlns:x="http://schemas.microsoft.com/winfx/2006/xaml"xmlns:d="http://schemas.microsoft.com/expression/blend/2008"xmlns:mc="http://schemas.openxmlformats.org/markup-compatibility/2006"xmlns:local="clr-namespace:Custom_Annotation_WPF"mc:Ignorable="d"Title="MainWindow" Height="1000" Width="1000"Loaded="MainWindow_Load"><Grid Name="imageViewerGrid"><Grid.RowDefinitions><RowDefinition Height="Auto"></RowDefinition><RowDefinition Height="*"></RowDefinition></Grid.RowDefinitions></Grid></Window>
We defined 2 rows, serving as containers for the annotations toolbar and the Image Viewer. You can adjust the Height and Width as shown if you desire but it does not matter for this tutorial.
Initialize the Image Viewer
Click on the Events icon in the Properties Window. Then, double-click the Load event to create an event handler. Add the below using statements in the using block at the top of MainWindow.xaml.cs.
// Using block at the topusing System;using System.IO;using System.Windows;using System.Windows.Controls;using System.Windows.Media.Imaging;using Leadtools;using Leadtools.Codecs;using Leadtools.Controls;using Leadtools.Annotations.Engine;using Leadtools.Annotations.Automation;using Leadtools.Annotations.Designers;using Leadtools.Annotations.Rendering;using Leadtools.Annotations.Wpf;
Add the below global variables:
// Declare these global membersprivate ImageViewer imageViewer;private RasterCodecs codecs;private AutomationInteractiveMode annInteractiveMode;private IAnnAutomationControl automationControl;private AnnAutomationManager annManager;private AnnAutomation annAutomation;
Add the following code to the MainWindow_Load event handler to initialize the ImageViewer and create a new blank RasterImage.
private void MainWindow_Load(object sender, EventArgs e){// Initialize the imageViewer objectimageViewer = new ImageViewer{Background = SystemColors.AppWorkspaceBrush,UseDpi = true,ViewPadding = new ControlPadding(),ViewHorizontalAlignment = ControlAlignment.Center,ViewVerticalAlignment = ControlAlignment.Center,};imageViewerGrid.Children.Add(imageViewer);Grid.SetRow(imageViewer, 1);imageViewer.BringIntoView();// Create a plain white background to draw onimageViewer.Image = RasterImage.Create(1000, 1000, 24, 96, RasterColor.White);// Initialize the codecs objectcodecs = new RasterCodecs();}
Add Toolbar Icon Resource
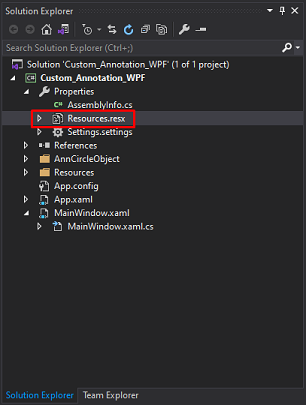
In the Solution Explorer, drop down the Properties tab, and double-click Resources.resx.
Click Add Resource and then click Add Existing File...
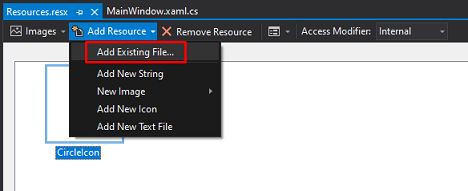
Download the Circle Icon PNG image below and browse to the location and click Open.
After the resource has been imported, the project will create a Resources folder.
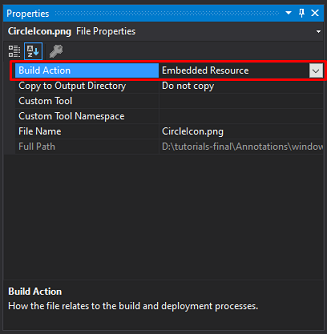
This image needs to be embedded into the project. To do so, drop down the Resources folder in the Solution Explorer, and click on Create-a-Custom-Annotation-Circle-Icon.png. In the properties, change the Build Action to embedded resource.
Create Custom Circle Annotation Object Classes
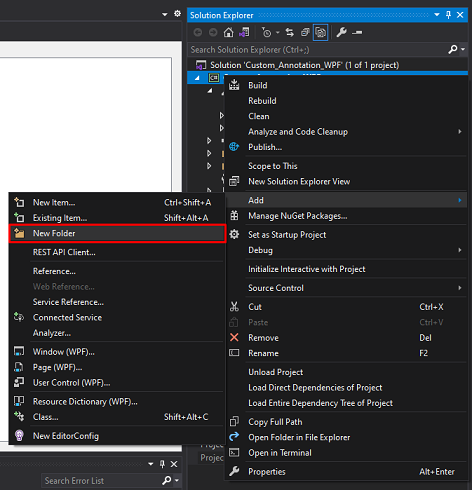
In the Solution Explorer, right-click the Project, highlight Add, and click New Folder. Rename the folder to be AnnCircleObject.
In the Solution Explorer, right-click the AnnCircleObject folder, highlight Add, and click Class...
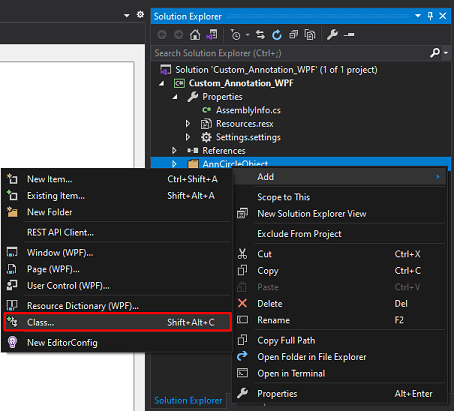
Add four new classes:
AnnCircleEditDeisgner.csAnnCircleDrawDesigner.csAnnCircleObject.csAnnCircleObjectRenderer.cs
Note
Be sure to change the namespace for each of these classes to match the namespace in
MainWindow.xaml.cs.
Add the below code to the AnnCircleEditDesigner class:
using System;using Leadtools;using Leadtools.Annotations.Engine;using Leadtools.Annotations.Designers;namespace Custom_Annotation_WPF{class AnnCircleEditDesigner : AnnRectangleEditDesigner{private AnnCircleObject circle;private LeadPointD begin = LeadPointD.Empty;private LeadPointD end = LeadPointD.Empty;private LeadPointD anchorThumb = LeadPointD.Empty;private LeadPointD currentThumb = LeadPointD.Empty;private LeadPointD leftThumb = LeadPointD.Empty;private LeadPointD rightThumb = LeadPointD.Empty;private LeadPointD topThumb = LeadPointD.Empty;private LeadPointD bottomThumb = LeadPointD.Empty;private LeadPointD center = LeadPointD.Empty;private int radiusModX;private int radiusModY;private double radius;/// <summary>/// Constructor for the AnnCircleEditDesigner/// </summary>public AnnCircleEditDesigner(IAnnAutomationControl automationControl, AnnContainer annContainer, AnnRectangleObject annRectangle): base(automationControl,annContainer,annRectangle) { }/// <summary>/// override the pointer down event/// set the beginning and ending points to the location of the first click/// </summary>public override bool OnPointerDown(AnnContainer sender, AnnPointerEventArgs e){circle = (AnnCircleObject)TargetObject;begin = circle.Bounds.TopLeft;radius = circle.Rect.Width / 2;center = circle.RotateCenter;leftThumb = LeadPointD.Create(center.X - radius, center.Y);rightThumb = LeadPointD.Create(center.X + radius, center.Y);topThumb = LeadPointD.Create(center.X, center.Y - radius);bottomThumb = LeadPointD.Create(center.X, center.Y + radius);currentThumb = LeadPointD.Empty;anchorThumb = LeadPointD.Empty;radiusModX = 0;radiusModY = 0;return base.OnPointerDown(sender, e);}/// <summary>/// override the pointer move event/// set the new mouse point to the end variable/// do some math to create a circle object (width/height stay equal)/// </summary>public override bool OnPointerMove(AnnContainer sender, AnnPointerEventArgs e){circle = (AnnCircleObject)TargetObject;if (Operation == AnnEditDesignerOperation.MoveThumb){end = e.Location;// Set Anchor Pointif (MoveThumbIndex != -1 && currentThumb.IsEmpty) currentThumb = GetThumbLocations()[MoveThumbIndex];if (currentThumb == leftThumb){if (anchorThumb.IsEmpty) anchorThumb = rightThumb;radiusModX = (end.X > anchorThumb.X) ? 1 : -1;}if (currentThumb == rightThumb){if (anchorThumb.IsEmpty) anchorThumb = leftThumb;radiusModX = (end.X < anchorThumb.X) ? -1 : 1;}if (currentThumb == topThumb){if (anchorThumb.IsEmpty) anchorThumb = bottomThumb;radiusModY = (end.Y > anchorThumb.Y) ? 1 : -1;}if (currentThumb == bottomThumb){if (anchorThumb.IsEmpty) anchorThumb = topThumb;radiusModY = (end.Y < anchorThumb.Y) ? -1 : 1;}// Derive Top Leftradius = Math.Sqrt(Math.Pow(end.X - anchorThumb.X,2) + Math.Pow(end.Y - anchorThumb.Y,2)) / 2;center = LeadPointD.Create(anchorThumb.X + (radius * radiusModX), anchorThumb.Y + (radius * radiusModY));begin = LeadPointD.Create(center.X - radius, center.Y - radius);// Do the thingcircle.Rect = LeadRectD.Create(begin.X, begin.Y, radius * 2, radius * 2);Invalidate(circle.Rect);ResetRotateThumbs();return true;}return base.OnPointerMove(sender, e);}public override bool OnPointerUp(AnnContainer sender, AnnPointerEventArgs e){return base.OnPointerUp(sender, e);}}}
Add the below code to the AnnCircleDrawDesigner class:
using System;using Leadtools;using Leadtools.Annotations.Engine;using Leadtools.Annotations.Designers;namespace Custom_Annotation_WPF{class AnnCircleDrawDesigner : AnnRectangleDrawDesigner{// We need 2 points, a beginning and an ending pointprivate LeadPointD begin = LeadPointD.Empty;private LeadPointD end = LeadPointD.Empty;/// <summary>/// Constructor for the AnnCircleDrawDesigner/// </summary>public AnnCircleDrawDesigner(IAnnAutomationControl automationControl, AnnContainer container, AnnCircleObject annObject): base(automationControl, container, annObject) { }/// <summary>/// override the pointer down event/// set the beginning and ending points to the location of the first click/// </summary>public override bool OnPointerDown(AnnContainer sender, AnnPointerEventArgs e){if (begin.IsEmpty)begin = e.Location;return base.OnPointerDown(sender, e);}/// <summary>/// override the pointer move event/// set the new mouse point to the end variable/// do some math to create a circle object (width/height stay equal)/// </summary>public override bool OnPointerMove(AnnContainer sender, AnnPointerEventArgs e){if (pointerDown){end = e.Location;AnnCircleObject circle = (AnnCircleObject)TargetObject;double x = Math.Abs(end.X - begin.X);double y = Math.Abs(end.Y - begin.Y);double scaleX = 1;double scaleY = 1;if (x < y) scaleX = x != 0 ? y / x : 0;else scaleY = y != 0 ? x / y : 0;// Get Height and Widthdouble width = Math.Abs(end.X - begin.X) * Math.Abs(scaleX);double height = Math.Abs(end.Y - begin.Y) * Math.Abs(scaleY);// Restrict to Container Boundsif (begin.Y + height > sender.Bounds.Height) height = sender.Bounds.Height - begin.Y;if (begin.X + width > sender.Bounds.Width) width = sender.Bounds.Width - begin.X;// Ensure the Circle remains a circleif (width < height) height = width;if (height < width) width = height;// Do the thingcircle.Rect = LeadRectD.Create(begin.X, begin.Y, width, height);Invalidate(circle.Rect);}return true;}public override bool OnPointerUp(AnnContainer sender, AnnPointerEventArgs e){begin = LeadPointD.Empty;return base.OnPointerUp(sender, e);}}}
Add the below code to the AnnCircleObject class:
using Leadtools.Annotations.Engine;namespace Create_a_Custom_Annotation{class AnnCircleObject : AnnEllipseObject{//set the id to the UserObjectIDpublic const int CircleObjectId = UserObjectId;/// <summary>/// Constructor for the object/// set the id of the object to the circle object ID/// </summary>public AnnCircleObject(): base(){SetId(CircleObjectId);Tag = null;}protected override AnnObject Create(){return new AnnCircleObject();}}}
Add the below code to the AnnCircleObjectRenderer class:
using System.Collections.Generic;using Leadtools.Annotations.Rendering;using Leadtools.Annotations.Automation;using Leadtools.Annotations.Engine;using Leadtools;namespace Create_a_Custom_Annotation{class AnnCircleObjectRenderer : AnnEllipseObjectRenderer{/// <summary>/// Constructor for the renderer/// get the ellipse object renderer and use the same styles for the circle/// </summary>public AnnCircleObjectRenderer(AnnAutomationManager manager): base(){IAnnObjectRenderer annEllipseObjRenderer = manager.RenderingEngine.Renderers[AnnObject.EllipseObjectId];LabelRenderer = annEllipseObjRenderer.LabelRenderer;LocationsThumbStyle = annEllipseObjRenderer.LocationsThumbStyle;RotateCenterThumbStyle = annEllipseObjRenderer.RotateCenterThumbStyle;RotateGripperThumbStyle = annEllipseObjRenderer.RotateGripperThumbStyle;// The below snippet changes the annotation's thumbnail size//LeadSizeD newThumbSize = LeadSizeD.Create(300, 300); // New size of the thumbnails, change as necessary//LocationsThumbStyle.Size = newThumbSize;//RotateCenterThumbStyle.Size = newThumbSize;//RotateGripperThumbStyle.Size = newThumbSize;}/// <summary>/// override the RenderThumbs method/// go through the thumbs and remove the top bottom left and right thumbs so it cannot be changed from a circle/// </summary>public override void RenderThumbs(AnnContainerMapper mapper, LeadPointD[] thumbLocations, AnnFixedStateOperations operations){List<LeadPointD> newThumbs = new List<LeadPointD>();for (int i = 0; i < thumbLocations.Length; i += 2)newThumbs.Add(thumbLocations[i]);base.RenderThumbs(mapper, newThumbs.ToArray(), operations);}}}
Initialize Annotations and Create Custom Annotation Code
Right-click on MainWindow.xaml in the Solution Explorer and select View Code to bring up the code behind the form. Add a new method named InitAnnotations(), and call the new method inside the MainWindow_Load event handler below imageViewer.BringIntoView().
private void MainWindow_Load(object sender, EventArgs e){// Initialize the imageViewer objectimageViewer = new ImageViewer{Background = SystemColors.AppWorkspaceBrush,UseDpi = true,ViewPadding = new ControlPadding(),ViewHorizontalAlignment = ControlAlignment.Center,ViewVerticalAlignment = ControlAlignment.Center,};imageViewerGrid.Children.Add(imageViewer);Grid.SetRow(imageViewer, 1);imageViewer.BringIntoView();InitAnnotations();// Create a plain white background to draw onimageViewer.Image = RasterImage.Create(1000, 1000, 24, 96, RasterColor.White);// Initialize the codecs objectcodecs = new RasterCodecs();}
Add the following code inside the new InitAnnotations() method:
void InitAnnotations(){//AnnManager initialization comes firstannManager = new AnnAutomationManager{RestrictDesigners = true,RenderingEngine = new AnnWPFRenderingEngine()};//Create my custom objectsCreateCustomObject(annManager);//create the helper and toolbar, then add them to the formAutomationManagerHelper annHelper = new AutomationManagerHelper(annManager);annHelper.CreateToolBar();imageViewerGrid.Children.Add(annHelper.ToolBar);Grid.SetRow(annHelper.ToolBar, 0);//create the automation control and attach the viewer to itautomationControl = new ImageViewerAutomationControl();((ImageViewerAutomationControl)automationControl).ImageViewer = imageViewer;//initialize the interactive mode and add it to the viewerannInteractiveMode = new AutomationInteractiveMode{AutomationControl = automationControl};imageViewer.InteractiveModes.BeginUpdate();imageViewer.InteractiveModes.Add(annInteractiveMode);imageViewer.InteractiveModes.EndUpdate();//initialize the automationannAutomation = new AnnAutomation(annManager, automationControl);//whenever loading a new image, set the new size in the containerimageViewer.ItemChanged += ImageViewer_ItemChanged;annAutomation.Active = true;}private void ImageViewer_ItemChanged(object sender, ImageViewerItemChangedEventArgs e){if (e.Reason == ImageViewerItemChangedReason.Image)annAutomation.Container.Size = annAutomation.Container.Mapper.SizeToContainerCoordinates(imageViewer.ImageSize.ToLeadSizeD());}
Add a new method inside the Form1 class named CreateCustomObject(AnnAutomationManager annManager). This method is called inside the InitAnnotations() method as shown above. Add the below code to the new method:
private void CreateCustomObject(AnnAutomationManager annManager){//create the circle object, assign the designers, set the toolbar image, and then add it to the manager and rendering enginevar exeAsm = System.Reflection.Assembly.GetExecutingAssembly();Stream stream = null;foreach (string res in exeAsm.GetManifestResourceNames())if (res.Contains("CircleIcon")){stream = exeAsm.GetManifestResourceStream(res);break;}BitmapImage bitmapImage = new BitmapImage();bitmapImage.BeginInit();bitmapImage.StreamSource = stream;bitmapImage.EndInit();AnnAutomationObject circleAutomationObject = new AnnAutomationObject{Id = AnnCircleObject.CircleObjectId,Name = "Circle",ToolBarToolTipText = Name,DrawDesignerType = typeof(AnnCircleDrawDesigner),EditDesignerType = typeof(AnnCircleEditDesigner),RunDesignerType = typeof(AnnRunDesigner),ObjectTemplate = new AnnCircleObject(),ToolBarImage = bitmapImage,};annManager.Objects.Add(circleAutomationObject);annManager.RenderingEngine.Renderers.Add(AnnCircleObject.CircleObjectId, new AnnCircleObjectRenderer(annManager));}
Run the Project
Run the project by pressing F5, or by selecting Debug -> Start Debugging.
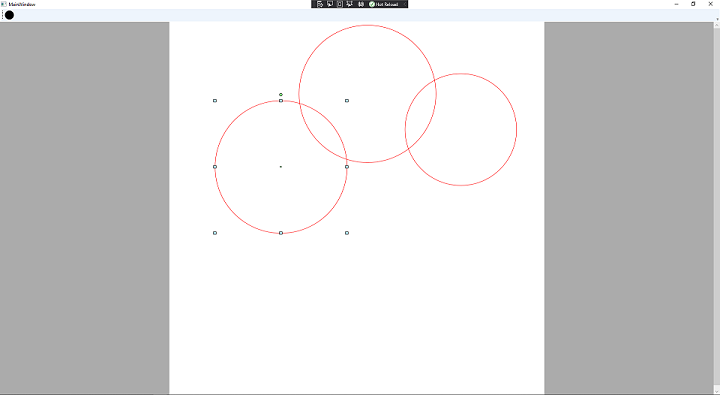
If the steps were followed correctly, the application should run and display a blank RasterImage. To draw the custom circle annotations, click the button on the top left of the form.
Wrap-up
This tutorial covered how to create a custom circle annotation using the LEADTOOLS Annotations SDK technology.
