L_CloudsBitmap
#include "l_bitmap.h"
L_INT EXT_FUNCTION L_CloudsBitmap(pBitmap, uSeed, uFrequency, uDensity, uOpacity, crBackColor, crCloudsColor, uFlag)
|
pBITMAPHANDLE pBitmap; |
/* pointer to the bitmap handle */ |
|
L_UINT uSeed; |
/* randomization factor */ |
|
L_UINT uFrequency; |
/* number of clouds */ |
|
L_UINT uDensity; |
/* cloud density */ |
|
L_UINT uOpacity; |
/* transparency percentage */ |
|
COLORREF crBackColor; |
/* background color */ |
|
COLORREF crCloudsColor; |
/* cloud's color */ |
|
L_UINT uFlag; |
/* flags */ |
Applies cloud effects to a bitmap. This function is available in the Raster Pro and above toolkits.
|
Parameter |
Description |
|
|
pBitmap |
Pointer to the bitmap handle that references the bitmap on which to apply the effect. |
|
|
uSeed |
Seed value that controls the cloud creation process. Possible values are those values that are 0 or greater. |
|
|
uFrequency |
Value that controls the number of clouds inside the image. Valid values are 0 or greater. It represents the concentration of the clouds. Possible values are range from 0 to 16. The value of 0 means no clouds texture will be created, while the value of 16 means the maximum concentration of the clouds. |
|
|
uDensity |
Value that indicates the detail in the cloud. Possible values range from 0 to 16. The value of 0 means no clouds texture will be created., while the value of 16 means the maximum detailed texture in the clouds. Use larger values to increase the detail in the clouds, smaller values for blurring. |
|
|
uOpacity |
Value that indicates the transparency, in percent, between the cloud's image and the original image. Possible values range from 0 to 100. This parameter is used if the CLD_OPACITY or CLD_DIFFERENCE flag is set. A value of 0 indicates that no clouds are being used and a value of 100 represents a mix of clouds and image. |
|
|
crBackColor |
The COLORREF value that specifies the fill color for the areas outside the cloud. You can specify a COLORREF value, such as the return value of the Windows RGB macro, or you can use the PALETTEINDEX macro to specify a palette color. |
|
|
crCloudsColor |
The COLORREF value that specifies the fill color for the cloud. You can specify a COLORREF value, such as the return value of the Windows RGB macro, or you can use the PALETTEINDEX macro to specify a palette color. |
|
|
uFlag |
Flag that specifies how to apply the effect. Possible values are: |
|
|
|
Value |
Meaning |
|
|
CLD_PURE |
[0x0000] Create a pure cloud texture. |
|
|
CLD_DIFFERENCE |
[0x0001] Apply the difference between the created cloud texture and the original image. |
|
|
CLD_OPACITY |
[0x0002] Combine the cloud colors with the colors of the original image by using the uOpacity value. |
Returns
|
SUCCESS |
The function was successful. |
|
< 1 |
An error occurred. Refer to Return Codes. |
Comments
The uSeed parameter allows you to change the shape of the cloud effect. The clouds are created using a pseudo-random process based on the value of the uSeed parameter. Each uSeed parameter value produces a different cloud effect from the other uSeed parameter values.
Use the CLD_PURE flag to create a bitmap of the cloud effect by itself.
When using the CLD_OPACITY flag, if the opacity is 0, the resulting pixel value relies entirely on the value of the original pixel. As the opacity increases to 100, the value of the cloud pixel has an increasing effect on the resulting pixel value.
When using the CLD_DIFFERENCE flag, if the opacity is 0, the resulting pixel value is just the absolute difference between the original pixel value and the cloud pixel value. As the opacity increases, the resulting pixel value is increasingly affected by an additional factor related to the absolute difference.
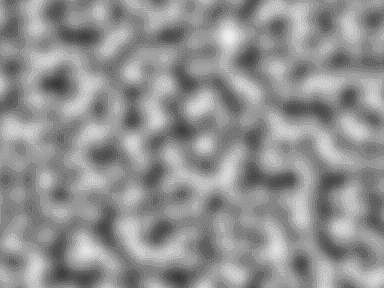
The following two figures illustrate the cloud effect by itself.
This figure was obtained by using the following settings:
|
Parameter |
Value |
|
uFrequency |
16 |
|
uDensity |
1 |
|
crBackColor |
Black |
|
crCloudsColor |
White |
|
uSeed |
0 |
|
Flags |
CLD_PURE |

This figure was obtained by using the following settings:
|
Parameter |
Value |
|
uFrequency |
1 |
|
uDensity |
16 |
|
crBackColor |
Black |
|
crCloudsColor |
White |
|
uSeed |
0 |
|
Flags |
CLD_PURE |
The following two figures show the effects of the function using the CLD_OPACITY flag. If you use the following image

and call this function using the following values:
|
Parameter |
Value |
|
uFrequency |
16 |
|
uDensity |
16 |
|
crBackColor |
Black |
|
crCloudsColor |
White |
|
uSeed |
0 |
|
Flags |
CLD_OPACITY |
|
uOpacity |
50 |
The following figure results:

This function can process the whole image or a region of the image. If a bitmap has a region, the effect is applied only to the region.
This function supports 12 and 16-bit grayscale and 48 and 64-bit color images. Support for 12 and 16-bit grayscale and 48 and 64-bit color images is available only in the Document/Medical toolkits.
To update a status bar or detect a user interrupt during execution of this function, Refer to L_SetStatusCallback.
This function does not support signed data images. It returns the error code ERROR_SIGNED_DATA_NOT_SUPPORTED if a signed data image is passed to this function.
Use this function in order to use Perlin equations to generate pseudo-random noise, and then procedurally transform that noise into a cloud-like texture. This function applies equations to the Perlin noise that are different than those used by the L_PerlinBitmap function.
Use the L_AddBitmapNoise function in order to add random noise to a bitmap.
Use the L_PerlinBitmap function to use a pseudo-random number generator in order to create a Perlin noise, and then procedurally transform that noise into a texture. Depending on the flags that are set, the texture can be saved as a bitmap by itself, or the texture can be combined with another bitmap. For more information, refer to Using the L_PerlinBitmap function.
Required DLLs and Libraries
|
LTIMG For a listing of the exact DLLs and Libraries needed, based on the toolkit version, refer to Files To Be Included With Your Application. |
Platforms
Windows 95 / 98 / Me, Windows 2000 / XP.
See Also
Example
/*Apply the difference clouds effect, with white background and black foreground clouds*/
BITMAPHANDLE LeadBitmap; /* Bitmap handle for the image */
/* Load a bitmap at its own bits per pixel */
L_LoadBitmap TEXT("Image1.cmp"), &LeadBitmap, sizeof(BITMAPHANDLE), 0, ORDER_BGRORGRAY, NULL, NULL);
L_CloudsBitmap(&LeadBitmap, 1000, 4, 10, 10, RGB(255,255,255), RGB(0,0,0), CLD_DIFFERENCE);