Enabling HTTPS for the LEADTOOLS Medical Viewer and Service on IIS
HTTPS (HTTP over SSL/TLS) security is a requirement for many web applications. When properly implemented, HTTPS ensures that the traffic received was really sent from the expected endpoint, protecting the client and server. When a web application is secured via HTTPS, all resources, including web services, must also be secure. Fortunately, HTTPS support is ubiquitous and most of the plumbing is already in place. However, because HTTPS requires a machine-specific certificate, HTTPS is not enabled in the LEADTOOLS Medical Viewer and Service by default.
Adding HTTPS Support to the Service Hosted on IIS
Perform the following steps to add HTTPS support to the Medical Viewer and Service:
-
Create a self-signed certificate -OR- Obtain an SSL (Secure Sockets Layer) certificate
-
Add IIS binding to the certificate you obtained
-
In IIS, configure the SSL settings for the virtual directory of the web service
-
Configure the web.config file to a secure binding
More detail about each step follows.
Obtain an SSL Certificate
There are two methods that can be used to obtain a certificate, as follows:
-
Create a certificate signed by an internal or domain Certificate Authority (CA). These certificates are usually trusted across the domain, but the IT department may need to be involved and it is possible that your organization may not have an internal CA. Although each client running the host will still need a machine-specific SSL certificate, some equipment (like scanners) could be shared. The drawback is that the certificate is only trusted on the machine on which the certificate is created.
-
Purchase an SSL certificate from an external trusted authority such as Symantec (VeriSign), Thawte, or GoDaddy. This has the same benefits as a domain certificate, but does not require a domain certificate authority. The drawback is that this is the most expensive (and possibly prohibitive), option.
Create a Self-Signed Certificate
There are many resources on the Internet that explain each option described above in more detail. For information about creating a self-signed certificate, refer to https://docs.microsoft.com/en-us/dotnet/framework/wcf/feature-details/how-to-configure-an-iis-hosted-wcf-service-with-ssl, and search for "Create a Self-Signed Certificate".
The advantage of this option is that it is free, making it a popular choice for development and internal deployments. The drawback is that the certificate is only trusted on the machine that created it.
Perform the following steps to create a self-signed certificate:
-
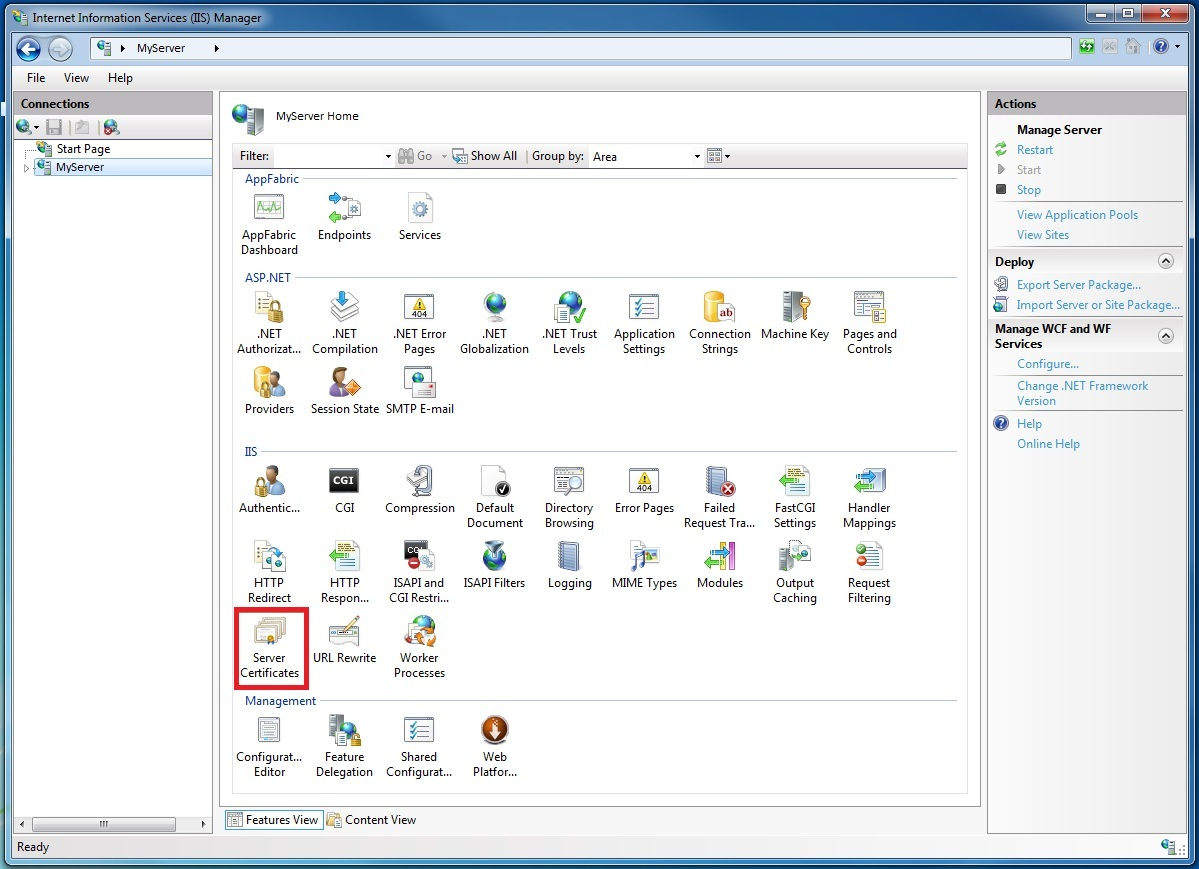
Open the Internet Information Services Manager (inetmgr.exe), and select your computer name in the left-hand tree view. On the right-hand side of the screen select Server Certificates, as shown in the following figure:
-
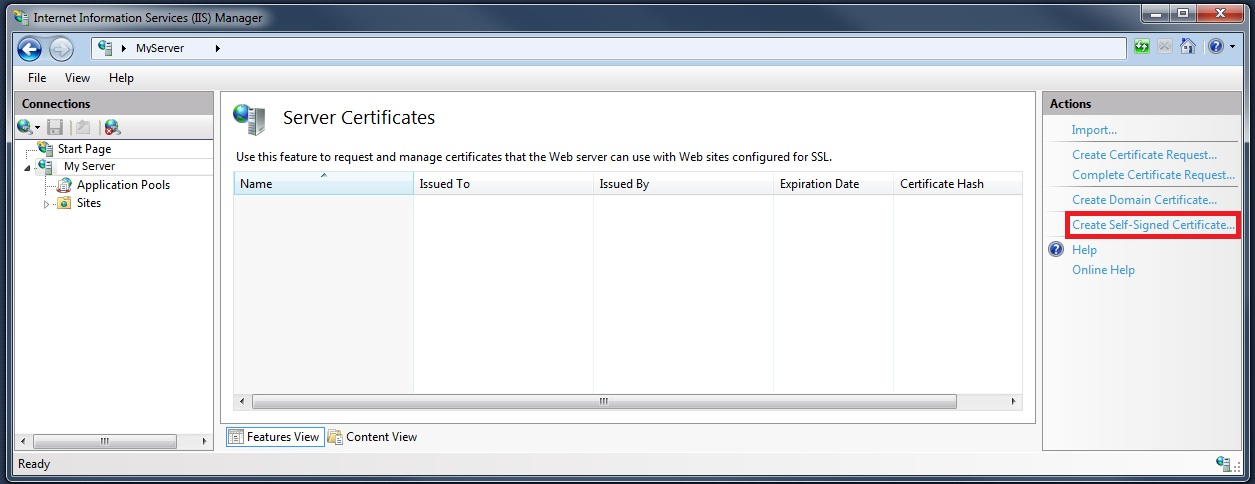
In the Server Certificates features view, click the Create Self-Signed Certificate action, as shown in the following figure:
-
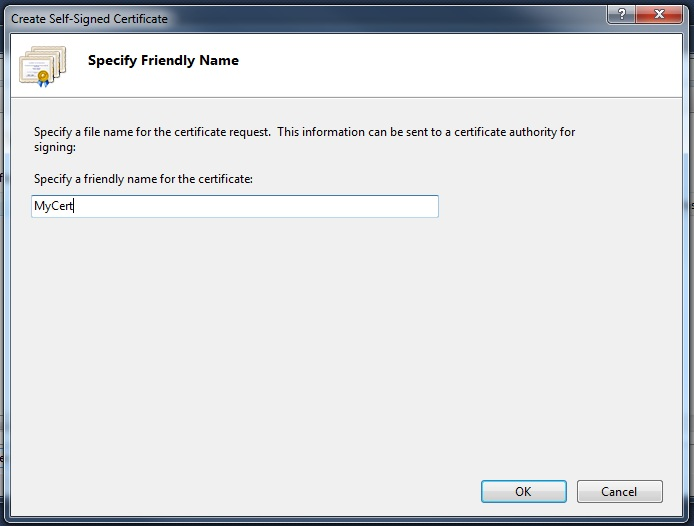
In the Create Self-Signed Certificate dialog, enter a friendly name for the self-signed certificate and click OK. See the following figure.
The newly created self-signed certificate details are now shown in the Server Certificates window, as shown in the following figure:
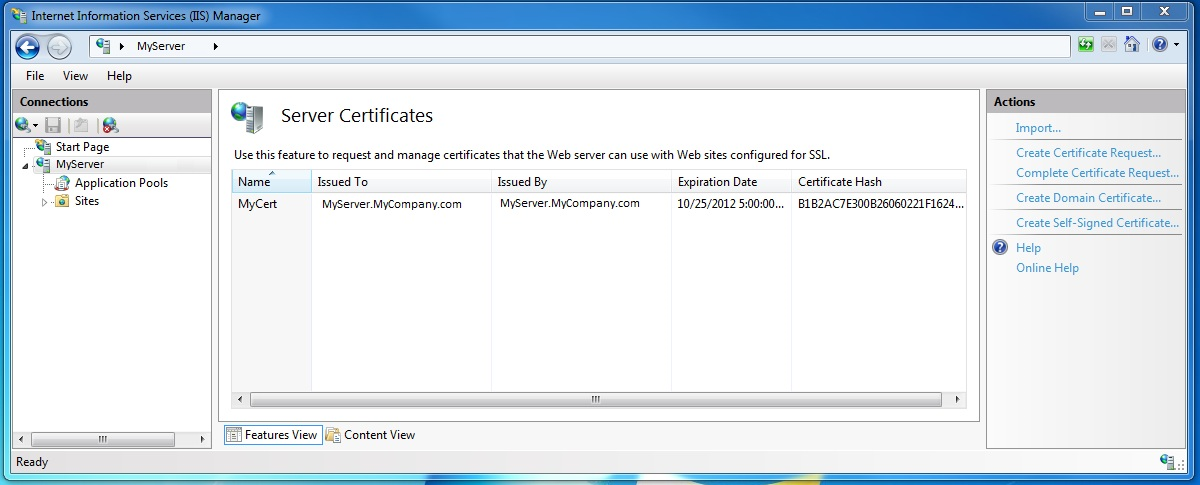
The generated certificate is installed in the Trusted Root Certification Authorities store.
Add SSL Binding to the Certificate
-
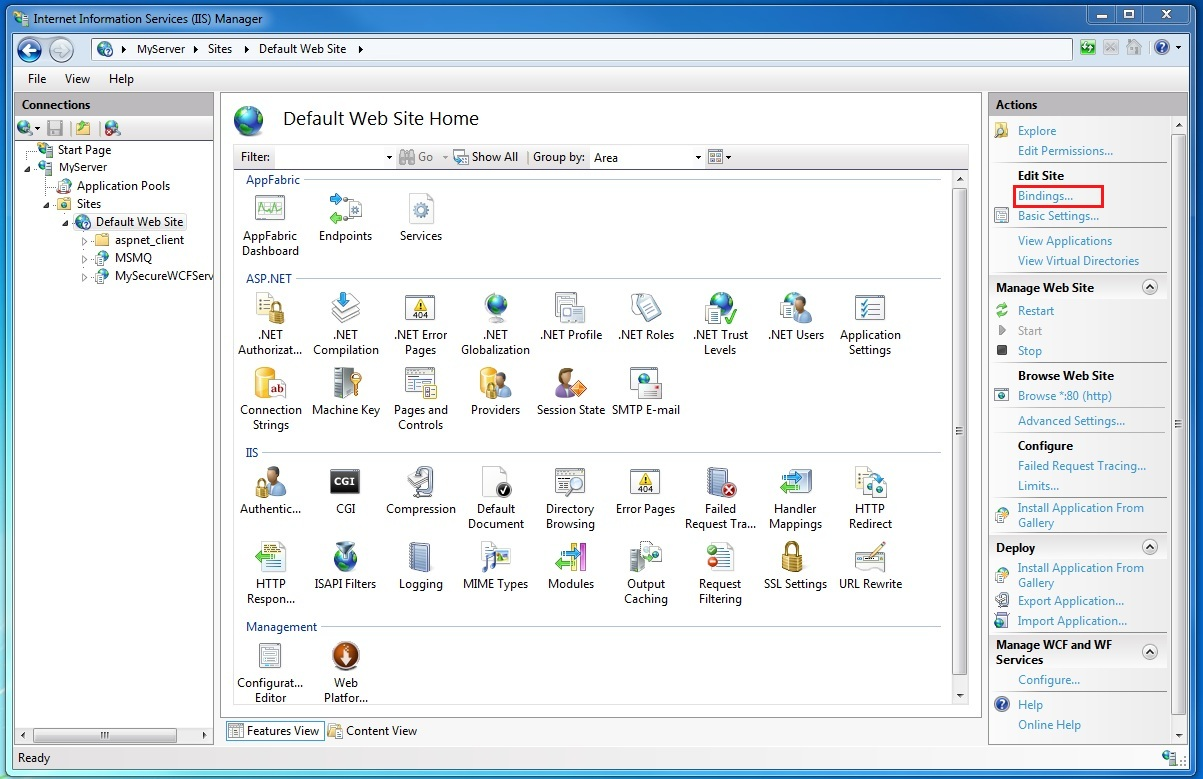
Still in the Internet Information Services Manager, expand the Sites folder and then the Default Web Site folder in the tree view on the left-hand side of the screen.
-
Click the Bindings…. Link in the Actions section in the upper-right-hand portion of the window, as shown in the following figure:
-
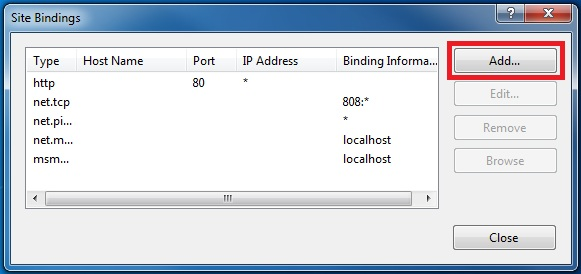
In the Site Bindings window, click the Add button, as shown in the following figure:
-
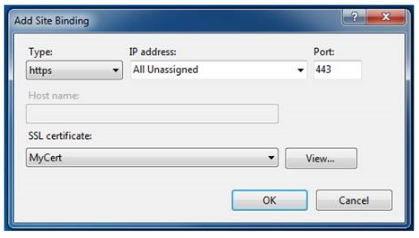
In the Add Site Binding dialog, select "https" for the type and the friendly name of the self-signed certificate you just created. The dialog is shown in the following figure:
Configure a Virtual Directory for SSL
-
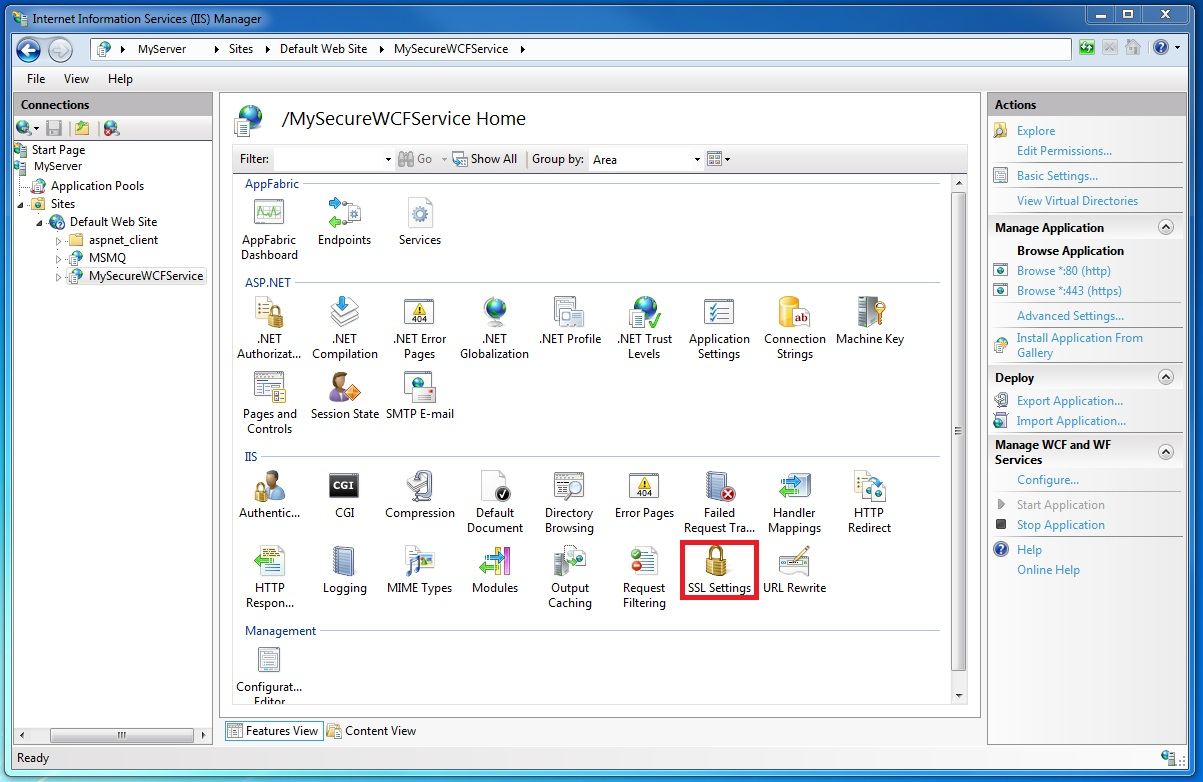
Still in the Internet Information Services Manager, select the virtual directory containing your WCF secure service.
-
In the center pane of the window, select SSL Settings in the IIS section, as shown in the following figure:
-
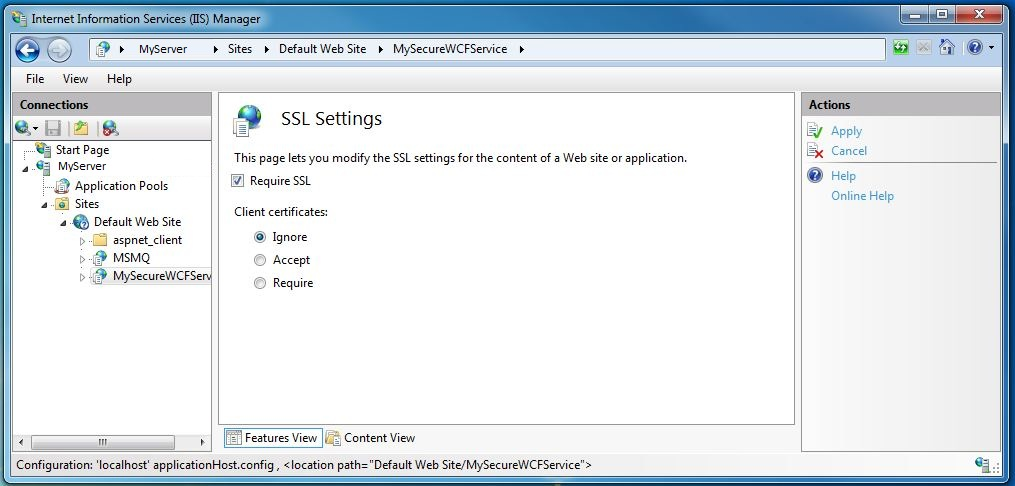
In the SSL Settings Features View, select the Require SSL check box and click the Apply action in the Actions section on the right-hand-side of the window, as shown in the following figure:
Configure WCF Service for HTTP Transport Security
-
Update the web.config file for the
MedicalViewerService, update each endpoint declaration (except for theLeadtools.Medical.WebViewer.Wcf.AnnotationsService) with a new bindingConfiguration attribute, as follows:- If the endpoint has
bindingConfiguration="HandleLargeData", change it tobindingConfiguration="SSLHandleLargeData"<servicename="Leadtools.Medical.WebViewer.Wcf.PatientAccessRightsService"behaviorConfiguration="WebViewerServiceBehavior"><endpointaddress=""binding="webHttpBinding"bindingConfiguration="SSLHandleLargeData"contract="Leadtools.Medical.WebViewer.ServiceContracts.IPatientAccessRightsService"behaviorConfiguration="WebViewerServiceBehavior"></endpoint></service> - If the endpoint has
binding="webHttpBinding"and has nobindingConfigurationdefined, addbindingConfiguration="SSLBinding".<servicename="Leadtools.Medical.WebViewer.Wcf.ObjectQueryService"behaviorConfiguration="WebViewerServiceBehavior"><endpointaddress=""binding="webHttpBinding"bindingConfiguration="SSLBinding"contract="Leadtools.Medical.WebViewer.ServiceContracts.IPatientAccessRightsService"behaviorConfiguration="WebViewerServiceBehavior"></endpoint></service> - Change all:
to
<endpoint address="mex" binding="mexHttpBinding"><endpoint address="mex" binding="mexHttpsBinding">
- If the endpoint has
-
Update all of the .svc files in the
MedicalViewerServiceto remove the highlightedFactoryattribute.Original:
<% @ServiceHost Language=C# Debug="true" Factory="System.ServiceModel.Activation.WebServiceHostFactory" Service="Leadtools.Medical.WebViewer.Wcf.ArchiveQueryService" CodeBehind="ArchiveQueryService.cs"%>Updated:
<% @ServiceHost Language=C# Debug="true" Service="Leadtools.Medical.WebViewer.Wcf.AnnotationsService" CodeBehind="AnnotationsService.cs"%>
Configure Web Client for HTTP Transport Security
In the MedicalWebViewer\Scripts\config.ts & config.js, configure the service URLs to use https instead of http
serviceUrl: "http://local....
Becomes
serviceUrl: "https://local
Conclusion
Enabling HTTPS support is an important first step in bridging the gap between secured browser applications and the desktop. However, HTTPS is not enabled by default because a machine-specific certificate is required to encrypt the connection. Fortunately, the steps required can be performed easily and without necessarily having to purchase a certificate.
