Take the following steps in Microsoft Expression Blend to create an image list using LEADTOOLS ImageList and ImageListItem controls.
- Create a Microsoft Expression Blend project and set it up to use LEADTOOLS WPF controls. Make your project Name and Window Title "MyList."
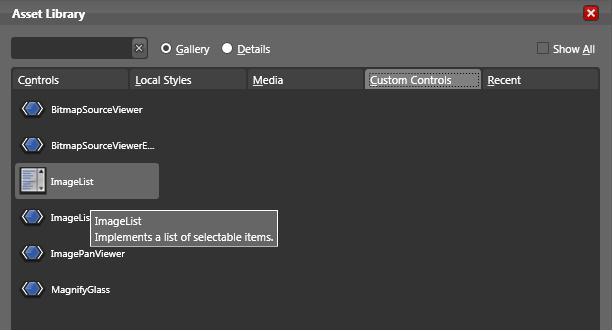
- On the left-hand side of the screen, click the Asset Library arrow

- From the pop-up window, click the Custom Controls tab, then ImageList.
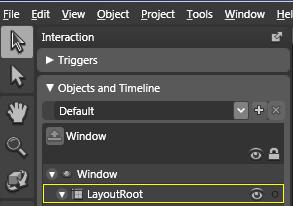
- Close the Asset Library pop-up. On the Interaction tab, under Objects and Timelines, double-click LayoutRoot to select it:
- Click near the top left of the window, and drag to create a box about 150 pixels wide, and as tall as the window. Guide bars will pop-up to show where to align your list with the window frame.
- On the Properties tab, you can Name your ImageList if you wish. This is useful if you will create multiple lists.
- Under Appearance, you can set a default ImageSize, border and margin thicknesses, and so forth. Use ItemSize to set a default size for the individul image item controls (placeholders) that you will place inside the list. Use the ViewStyle list box to select a default display style for your list.
- Under Layout, click the horizontal and vertical alignment buttons to position the list at the top left of the window.
- Under Behavior, set the ScrollStyle to Vertical.
Add the Image List Control
First, you will draw the area where the image list is to appear. This will automatically include customizeable elements like scroll bars.
This will make the ImageList the active control:
Add Image Item Controls to the Image List
Next, you will designate how images are to be laid out inside your list. If you wish, each of these image containers can be independently customized.
- From the Asset Library, select Custom Controls->ImageListItem.
- Under Objects and Timelines, select your ImageList. This will highlight the image list that you drew in the Window.
- Place the cursor near the top left corner of the ImageList, and click-and-drag to draw a rectangle of approximately 125x125 pixels.
- Repeat steps two and three, until you have added a total of four ImageListItems. Don't worry if the boxes are not all exactly the same size--they will snap to the default setting.
- Select an ImageListItem by left-clicking on Objects and Timeline-->ImageListItem.
- For each item, on the Properties tab, under Appearance, type or paste a complete path and filename into the Image field.
For Example:
- C:\Program Files\LEAD Technologies\LEADTOOLS 15\Images\ImageProcessingDemo\NaturalFruits.jpg
- C:\Program Files\LEAD Technologies\LEADTOOLS 15\Images\ScarletMacaws.jpg
- C:\Program Files\LEAD Technologies\LEADTOOLS 15\Images\eye.gif
- C:\Program Files\LEAD Technologies\LEADTOOLS 15\Images\Butterfly.jpg
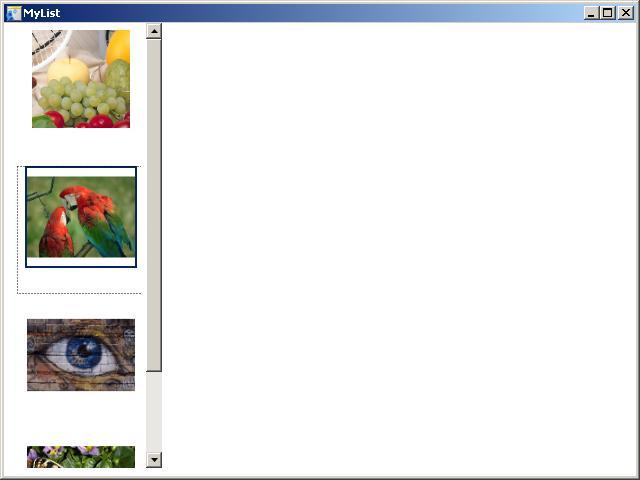
- Press F5 to build your application. This will take a few seconds.
When it is done, you'll have a scrollable image list. Click any image in the list to select it:
 Example
[Window1.xaml]
<Windowxmlns="http://schemas.microsoft.com/winfx/2006/xaml/presentation"xmlns:x="http://schemas.microsoft.com/winfx/2006/xaml"xmlns:Leadtools_Windows_Controls="clr-namespace:Leadtools.Windows.Controls;assembly=Leadtools.Windows.Controls"x:Class="MyList.Window1"x:Name="Window"Title="MyList"Width="640" Height="480"><Grid x:Name="LayoutRoot"><Leadtools_Windows_Controls:ImageList HorizontalAlignment="Left" Margin="8,0,0,8" VerticalAlignment="Center" Width="150" IsSynchronizedWithCurrentItem="True" ScrollStyle="Vertical" ViewStyle="Explorer"><Leadtools_Windows_Controls:ImageListItem Width="131" Content="ImageListItem"><Leadtools_Windows_Controls:ImageListItem.Image><BitmapImage UriSource="file:///C:/Program Files/LEAD Technologies/LEADTOOLS 15/Images/ImageProcessingDemo/NaturalFruits.jpg"/></Leadtools_Windows_Controls:ImageListItem.Image></Leadtools_Windows_Controls:ImageListItem><Leadtools_Windows_Controls:ImageListItem Width="127" Height="96" Content="ImageListItem"><Leadtools_Windows_Controls:ImageListItem.Image><BitmapImage UriSource="file:///C:/Program Files/LEAD Technologies/LEADTOOLS 15/Images/ScarletMacaws.jpg"/></Leadtools_Windows_Controls:ImageListItem.Image></Leadtools_Windows_Controls:ImageListItem><Leadtools_Windows_Controls:ImageListItem Width="124" Height="107" Content="ImageListItem"><Leadtools_Windows_Controls:ImageListItem.Image><BitmapImage UriSource="file:///C:/Program Files/LEAD Technologies/LEADTOOLS 15/Images/eye.gif"/></Leadtools_Windows_Controls:ImageListItem.Image></Leadtools_Windows_Controls:ImageListItem><Leadtools_Windows_Controls:ImageListItem Width="115" Height="120" Content="ImageListItem"><Leadtools_Windows_Controls:ImageListItem.Image><BitmapImage UriSource="file:///C:/Program Files/LEAD Technologies/LEADTOOLS 15/Images/Butterfly.jpg"/></Leadtools_Windows_Controls:ImageListItem.Image></Leadtools_Windows_Controls:ImageListItem></Leadtools_Windows_Controls:ImageList></Grid></Window>
See Also
Programming Reference
Adding LEADTOOLS Controls to Microsoft Expression BlendDisplay Images Using Expression Blend
Creating Image Lists Using Expression Blend
Link an Image List to an Image Viewer Using Expression Blend
Add a Magnifying Glass Using Expression Blend
Adding Bitmap Effects Using Expression Blend
Working with Images Using Visual Studio
Loading an Image File Using WIC
Saving an Image File Using WIC Loading and Saving Images with the LEADTOOLS RasterImageViewer