With the release of LEADTOOLS version 14.5, many new features were introduced to the annotations. Some of these features alter the way annotations are displayed. Other features change or enhance the user interface. The following features were introduced:
New Annotation Rotate Option XML Format New XP Style Annotation Toolbar New Annotation Side Handles New AnnNewGroupEditDesigner Class New Calibrate Ruler Feature New Annotation Cursors New Rubber Stamp Display Styles
New Annotation Rotate Option
In previous versions of LEADTOOLS, annotation objects could be rotated by holding the Shift key while dragging a handle. With the new rotate options, two rotate handles are displayed on a selected object. One of the handles is the "gripper" handle, which rotates the object when dragged. The other handle is the "center" handle, which determines the center of rotation. The center of rotation can be moved by dragging. The gripper handle can be moved anywhere by dragging.
The following figure illustrates a rotate by dragging the "gripper" handle:
The following figure illustrates moving the "center" handle:

The rotate handles can be reset to a default location by right-clicking the annotation object, and selecting the Reset Rotate Control Points option, as shown in the following figure:
The rotate control points can be globally hidden or displayed by right-clicking on the image (not an annotation object), and selecting the Use Rotate Control Points option, as shown in the following figure:
The new annotation rotate handles are implemented by the following functions:
AnnAutomation.CanResetRotatePoints property AnnAutomation.ResetRotatePoints method AnnAutomationManager.RotateCenterControlPoint property AnnAutomationManager.RotateCenterControlPointCursor property AnnAutomationManager.RotateGripperControlPoint property AnnAutomationManager.RotateGripperControlPointCursor property AnnAutomationManager.RotateLinePen property AnnAutomationObject.UseRotateControlPoints property AnnCrossProductObject.RestoreOriginalLocation method AnnCrossProductObject.SaveOriginalLocation method AnnCrossProductObject.ResetRotatePoints method AnnEditDesigner.RotateCenterControlPoint property AnnEditDesigner.RotateCenterControlPointLocation property AnnEditDesigner.RotateGripperControlPoint property AnnEditDesigner.RotateGripperControlPointLocation property AnnEditDesigner.RotateLinePen property AnnEditDesigner.UseRotateControlPoints property AnnEditDesignerOperation.MoveRotateCenter enumeration member AnnEditDesignerOperation.MoveRotateGripper enumeration member AnnGroupObject.CalculateRotateAngle method AnnGroupObject.ResetRotatePoints method AnnGroupObject.RestoreOriginalLocation method AnnGroupObject.SaveOriginalLocation method AnnLineObject.CalculateRotateAngle method AnnLineObject.ResetRotatePoints method AnnLineObject.ResetRotatePoints method AnnLineObject.RestoreOriginalLocation method AnnLineObject.SaveOriginalLocation method AnnObject.CalculateRotateAngle method AnnObject.GripperDistance property AnnObject.ResetRotatePoints method AnnObject.RotateCenter property AnnObject.RotateGripper property AnnObject.SaveOriginalLocation method AnnObject.TransformRotatePoints method AnnPolylineObject.RestoreOriginalLocation method AnnPolylineObject.SaveOriginalLocation method AnnProtractorObject.ResetRotatePoints method AnnProtractorObject.RestoreOriginalLocation method AnnProtractorObject.SaveOriginalLocation method AnnRectangleObject.calculateRotateAngle method AnnRectangleObject.RestoreOriginalLocation method AnnRectangleObject.SaveOriginalLocation method AnnTransformObjectMode.PointsAndRotate enumeration member
XML Format
Prior to version 14.5, annotations could be saved using the AnnCodecs.Save method in one of three formats:
AnnCodecsFormat.Native - a text-based file format for storing annotations AnnCodecsFormat.Encoded - a binary file format for storing annotations AnnCodecsFormat.Serialize - a .NET Serialize format
Unlike the Native format, the XML is both forward- and backward-compatible. It is human readable. Files using the XML format can be easily modified using a standard text editor (i.e. notepad.exe). It can be easily parsed using any standard XML parser. It can be used with any of the growing number of utilities that work with XML.
The annotation toolbar was updated to have a Windows-XP look and feel. As with previous versions of LEADTOOLS, the annotation toolbar can be customized with your own images. The following figure displays a sample of the original style and the new style:
Programmatically, set the UseXPStyleToolBar property to true to use the new XP style of toolbar. Set the UseXPStyleToolBar property to false to use the original style of toolbar.
New AnnNewGroupEditDesigner Class
The AnnNewGroupEditDesigner class extends AnnRectangleEditDesigner class to provide functionality for editing an AnnGroupObject annotation object on an annotation container. This class has improved resizing and rotate functionality over the AnnGroupEditDesigner class.
The MaintainAspectRatio function was added to control whether the aspect ratio is maintained when the group is resized. When selecting an AnnRectangleObject , or any annotation object that derives from AnnRectangleObject , or an AnnGroupObject , eight control points appear. If MaintainAspectRatio is true (default), dragging one of the four corner control points will change the size of the annotation object while maintaining its aspect ratio. If false, the aspect ratio is not preserved.
The AnnNewGroupEditDesigner class also changes the multiple-selection behavior. In previous versions of LEADTOOLS, you could select multiple objects and manipulate the objects by dragging any handle of any object. When moving a handle, the results were often not intuitive. With the new multi-select option, all selected objects are outlined with a multi-select border. The multi-select border has eight resize handles, and two rotate handles. Now, moving, resizing, and rotating multiply select objects is clear and easy to do.
The following figure displays a sample of the original style and the new style:

New Calibrate Ruler Feature
With this feature, a user can automatically calibrate a ruler to the desired size when using the automation. This is useful when a user wants to interactively measure something in an image. Note that there are four annotation object classes used for measuring:
Any of these objects can be calibrated. To calibrate a ruler:Load desired image. Draw an AnnRulerObject object and size to desired size. In this example, we will assume that the grid is composed of 1 inch squares, so after calibrating the ruler, the diagonal of a 1-inch by 2-inch rectangle should measure 2.24 inches. . The following figure displays an uncalibrated ruler: 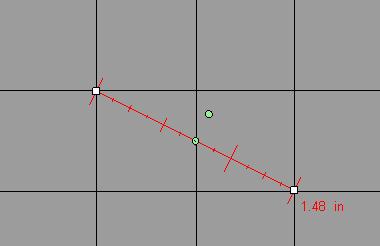
Right-click the AnnRulerObject object and select Ruler Properties, and then Ruler, as shown in the following figure: 
The following figure appears:
Click the Calibrate button to open the Calibrate Ruler dialog. The following figure displays: 
In the Calibrate dialog, set the Ruler Length to 2 and the Ruler Measurement to feet. Select the Apply to Newly Created Rulers check box. Click the OK button to close the Calibrate dialog. Click the OK button to save your selections and close the Ruler Properties dialog.
Draw a new ruler to measure any part of the image, as shown in the following figure: 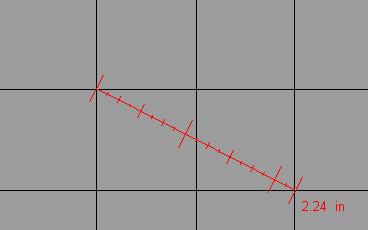
For more information on calibrating rulers, see the topic Calibrating Annotation Ruler Objects.
New Annotation Cursors
This new feature displays different cursors for many tasks in automated annotation mode. This feature displays unique annotation cursors in the following situations:
When hovering over a rotation gripper handle When hovering over a rotation center handle When hovering over any of the eight size handles-an appropriate arrow cursor is displayed depending on the handle and the rotation of the annotation object When dragging a selection When using any of the 30 annotation tools.
New Rubber Stamp Display Style
With LEADTOOLS Version 14.5 new default images are being introduced for the 26 predefined rubber stamp annotations. The following figure displays a sample of the original style and the new style:

Set the SetUseNewPicture property to true to use the new default pictures. Use the GetUseNewPicture property to get a value that indicates whether the new default pictures are being used.