With LEADTOOLS for WPF Standard edition and LEADTOOLS for WPF Module, you can take the following steps to add special effects to images, buttons, or other items. You can add LEADTOOLS effects to Windows objects, Windows effects to LEADTOOLS objects, or any combination of effects to almost any object.
- In Microsoft Expression Blend, open a project. If you wish, open the project you created in the Link an Image List to an Image Viewer tutorials.
- From the Interaction tab, under Objects and Timeline, select an object. In this example, select an ImageListItem.
- From the Properties tab, under Appearance, select the down arrow
 to expand the Advanced Properties options.
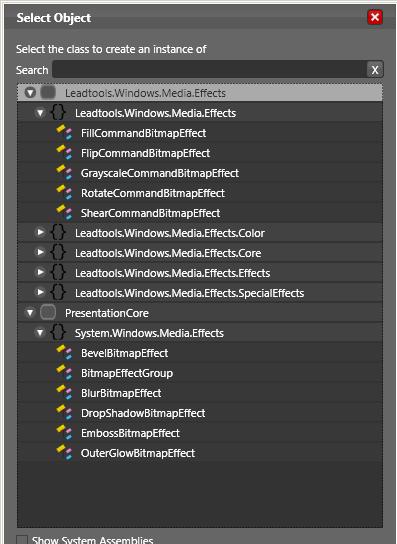
 - Choose BitmapEffect-->New. A Select Object window will appear.
There are two groups of effects: Leadtools.Windows.Media.Effects, and PresentationCore.
- Under Leadtools.Windows.Media.Effects, you will see the five namespaces that make up the assembly, including Leadtools.Windows.Media.Effects, Leadtools.Windows.Media.Effects.Color, Leadtools.Windows.Media.Effects.Core, Leadtools.Windows.Media.Effects.Effects, and Leadtools.Windows.Media.Effects.SpecialEffects.
- Under PresentationCore, you will see effects available from the Windows system (System.Windows.Media.Effects). These include Bevel, Blur, DropShadow, Emboss, and OuterGlow. The Microsoft System effects can be used alone, or, in the LEADTOOLS WPF Standard and WPF Module products, they can be combined with the much larger collection of effects available under Leadtools.Windows.Media.Effects:
- Under Presentation Core, look below System.Windows.Media.Effects, and select BevelBitmapEffect.
- Repeat steps 2 through 5 until you have applied this effect to all ImageListItems.
- Press F5 to build your application. Each image list item will now appear with beveled edges:

For an example of this effect applied to the entire image list, see Add a Magnifying Glass Using Expression Blend
Adding a Windows WPF Effect to a LEADTOOLS WPF Object
Adding a LEADTOOLS WPF Effect to a Windows WPF Object
- Create a button, then under Objects and Timeline, select it.
- Do steps 3 and 4 above.
- Under the Leadtools.Windows.Media.Effects group, expand Leadtools.Windows.Media.Effects.SpecialEffects, select BricksTextureCommandBitmapEffect, and then click OK.
- On the Properties tab, expand Appearance. Under BitmapEffect, you can adjust variables like brick height, roughness, width, and color.
- Press F5 to build your application. Depending on the variables you selected for your button and for the bricks effect, the button will look something like this:

Adding a LEADTOOLS WPF Effect to a LEADTOOLS WPF Object
- Repeat steps 1-5 at the top of this page. However, this time, in step 2, from the Interaction tab, under Objects and Timeline, select the BitmapSourceViewer. For step 5, under the Leadtools.Windows.Media.Effects group, expand Leadtools.Windows.Media.Effects.SpecialEffects. Select RomanMosaicCommandBitmapEffect, then click OK.
- Under Properties-Appearance-BitmapEffect, next to Flags select Rectangular,Circular.
- Press F5 to build your application. Click an item in your image list to see the mosaic effect applied:
Adding Multiple Effects
- Under Objects and Timeline, select the BitmapSourceViewer.
- Next to BitmapEffect (Roman...New, click the down arrow and select BitmapEffectGroup. Children (Collection) will appear underneath the BitmapEffect selector.
- Next to Children (Collection), click the ... button. A BitmapEffect Collection Editor: Children window will appear.
- Click Add another item. A Select Object window will appear.
- Select Leadtools.Windows.Media.Effects-->Leadtools.Windows.Media.Effects.SpecialEffects--> GlassEffectCommandBitmapEffect, then click OK. GlassEffectCommandBitmapEffect will appear on the Items list.
- Repeat step 5. This time, select: Leadtools.Windows.Media.Effects-->Leadtools.Windows.Media.Effects.SpecialEffects--> CloudsCommandBimapEffect, then OK to close the BitmapEffect Collection Editor:Children window. In the Properties list, note that the default background color is red. You can change this later if you wish.
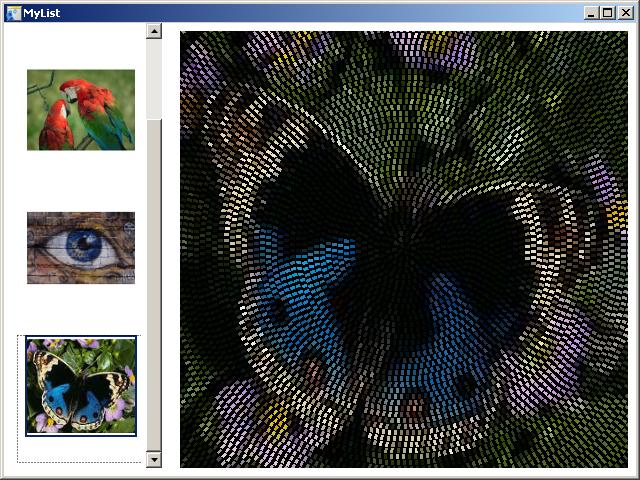
- Press F5 to build your application. Click an item in your image list to see the multiple effects applied to the image:

 Example
[Window1.xaml]
<Window
	xmlns="http://schemas.microsoft.com/winfx/2006/xaml/presentation"
	xmlns:x="http://schemas.microsoft.com/winfx/2006/xaml"
	xmlns:Leadtools_Windows_Controls="clr-namespace:Leadtools.Windows.Controls;assembly=Leadtools.Windows.Controls"
	x:Class="MyList.Window1"
	x:Name="Window"
	Title="MyList"
	Width="640" Height="480" xmlns:Leadtools_Windows_Media_Effects_SpecialEffects="clr-namespace:Leadtools.Windows.Media.Effects.SpecialEffects;assembly=Leadtools.Windows.Media.Effects">

	<Grid x:Name="LayoutRoot">
		<Leadtools_Windows_Controls:ImageList HorizontalAlignment="Left" Margin="8,0,0,8" VerticalAlignment="Center" Width="150" IsSynchronizedWithCurrentItem="True" ScrollStyle="Vertical" ViewStyle="Explorer" x:Name="ImageList">
			<Leadtools_Windows_Controls:ImageListItem Width="131" Content="ImageListItem">
				<Leadtools_Windows_Controls:ImageListItem.Image>
					<BitmapImage UriSource="file:///C:/Program Files/LEAD Technologies/LEADTOOLS 15/Images/ImageProcessingDemo/NaturalFruits.jpg"/>
				</Leadtools_Windows_Controls:ImageListItem.Image>
			</Leadtools_Windows_Controls:ImageListItem>
			<Leadtools_Windows_Controls:ImageListItem Width="127" Height="96" Content="ImageListItem">
				<Leadtools_Windows_Controls:ImageListItem.Image>
					<BitmapImage UriSource="file:///C:/Program Files/LEAD Technologies/LEADTOOLS 15/Images/ScarletMacaws.jpg"/>
				</Leadtools_Windows_Controls:ImageListItem.Image>
			</Leadtools_Windows_Controls:ImageListItem>
			<Leadtools_Windows_Controls:ImageListItem Width="124" Height="107" Content="ImageListItem">
				<Leadtools_Windows_Controls:ImageListItem.Image>
					<BitmapImage UriSource="file:///C:/Program Files/LEAD Technologies/LEADTOOLS 15/Images/eye.gif"/>
				</Leadtools_Windows_Controls:ImageListItem.Image>
			</Leadtools_Windows_Controls:ImageListItem>
			<Leadtools_Windows_Controls:ImageListItem Width="115" Height="120" Content="ImageListItem">
				<Leadtools_Windows_Controls:ImageListItem.Image>
					<BitmapImage UriSource="file:///C:/Program Files/LEAD Technologies/LEADTOOLS 15/Images/Butterfly.jpg"/>
				</Leadtools_Windows_Controls:ImageListItem.Image>
			</Leadtools_Windows_Controls:ImageListItem>
		</Leadtools_Windows_Controls:ImageList>
		<Leadtools_Windows_Controls:BitmapSourceViewer Margin="176,8,8,8" x:Name="BitmapSourceViewer" Width="Auto" Height="Auto" Content="" SizeMode="Stretch" Source="{Binding Path=SelectedItem.Image, ElementName=ImageList, Mode=Default}">
			<Leadtools_Windows_Controls:BitmapSourceViewer.BitmapEffect>
				<BitmapEffectGroup>
					<Leadtools_Windows_Media_Effects_SpecialEffects:CloudsCommandBitmapEffect/>
					<Leadtools_Windows_Media_Effects_SpecialEffects:GlassEffectCommandBitmapEffect/>
				</BitmapEffectGroup>
			</Leadtools_Windows_Controls:BitmapSourceViewer.BitmapEffect>
		</Leadtools_Windows_Controls:BitmapSourceViewer>
	</Grid>
</Window>
See Also
Programming Reference
Adding LEADTOOLS Controls to Microsoft Expression BlendDisplay Images Using Expression Blend
Creating Image Lists Using Expression Blend
Link an Image List to an Image Viewer Using Expression Blend
Add a Magnifying Glass Using Expression Blend
Adding Bitmap Effects Using Expression Blend
Working with Images Using Visual Studio
Loading an Image File Using WIC
Saving an Image File Using WIC Loading and Saving Images with the LEADTOOLS RasterImageViewer