


 Syntax
| Visual Basic (Declaration) | |
|---|---|
Public Class BricksTextureCommand Inherits RasterCommand Implements IRasterCommand | |
| Visual Basic (Usage) |  Copy Code Copy Code |
|---|---|
| |
| C# | |
|---|---|
public class BricksTextureCommand : RasterCommand, IRasterCommand | |
| C++/CLI | |
|---|---|
public ref class BricksTextureCommand : public RasterCommand, IRasterCommand | |
Example
Run the BricksTextureCommand on an empty gray image.
| Visual Basic | Copy Code |
|---|---|
Public Sub BricksCommandExample() | |
| C# | Copy Code |
|---|---|
public void BricksCommandExample() | |
Remarks
This command creates a brick-like texture. Edges that are in the angle of the light source are brightened and the others are darkened. Apply this texture to an image by using pimage as the source image. You can obtain the best result by applying this command on a medium brightness image. Using the shading option of BricksTextureCommandFlags.SmoothedOutEdges results in bricks that have a more chiseled look than the same settings with a shading option of BricksTextureCommandFlags.SmoothedInEdges. As an example, suppose you were to start with a gray image, like the following figure: 
Now suppose you call the BricksTextureCommand command. The following settings apply to all of the following figures:
Parameter Value OffsetX 0 OffsetY 0 RowDifference 35 BricksWidth 60 BricksHeight 20 If you were to use the following additional settings:
Parameter Value MortarRoughness 0 MortarRoughnessEvenness 0 BricksRoughness 0 BricksRoughnessEvenness 0 Flags BricksTextureCommandFlags.SmoothedOutEdges
The following figure results: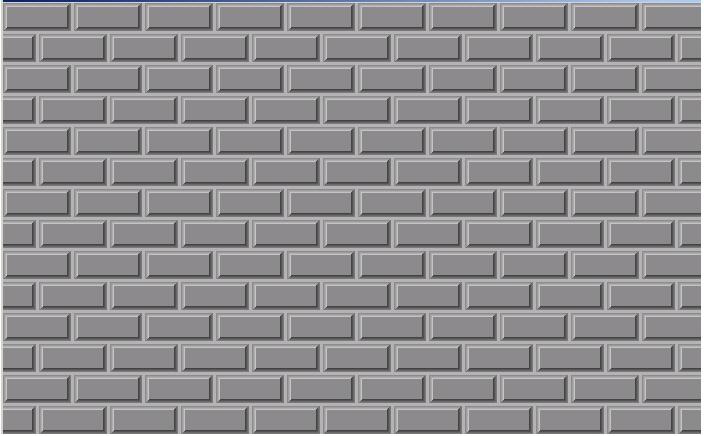
Note how smooth the surface of both the mortar and the bricks is. In the following figure, the only change from the previous settings is the value of BricksRoughness, which is set to 196: 
In the following figure, BricksRoughness remains set to 196 and in addition, BricksRoughnessEvenness is set to 4: 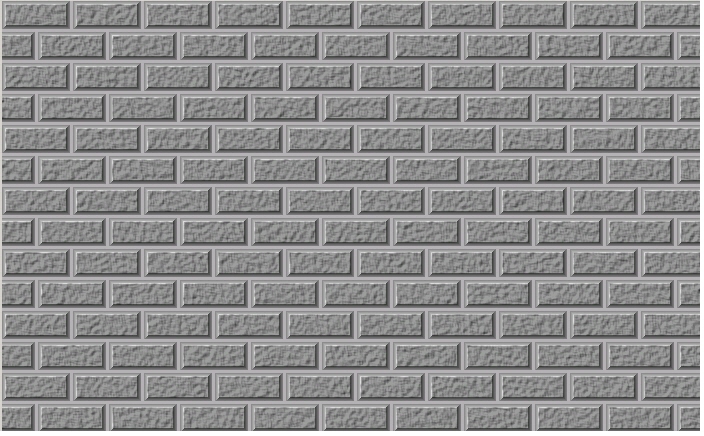
The next two figures show the difference between the BricksTextureCommandFlags.SmoothedOutEdges flag and the BricksTextureCommandFlags.SmoothedInEdges flag. For these figures the following settings are used:
Parameter Value MortarRoughness 0 MortarRoughnessEvenness 0 BricksRoughness 250 BricksRoughnessEvenness 0 EdgeWidth 7 MortarWidth 4 In the following figure the BricksTextureCommandFlags.SmoothedOutEdges flag is set: 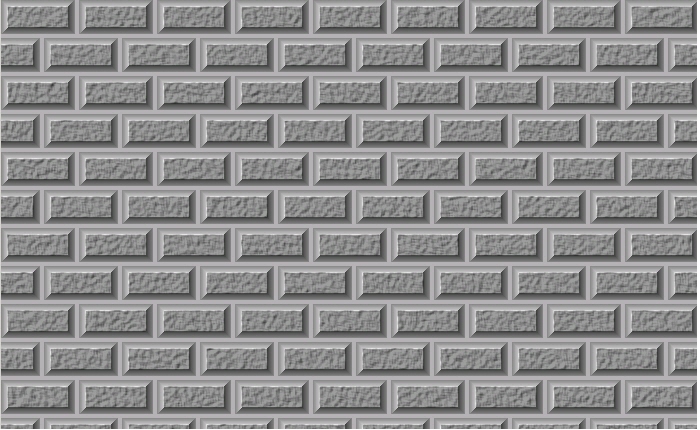
In the following figure the BricksTextureCommandFlags.SmoothedInEdges flag is set: 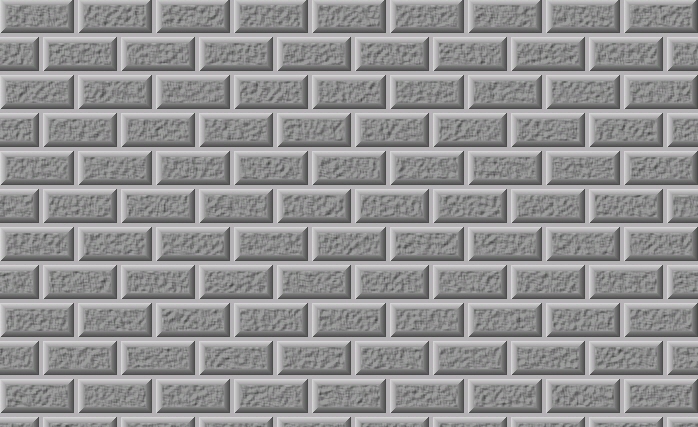
This command supports 12- and 16-bit grayscale and 48- and 64-bit color images. Support for 12- and 16-bit grayscale and 48- and 64-bit color images is available only in the Document/Medical toolkits. This command does not support signed data images. This command does not support 32-bit grayscale images.
Inheritance Hierarchy
System.Object
Leadtools.ImageProcessing.RasterCommand
Leadtools.ImageProcessing.SpecialEffects.BricksTextureCommand
Requirements
Target Platforms: Microsoft .NET Framework 2.0, Windows 98, Windows NT 4.0, Windows Millennium Edition, Windows 2000, Windows XP Home Edition, Windows XP Professional, Windows Server 2003 family
See Also
Reference
BricksTextureCommand MembersLeadtools.ImageProcessing.SpecialEffects Namespace
Applying Artistic Effects
EmbossCommand
ShadowCommand Class
ChangeHueSaturationIntensityCommand
ColoredPencilCommand Class
ColoredPencilExtendedCommand Class
ColorReplaceCommand
ColorThresholdCommand
DiscreteFourierTransformCommand
DirectionEdgeStatisticalCommand
FastFourierTransformCommand
FrequencyFilterCommand
FrequencyFilterMaskCommand
FourierTransformDisplayCommand
StatisticsInformationCommand
FeretsDiameterCommand
ObjectInformationCommand
RegionContourPointsCommand
GetRegionPerimeterLength
MathematicalFunctionCommand
SegmentCommand
SubtractBackgroundCommand
UserFilterCommand