Setting up the Android Development Environment
Take the following steps to set up the Android development environment before working with the LEADTOOLS Android libraries and demo projects.
- Install the Java Development Kit (JDK) 1.6 which includes the Java Runtimes (JRE) and libraries from http://www.oracle.com/technetwork/java/javase/downloads/index.html.

- Install Eclipse from http://www.eclipse.org/downloads/.
Note: To make sure the demo projects work properly use Eclipse Juno (ver. 4.2) for Windows 64 Bit and Eclipse IDE for Java Developers package.
The download .zip file will contain the Eclipse executable and supplemental directories, but not an installer. Copy the contents to a specific folder (for example, the Program Files folder).

- Install the Android SDK from http://developer.android.com/sdk/index.html.
- On this web page click USE AN EXISTING IDE and then click Download the SDK Tools for Windows.
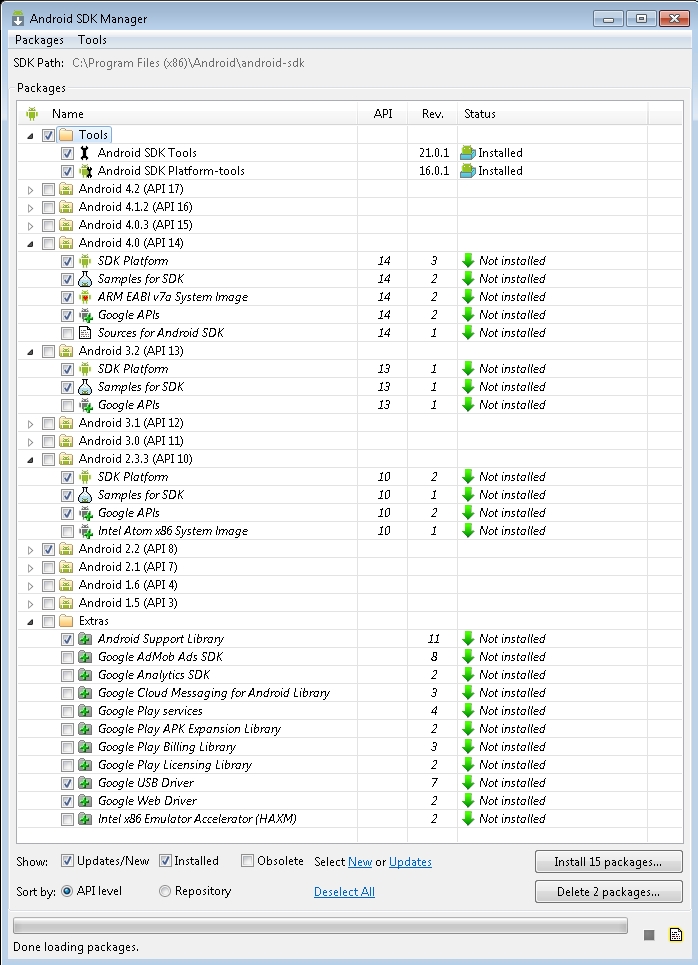
- Start the Android SDK Manager and select the packages that are to be installed. Click Install XX packages.... Once the packages are downloaded and installed, close the SDK Manager.
Installing the ADT Plug-in
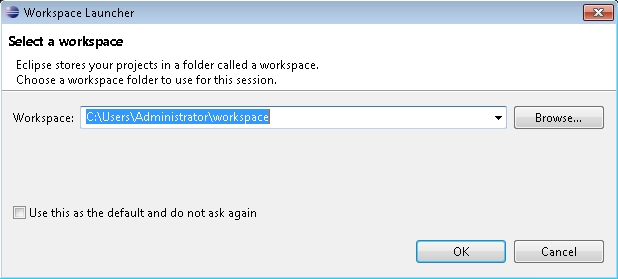
- Start Eclipse. The first time it is used, a Select a workspace dialog box will appear so you can specify the location on the PC where the new project files will be saved. After selecting a workspace, click Ok.
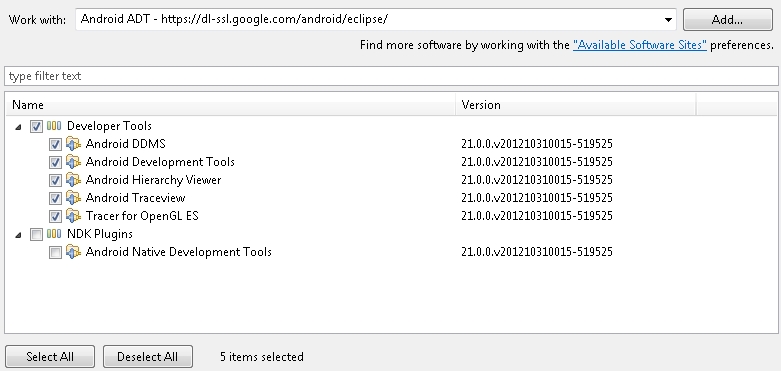
- The Eclipse main interface will appear. Choose Help -> Install New Software.... Click the Add... button and enter the address https://dl-ssl.google.com/android/eclipse/ in the Work with: edit box and click Ok.
Select all items listed under "Developer Tools" as shown below, then click Next then Finish.
Creating Android Virtual Devices
- Restart Eclipse. From the toolbar, click this button
 to start the Android Virtual Device Manager.
- On the Android Virtual Device Manager dialog box click New.... A Create new Android Virtual Device (AVD) dialog box will appear. Using the settings as shown in the following screen captures, create two Android Virtual Device.
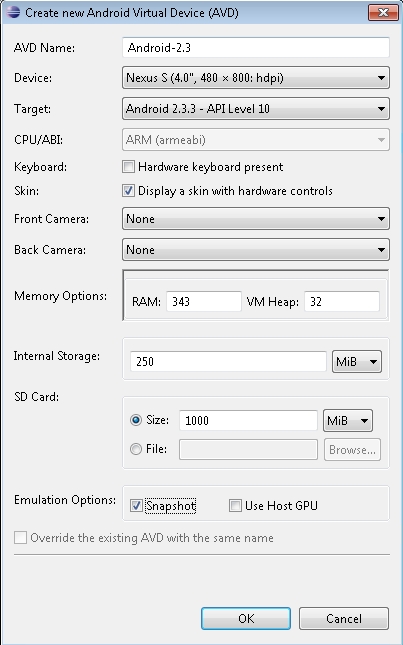

Note: These two virtual devices are the most common types of Android devices currently in use. Once they have been created, close the Virtual Device Manager.
Import and Set Up Leadtools.Demos
Take the following steps to start working with the LEADTOOLS Android Libraries and Demo Projects:
Fix file permissions
- Make sure you have a copy of the LEADTOOLS Android libraries (JARs and SOs) and the LEADTOOLS Android demo projects.
- Open Eclipse and choose File -> Import. Under Select an import source: expand the Android Source, then choose Existing Android Code Into Workspace.

- On the Import Projects dialog box click the Browse... button and select the root directory for Leadtools.Demos. If the Copy projects into workspace option is selected, a copy of the project will be placed in the workspace specified during startup. Click Finish to load the project.

- From the Project menu, uncheck Build Automatically. Then choose Project -> Build Project.
Import and Setup Viewer Demo
Import Project
- After the files are copied, from Eclipse choose File -> Import and select Existing Android Code Into Workspace as applied for the Leadtools.Demo project. Select the ViewerDemo as the Root Directory for the project. Right-click on the ViewerDemoActivity project that has been added to the Package Explorer pane in Eclipse and choose properties.
- Click on the Android option on the left. If the ViewerDemo project is in the same root directory as Leadtools.Demos, a reference to Leadtools.Demos with a green check mark should be available under the Library section. If it is not, add the Leadtools.Demos as a reference project by clicking the Add... button.
Building the Project
Select the ViewerDemoActivity item in the Package Explorer on the left side of Eclipse, and then choose
Project ->
Build Project. If the project doesn't build, inspect the errors list from
Problems pane at the bottom.
Note: If the errors are related to missing namespaces in the source code, review the prior setup steps to make sure each item was completed correctly.
Note: If the errors are related to missing method names or properties for the LEADTOOLS classes, please contact Tech Support to report these issues.
If changes are made to resolve the errors, save them and choose Project -> Clean... and click OK, then click Project -> Build Project.
Set up a Run Configuration (Optional)
- To test the Viewer Demo project on a specific device or emulator, choose Run -> Run Configurations.... A new run configuration should have been created called ViewerDemoActivity. If it was not, double-click on Android Application, and click on the newly created configuration, then click the Browse... button and select the ViewerDemoActivity.
- Select the Target tab and select Automatically pick compatible device... and then choose either the Android 2.3 or Android 4.0 emulators that were set up earlier. Click Apply and then Close.
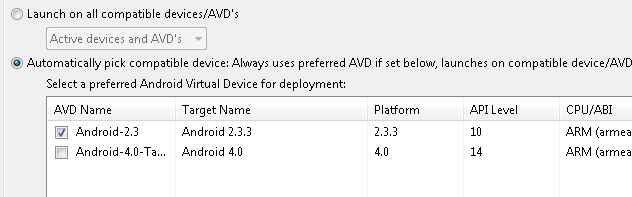
Note: To run the application on a physical device connected to the computer, select Always prompt to pick device.
- To run the demo using the newly created configuration for the first time, choose Run -> Run Configurations... and select the configuration, then click Run. After running the configuration, it will appear in the Run History, allowing quicker access.
Running the Demo
- After the project is built and (optionally) the run configuration set up, choose Run -> Run. If the run configuration was not setup, choose the Run As Android Application option.
- An emulator will start up and the Viewer Demo will be uploaded, installed and run on the emulator. If the emulator has not been started previously, it may take a few minutes to boot up. To prevent this delay, make sure the Enable Snapshot option is selected. It is recommended to start the emulator before running the project. The emulator can be started from the Android Virtual Device Manager.
- After the demo is open, the LEADTOOLS License notification will appear as an indication that the demo is running without license information applied. Click OK. The demo will be fully functionally even if the license information has not been applied, but a notification will appear each time the application is started.
The application will appear as shown below:

Android Debug Monitor
- If certain files should be placed on either the emulator's SD card or a physical device's SD card, then open the DMS in eclipse. All of the connected Android devices will be listed in addition to any running emulators under the Devices tab.
- To push a file to a device, select it from the Devices tab, then select the File Explorer tab on the right pane. Click the sdcard directory and then click the Push a file onto the device... button in the upper right hand corner of the File Explorer tab.

- Choose the file to place on the device and click OK. After the transfer is finished, the device will be able to open that file from the file select dialogs in the demos.
The Android Debug Monitor can be used for various other tasks related to interacting with either the emulators or physical Android devices depending on the system. This includes taking screenshots, getting files from the device, monitoring memory usage, forcing garbage collection, monitoring threads per process, killing processes, and sending phone events (fake calls) to the device.
Troubleshooting
The Demo crashes immediately...
If the demo crashes immediately on the device after it is run, check that all steps in the Directory Preparation section in the Import and Setup Viewer Demo part were completed successfully.
Fixed src errors, but the project still doesn't build...
- If the source of the demo has been modified and the project still cannot be built, save any changes in the file, and then choose Build - > Clean before rebuilding the project.
- If the imported jars are not marked as exported, right-click on the root node for the demo and choose Properties and then click on the Java Build Path properties. Open the Order and Export tab, and make sure all of the Leadtools.* jar files check boxes are checked.

- If the Java compiler version was not 1.6, right-click on the root node for the demo and choose Properties then click on the Java Compiler properties and make sure the version is 1.6.
Missing Android properties, methods, namespaces, etc...
If Android components were missing in the source code, right-click on the project, and choose
Android. Under the
Project Build Target, make sure that
Android 3.2 is selected and click
Ok.


 Products | Support | Contact Us | Copyright Notices