Calibrating a ruler means assigning a specific length to it. For example, on a digital X-ray of a hand, you may draw an annotation ruler object along one of the fingers. You know that this distance is supposed to be exactly 6.5 cm. Using the new calibration functionality you can calibrate this ruler, all existing rulers, and all newly created rulers so that they would precisely measure this distance to be 6.5 cm.
In automated mode, calibration is accomplished as follows:
- Draw an AnnRulerObject.
- In the design mode, right-click the object.
- Choose Ruler Properties and then Ruler.
- Click the Calibrate button to display the following dialog:
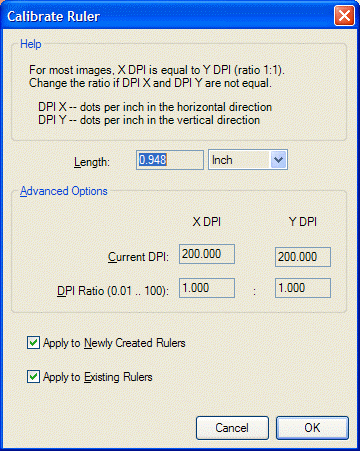
- In the Length edit box, enter the length to which the ruler is to be assigned.
- In the Measurement Units combo box beside the Length edit box, select the corresponding unit of measure.
- In most cases, you can leave the values in the Advanced Options section as they are.
The first time you calibrate a ruler, the Current DPI will give the horizontal and vertical resolutions of the image in dots per inch. For most images, these values will be equal, and the DPI Ratio will be 1:1. However, for some images (for example, some fax images) the horizontal and vertical resolutions are different. This will be automatically reflected in both the Current DPI and DPI Ratio settings. If you need to change the DPI ratio, enter a new ratio. This ratio must be between (1/100) and 100 inclusive.
- If you want the calibration to apply to all newly created rulers, select the Apply to Newly Created Rulers check box. If you select this option, all rulers, polyrulers, cross-products and protractors will adopt the new calibrated values.
- If you want the calibration to apply to all existing rulers, select the Apply to Existing Rulers check box. If you use this option, all rulers, polyrulers, cross-products and protractors will be affected.
- Click the OK button when you are satisfied with the calibration values.
- Note that the calibration does not take effect until you click the Apply button on the parent dialog.

 Products | Support | Contact Us | Copyright Notices