 New Rubber Stamp Display Style
New Annotation Features of Version 14.5
|
Note: |
This topic is for Document/Medical only. |
With this release of LEADTOOLS version 14.5, many new features are being introduced to the annotations. Some of these features alter the way annotations are displayed. Other features change or enhance the user interface. To maintain backward compatibility within version 14, most of these features must be enabled by calling the L_AnnSetOptions functions. In LEADTOOLS version 15, these options will be enabled by default.
The following features are being introduced:
New Rubber Stamp Display Style
New XP Style Annotation Toolbar
New Alpha Background Fill Option
New Annotation Rotate Option
New Annotation Side Handles
New Annotation Multi-select
New Annotation Cursors
New ESC to Cancel
New Calibrate Ruler Feature
New Dot Dash Lines
New XML Format
New Text Annotation Options
The following paragraphs describe each feature in more detail.
New Rubber Stamp Display Style
In previous versions of LEADTOOLS, you could draw any of 26 predefined rubber stamp annotations. While any of these metafiles can be changed, users have asked for more contemporary-looking defaults. LEADTOOLS has responded and developed new default images. The following figure displays a sample of the original style and the new style:

The new rubber stamp style can be enabled using the following code snippet:
L_VOID ExampleEnableOption(HANNOBJECT hAutomation)
{
L_UINT uOptions = 0;
L_AnnGetOptions( hAutomation);
L_AnnSetOptions( hAutomation, uOptions | OPTIONS_NEW_STAMP_METAFILES);
}
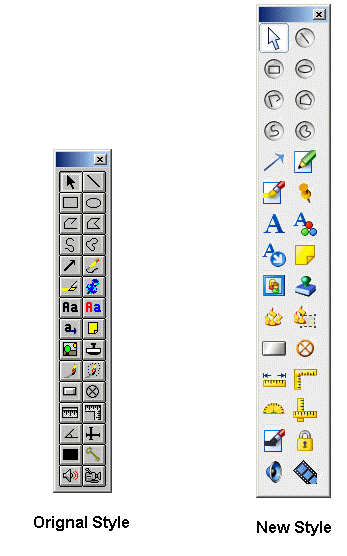
New XP Style Annotation Toolbar
The annotation toolbar has been updated to have a Windows-XP look and feel. As with previous versions of LEADTOOLS, the annotation toolbar can be customized with your own images.
The following figure displays a sample of the original style and the new style:
For more information on toolbars, see the documentation for ANNBUTTON and the functions L_AnnFreeToolBarButtons, L_AnnGetToolBarButtons, L_AnnSetToolBarButtons
The new XP-style annotation toolbar can be enabled using the following code snippet:
L_VOID ExampleEnableOption(HANNOBJECT hAutomation)
{
L_UINT uOptions = 0;
L_AnnGetOptions( hAutomation);
L_AnnSetOptions( hAutomation, uOptions | OPTIONS_NEW_TOOLBAR);
}
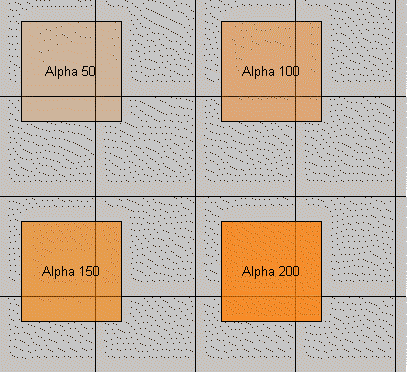
New Alpha Background Fill Option:
Previous versions of LEADTOOLS supported annotations with translucent backgrounds. With version 14.5, there is an alpha option that allows you to specify an alpha value from 0 (completely transparent background) to 255 (completely opaque background) inclusive.
The new alpha background fill option can be enabled using the following code snippet:
L_VOID ExampleEnableOption(HANNOBJECT hAutomation)
{
L_UINT uOptions = 0;
L_AnnGetOptions( hAutomation);
L_AnnSetOptions( hAutomation, uOptions | OPTIONS_NEW_ALPHA);
}
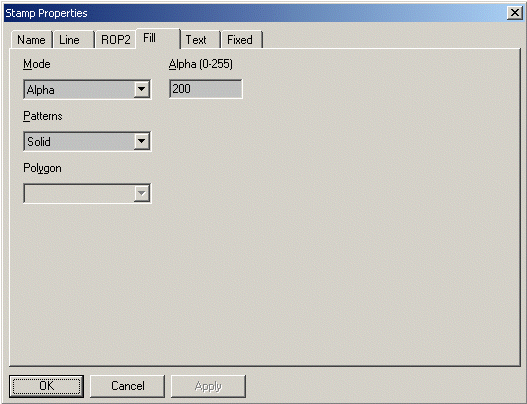
When enabled, you can right-click an annotation object to display the Fill dialog with the new alpha option. Here you can enter an alpha value from 0 – 255 inclusive. The following figure displays the Fill dialog for the Stamp object:
The following figure displays rectangle annotation objects using different alpha values:
For more information, see the documentation for L_AnnGetFillModeExt and L_AnnSetFillModeExt.
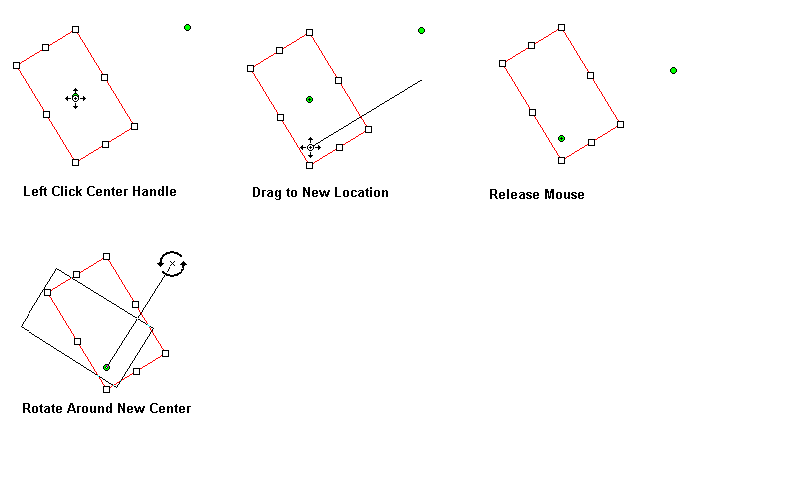
New Annotation Rotate Option
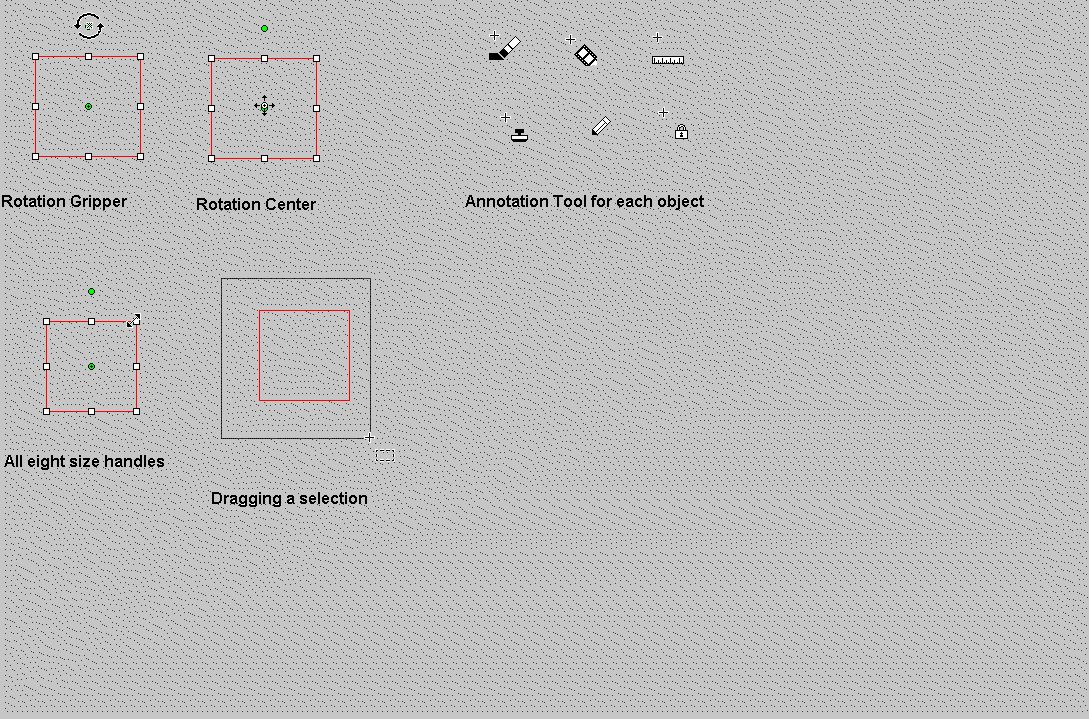
In previous versions of LEADTOOLS, annotation objects could be rotated by holding the <SHIFT> key while dragging a handle. With the new rotate options, two rotate handles are displayed on a selected object. One of the handles is the "gripper" handle, which rotates the object when dragged. The other handle is the "center" handle, which determines the center of rotation. The center of rotation can be moved by dragging. The gripper handle can be moved anywhere by dragging.
The following figure illustrates a rotate by dragging the "gripper" handle:
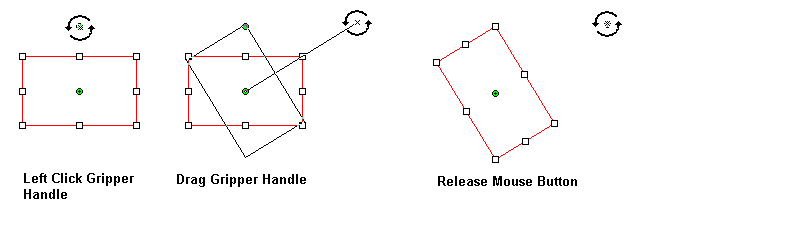
The following figure illustrates moving the "center" handle:
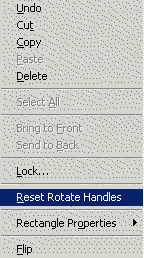
The rotate handles can be reset to a default location by right-clicking the annotation object, and selecting the Reset Rotate Handles option, as shown in the following figure:
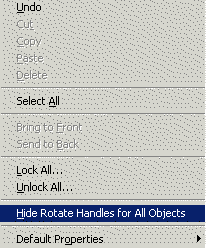
The rotate handles can be globally hidden or displayed by right-clicking on the image (not an annotation object), and selecting the Hide Rotate Handles For All Objects option, as shown in the following figure:
The new annotation rotate object can be enabled using the following code snippet:
L_VOID ExampleEnableOption(HANNOBJECT hAutomation)
{
L_UINT uOptions = 0;
L_AnnGetOptions( hAutomation);
L_AnnSetOptions( hAutomation, uOptions | OPTIONS_NEW_ROTATE);
}
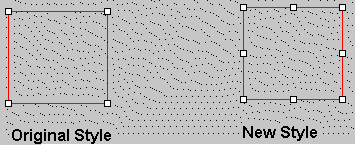
New Annotation Side Handles
In previous versions of LEADTOOLS, rectangular annotation objects were displayed with four handles to manipulate the object. With this new feature, rectangular objects are displayed with four additional side handles. Dragging the side handles resizes the annotation object only in one dimension. Dragging the corner handles resizes the object in two dimensions, preserving the aspect ratio.
The new annotation side handles can be enabled using the following code snippet:
L_VOID ExampleEnableOption(HANNOBJECT hAutomation)
{
L_UINT uOptions = 0;
L_AnnGetOptions( hAutomation);
L_AnnSetOptions( hAutomation, uOptions | OPTIONS_NEW_ SIDE_HANDLES);
}
The following figure displays a sample of the original style and the new style:
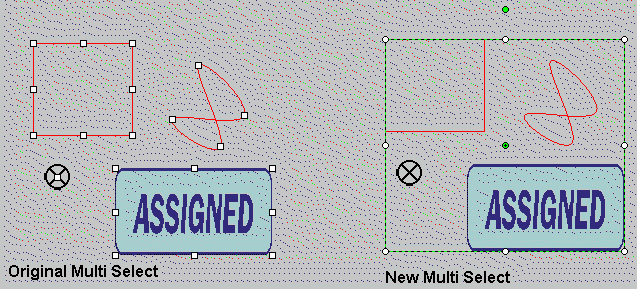
New Annotation Multi-select
In previous versions of LEADTOOLS, you could select multiple objects and manipulate the objects by dragging any handle of any object. When moving a handle, the results were often not intuitive. With the new multi-select option, all selected objects are outlined with a multi-select border. The multi-select border has eight resize handles, and two rotate handles. Now, moving, resizing, and rotating multiply select objects is clear and easy to do.
The new annotation multi-select feature can be enabled using the following code snippet:
L_VOID ExampleEnableOption(HANNOBJECT hAutomation)
{
L_UINT uOptions = 0;
L_AnnGetOptions( hAutomation);
L_AnnSetOptions( hAutomation, uOptions | OPTIONS_NEW_ MULTI_SELECT);
}
The following figure displays a sample of the original style and the new style:
New Annotation Cursors
This new feature displays different cursors for many tasks in automated annotation mode. This feature displays unique annotation cursors in the following situations:
When hovering over a rotation gripper handle
When hovering over a rotation center handle
When hovering over any of the eight size
handles—an appropriate arrow cursor is displayed depending on the handle
and the rotation of the annotation object.
When dragging a selection
When using any of the 30 annotation tools.
All annotation cursors can be changed to your own custom cursors by calling the L_AnnSetAutoCursor and L_AnnGetAutoCursor functions.
The new annotation cursors can be enabled using the following code snippet:
L_VOID ExampleEnableOption(HANNOBJECT hAutomation)
{
L_UINT uOptions = 0;
L_AnnGetOptions( hAutomation);
L_AnnSetOptions( hAutomation, uOptions | OPTIONS_NEW_ CURSORS);
}
The following figure displays some of the new cursors:
New ESC to Cancel
In previous versions of LEADTOOLS, the ESC key was not set to cancel actions in annotation automation mode. With this new feature, a user can press the ESC key to cancel many actions in annotation automation mode. For example, when drawing an annotation, pressing ESC will cancel the annotation completely. When rotating, resizing, or moving an annotation, pressing ESC will cancel the action leaving the annotation unchanged.
The new ESC to Cancel feature can be enabled using the following code snippet:
L_VOID ExampleEnableOption(HANNOBJECT hAutomation)
{
L_UINT uOptions = 0;
L_AnnGetOptions( hAutomation);
L_AnnSetOptions( hAutomation, uOptions | OPTIONS_NEW_ ESC_CANCEL);
}
New Calibrate Ruler Feature
With this feature, a user can automatically calibrate a ruler to the desired size. This is useful when a user wants to interactively measure something in an image. Note that there are four annotations objects used for measuring:
ANNOBJECT_RULER
ANNOBJECT_POLYRULER
ANNOBJECT_CROSSPRODUCT
ANNOBJECT_PROTRACTOR
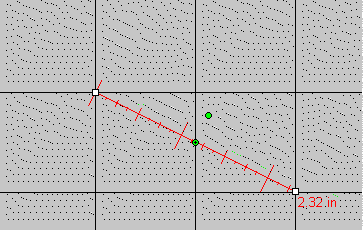
Any of these objects can be calibrated. To calibrate a ruler:
|
1. |
Load desired image |
|
2. |
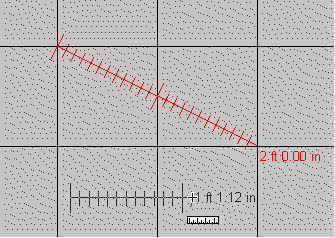
Draw an ANNOBJECT_RULER object and size to desired size. In this example, we will calibrate the diagonal to be 2 feet. The following figure displays an uncalibrated ruler: |
|
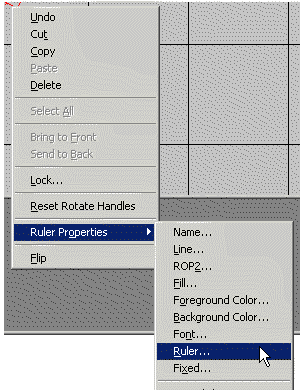
3. |
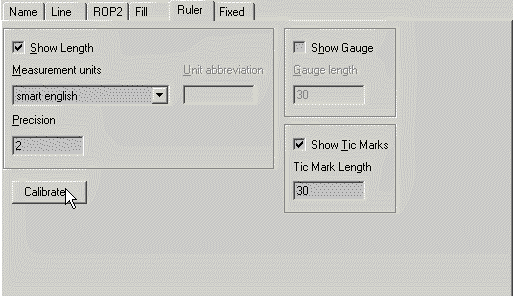
Right-click the ANNOBJECT_RULER object and select Ruler Properties, and then Ruler, as shown in the following figure: |
|
|
The following figure appears: |
|
4. |
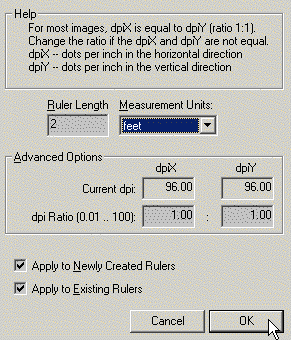
Click the Calibrate button to open the Calibrate Ruler dialog. The following figure displays: |
|
|
In the Calibrate dialog, set the Ruler Length to 2 and the Ruler Measurement to feet. Select the Apply to Newly Created Rulers check box. Click the OK button to close the Calibrate dialog. Click the OK button to save your selections and close the Ruler Properties dialog. |
|
5. |
Draw a new ruler to measure any part of the image, as shown in the following figure: |
The new calibrate ruler feature can be enabled using the following code snippet:
L_VOID ExampleEnableOption(HANNOBJECT hAutomation)
{
L_UINT uOptions = 0;
L_AnnGetOptions( hAutomation);
L_AnnSetOptions( hAutomation, uOptions | OPTIONS_NEW_CALIBRATE_RULER);
}
For more information on calibrating rulers, see the documentation for L_AnnCalibrateRuler, and the topic Calibrating Annotation Ruler Objects.
New Dot Dash Lines
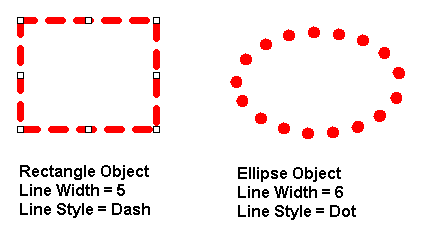
Most of the LEAD annotation objects have a Line Width and Line Style option. This can be used to draw the annotations with thick lines, and change the line style from solid to dashed or dotted. In previous versions of LEADTOOLS, drawing annotations with thick lines (line width more than 1 pixel) required that the line style be Solid. This is due to a limitation of Windows GDI. In version 14.5, this limitation has been removed. Now annotation objects can be drawn with thick lines of any style. The following example illustrates this:
This feature can be enabled using the following code snippet.
L_VOID ExampleEnableOption(HANNOBJECT hAutomation)
{
L_UINT uOptions = 0;
L_AnnGetOptions( hAutomation);
L_AnnSetOptions( hAutomation, uOptions | OPTIONS_NEW_DOT_DASH_LINES);
}
New XML Format
Prior to version 14.5, annotations could be saved in one of two formats:
ANNFMT_NATIVE – a text based file format
for storing annotations
ANNFMT_ENCODED – a binary file format for
storing annotations
In version 14.5, there is a new text-based format for annotations – ANNFMT_XML. This is a new text based format for storing LEAD annotations that follows the XML (Extensible Markup Language) format.
There are many advantages of using the ANNFMT_XML format:
Unlike the ANNFMT_NATIVE, ANNFMT_XML is both
forward and backward compatible.
It is human readable
Files using the ANNFMT_XML format can be
easily modified using a standard text editor (i.e. notepad.exe)
It can be easily parsed using any standard
XML parser
It can be used with any of the growing number
of utilities that work with XML
This option does not need to be enabled using L_AnnSetOptions. To use this feature, simply pass the flag ANNFMT_XML to the annotation save functions. For more information, see the documentation for L_AnnSave, L_AnnSaveOffset, L_AnnSaveMemory, L_AnnLoad, L_AnnLoadOffset and L_AnnLoadMemory.
New Text Annotation Options
For the following text based annotations, you can now change the text color so that it is different from the border color. Also, you can optionally show or hide the text.
ANNOBJECT_TEXT
ANNOBJECT_TEXTPOINTER
ANNOBJECT_STAMP
ANNOBJECT_NOTE
ANNOBJECT_PUSHPIN
For the following text based annotations, you can now optionally show or hide the border.
ANNOBJECT_TEXT
ANNOBJECT_STAMP
These properties can also be set for the following annotation objects for purposes of recursion:
ANNOBJECT_CONTAINER
ANNOBJECT_AUTOMATION
ANNOBJECT_BUTTON
To see these new features:
|
1. |
Draw an ANNOBJECT_TEXT object |
|
2. |
Right-click the object |
|
3. |
Select Text Properties and then Text |
|
4. |
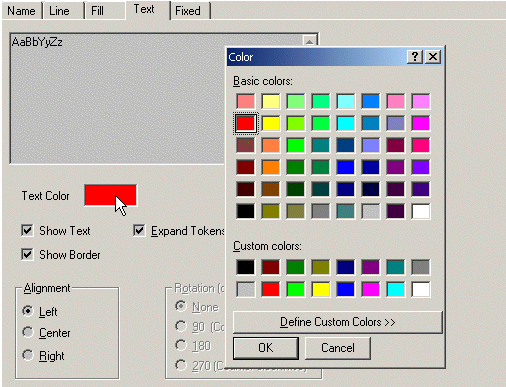
In the Text dialog, select the Show Border check box |
|
5. |
Click the Text Color button to change the color to blue. The following figure displays the Text dialog: |
|
6. |
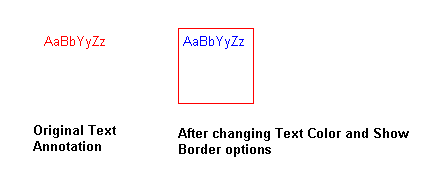
The following figure displays the original text object before and after changing the text color to blue: |
This feature can be enabled using the following code snippet.
L_VOID ExampleEnableOption(HANNOBJECT hAutomation)
{
L_UINT uOptions = 0;
L_AnnGetOptions( hAutomation);
L_AnnSetOptions( hAutomation, uOptions | OPTIONS_NEW_TEXT_OPTIONS);
}
For more information, see the documentation for the L_AnnSetTextOptions and L_AnnGetTextOptions functions.