L_BricksTextureBitmap
#include "l_bitmap.h"
L_INT
EXT_FUNCTION L_BricksTextureBitmap(pBitmap,
uBricksWidth,
uBricksHeight,
uOffsetX, uOffsetY, uEdgeWidth, uMortarWidth,
uShadeAngle, uRowDifference, uMortarRoughness,
uMortarRoughnessEvenness, uBricksRoughness,
uBricksRoughnessEvenness, crMortarColor, uFlags)
|
pBITMAPHANDLE
pBitmap; |
/* pointer to the bitmap handle */ |
|
L_UINT
uBricksWidth; |
/* width of the flat area of the brick */ |
|
L_UINT
uBricksHeight; |
/* height of the flat area of the brick */ |
|
L_UINT
uOffsetX; |
/* first brick X offset */ |
|
L_UINT
uOffsetY; |
/* first brick Y offset */ |
|
L_UINT
uEdgeWidth; |
/* perceived brick edge width */ |
|
L_UINT
uMortarWidth; |
/* mortar width */ |
|
L_UINT
uShadeAngle; |
/* shading angle */ |
|
L_UINT
uRowDifference; |
/* horizontal distance between the first brick in the
first row and the first brick in the second row */ |
|
L_UINT
uMortarRoughness; |
/* mortar roughness */ |
|
L_UINT
uMortarRoughnessEvenness; |
/* mortar weathering factor */ |
|
L_UINT
uBricksRoughness; |
/* brick roughness */ |
|
L_UINT
uBricksRoughnessEvenness; |
/* brick weathering factor */ |
|
COLORREF crMortarColor; |
/* mortar color */ |
|
L_UINT
uFlags; |
/* flags */ |
Creates a brick texture that makes the image look like it has been drawn
on a brick wall. This function is available
in the Raster
Pro and above toolkits.
|
Parameter |
Description |
|
pBitmap |
Pointer to the bitmap handle that references the bitmap
on which to apply the effect. |
|
uBricksWidth |
Flat area of the brick width, in pixels. Valid range
is from 0 to the bitmap width. |
|
uBricksHeight |
Flat area of the brick height, in pixels. Valid range
is from 0 to the bitmap height. |
|
uOffsetX |
The X distance between the bitmap origin and the first
brick origin, in pixels. |
|
uOffsetY |
The Y distance between the bitmap origin and the first
brick origin, in pixels. |
|
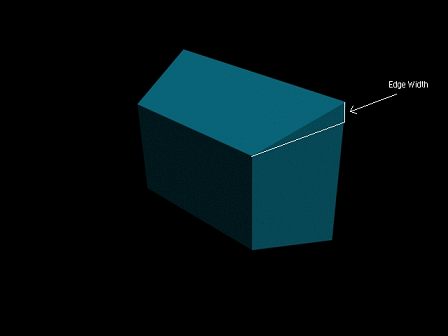
uEdgeWidth |
Perceived edge width, in pixels, which represents the
brick edge width when the brick is viewed from the perpendicular to the
front of the brick. Minimum value is 1. See the following figure: |
|
|
|
|
uMortarWidth |
Mortar width, or the space between two adjacent bricks. |
|
uShadeAngle |
Angle, in degrees, that identifies from which side
the light will hit the brick edges, resulting in a brightening of the
opposite angle edges, and the darkening of the other edges. Valid range
is from 0 to 360. |
|
uRowDifference |
Horizontal distance between the first brick of the
first row and the first brick on the next row, in pixels. Setting this
value to zero will make a grid-like wall. Valid range is from 0 to bitmap
width. |
|
uMortarRoughness |
Mortar roughness. Valid range is from 0 to 300. At
0, the mortar looks completely smooth. Use higher values to increase the
roughness. |
|
uMortarRoughnessEvenness |
Weathering factor for the mortar. Valid range is from
0 to 10. The higher the value the more weathered the mortar looks. |
|
uBricksRoughness |
Brick roughness. Valid range is from 0 to 300. At 0,
the brick looks completely smooth. Use higher values to increase the roughness
of the brick surface. |
|
uBricksRoughnessEvenness |
Weathering factor for the bricks. Valid range is from
0 to 10. The higher the value the more weathered the bricks look. |
|
crMortarColor |
The COLORREF value that specifies the mortar color.
You can specify a COLORREF value, such as the return value of the Windows
RGB macro, or you can use the PALETTEINDEX macro to specify a palette
color. |
|
uFlags |
Flags that determine which type of brick edge to use,
and which mortar style to use. You can specify no flags, one flag, or
combine one flag from each group of flags by using a bitwise OR ( | ).
The following flags indicate which type of shading
to use on the brick edges: |
|
|
Value |
Meaning |
|
|
BRICKS_SOLID |
[0x0000] Use bricks with solid edges. |
|
|
BRICKS_SMOOTHEDOUT |
[0x0001] Use bricks with edges that fade from in to
out. |
|
|
BRICKS_SMOOTHEDIN |
[0x0002] Use bricks with edges that fade from out to
in. |
|
|
The following flags indicate which type of mortar to
use: |
|
|
Value |
Meaning |
|
|
BRICKS_TRANSPARENTMORTAR |
[0x0000] Use transparent mortar. |
|
|
BRICKS_COLOREDMORTAR |
[0x0010] Use crMortarColor
mortar. |
Returns
|
SUCCESS |
The function was successful. |
|
< 1 |
An error occurred. Refer to Return
Codes. |
Comments
This function creates a brick-like texture. Edges that are in the angle
of the light source are brightened and the others are darkened. Apply
this texture to a bitmap by using pBitmap
as the source image. You can obtain the best result by applying this function
on a medium brightness image.
Using the shading option of BRICKS_SMOOTHEDOUT results in bricks that
have a more chiseled look than the same settings with a shading option
of BRICKS_SMOOTHEDIN.
As an example, suppose you were to start with a gray image, like the
following figure:

Now suppose you call the L_BricksTextureBitmap
function. The following settings apply to all of the following figures:
|
Parameter |
Value |
|
uOffsetX |
0 |
|
uOffsetY |
0 |
|
uRowDifference |
35 |
|
uBricksWidth |
60 |
|
uBricksHeight |
20 |
If you were to use the following additional settings:
|
Parameter |
Value |
|
uMortarRoughness |
0 |
|
uMortarRoughnessEvenness |
0 |
|
uBricksRoughness |
0 |
|
uBricksRoughnessEvenness |
0 |
|
uFlags |
BRICKS_SMOOTHEDOUT |
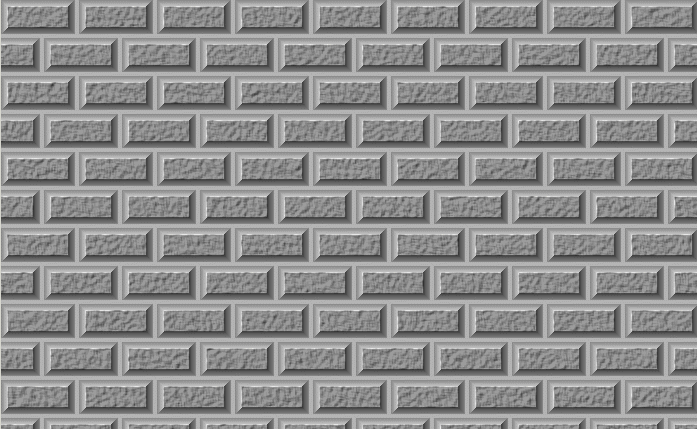
The following figure results:
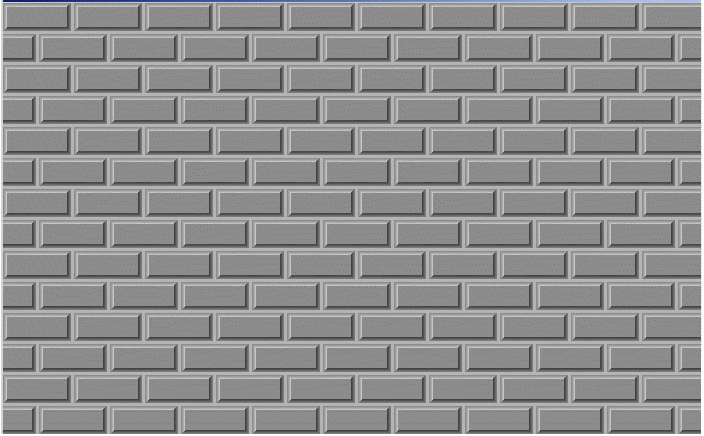
Note how smooth the surface of both the mortar and the bricks is. In
the following figure, the only change from the previous settings is the
value of uBricksRoughness, which is set to 196:
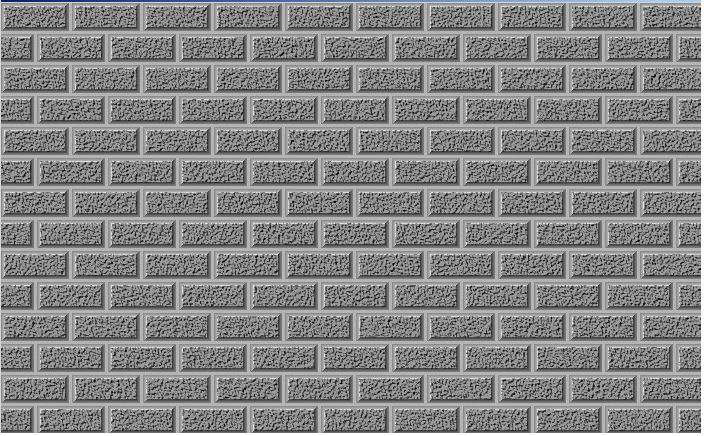
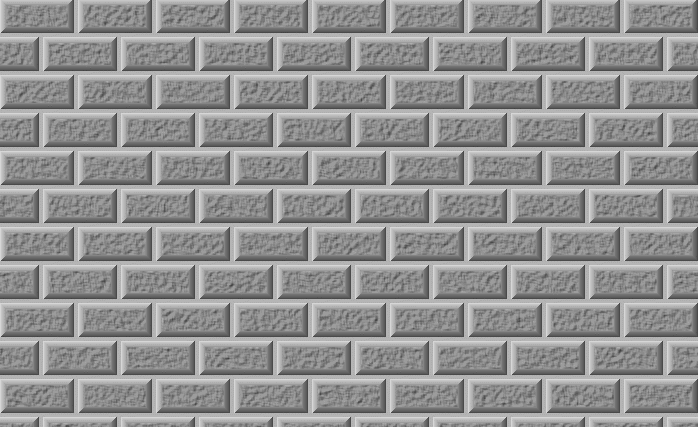
In the following figure, uBricksRoughness remains set to 196 and in
addition, uBricksRoughnessEvenness is set to 4:
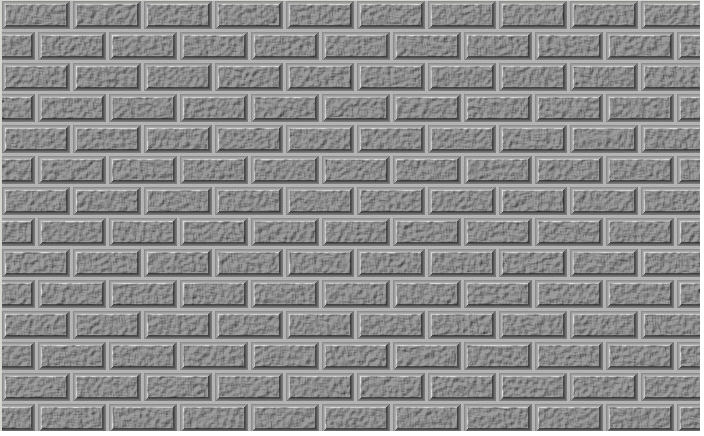
The next two figures show the difference between the BRICKS_SMOOTHEDOUT
flag and the BRICKS_SMOOTHEDIN flag. For these figures the following settings
are used:
|
Parameter |
Value |
|
uMortarRoughness |
0 |
|
uMortarRoughnessEvenness |
0 |
|
uBricksRoughness |
250 |
|
uBricksRoughnessEvenness |
4 |
|
uEdgeWidth |
7 |
|
uMortarWidth |
4 |
In the following figure the BRICKS_SMOOTHEDOUT flag is set:
In the following figure, the BRICKS_SMOOTHEDIN flag is set:
This function supports 12- and 16-bit grayscale and 48- and 64-bit color
images. Support for 12- and 16-bit grayscale and 48- and 64-bit color
images is available only in the Document/Medical
toolkits.
To update a status bar or detect a user interrupt during execution of
this function, refer to L_SetStatusCallback.
This function does not support signed data images. It returns the error
code ERROR_SIGNED_DATA_NOT_SUPPORTED if a signed data image is passed
to this function.
Required DLLs and Libraries
Platforms
Windows 95 / 98 / Me, Windows 2000 / XP.
See Also
|
Functions: |
L_EmbossBitmap,
L_AddShadowBitmap, L_AllocFTArray,
L_ChangeHueSatIntBitmap, L_ColorReplaceBitmap, L_ColorThresholdBitmap,
L_DFTBitmap, L_DirectionEdgeStatisticalBitmap,
L_FFTBitmap, L_FreeFTArray,
L_FrqFilterBitmap, L_FrqFilterMaskBitmap,
L_FTDisplayBitmap, L_GetBitmapStatisticsInfo,
L_GetFeretsDiameter, L_GetObjectInfo,
L_GetRgnContourPoints, L_GetRgnPerimeterLength,
L_MathFunctionBitmap, L_SegmentBitmap,
L_SubtractBackgroundBitmap,
L_UserFilterBitmap. |
|
Topics: |
Applying Artistic
Effects |
|
|
Raster Image
Functions: Filtering Images |
|
|
Raster
Image Functions: Artistic Effects |
|
|
Raster
Image Functions: Processing an Image |
Example
BITMAPHANDLE LeadBitmap; /* Bitmap handle for the image */
/* Load a bitmap at its own bits per pixel */
L_LoadBitmap (TEXT ("IMAGE3.CMP"), &LeadBitmap, sizeof (BITMAPHANDLE), 0, ORDER_BGR, NULL, NULL);
/* Apply the Bricks Texture effect to the image*/
L_BricksTextureBitmap(&LeadBitmap, 60, 20, 0, 0, 3, 4, 315, 33, 20, 0, 10, 0, 0, BRICKS_SMOOTHEDOUT);