ShowRippleDlg method (ILEADRasterDlgImgEfx)
|
Overview |
Refer to Using Imaging Common Dialogs |
Remarks
(Raster Pro and above toolkits) Displays the Ripple dialog box, and gets the options for the Ripple method.
The layout and action of the dialog depends on the flags set in the UIFlags property. Possible options are:
|
Value |
Meaning |
|
RIPPLE_AUTOPROCESS |
[0X00000001] process the image on OK. The Common Dialog Bitmap property must be assigned a valid bitmap before calling this method. |
|
RIPPLE_SHOW_CONTEXTHELP |
[0X00000002] dialog should contain a context sensitive help icon. |
|
RIPPLE_SHOW_PREVIEW |
[0X00000004] show a preview of the image in the dialog; The Common Dialog Bitmap property must be assigned a valid bitmap before calling this method. |
|
RIPPLE_SHOW_APPLY |
[0x00000080] Show the Apply button in the dialog. The dialog will not apply any effect unless the user presses the Apply button. |
|
RIPPLE_SHOW_TOOL_ZOOMLEVEL |
[0X00000008] show the "Zoom to fit" and "Zoom Normal" toolbar buttons. The RIPPLE_SHOW_PREVIEW flag must be set in order to show these buttons. |
If you include RIPPLE_AUTOPROCESS or RIPPLE_SHOW_PREVIEW in the UIFlags property, the Common Dialog Bitmap property must be assigned a valid bitmap before calling this method.
The properties associated with this dialog box are:
To include a Help button in the dialog, set the ShowHelpButton property to VARIANT_TRUE.
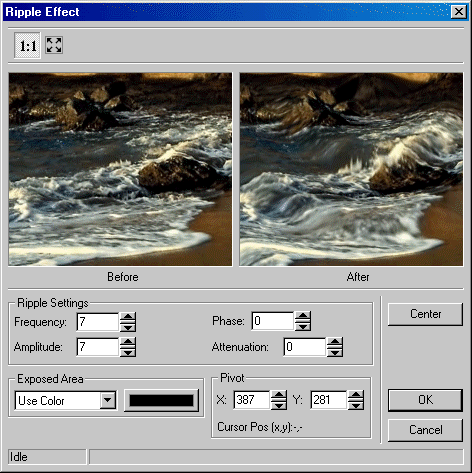
The Ripple dialog can be seen below:
This dialog has the following fields:
![]() Pivot Section:
Pivot Section:
This section contains two edit boxes and a display area for setting
the pivot point. You can also set the pivot point by right clicking on
the Before view. The Pivot point ![]() appears on the point
you just clicked.
appears on the point
you just clicked.
X Edit box:
Use this to set the pivot's x-axis position in the image. Enter the value directly in the edit box or use the arrows to set the desired value.
Y Edit box:
Use this to set the pivot's y-axis position in the image. Enter the value directly in the edit box or use the arrows to set the desired value.
Cursor Pos (x,y)
Brings up the mouse position with respect to the image.
Center Button:
Use the Center button to center the Before and After views with respect
to ![]() the pivot point position.
the pivot point position.
See Also