ShowRemapIntensityDlg method (ILEADRasterDlgClr)
|
Overview |
Refer to Using Imaging Common Dialogs |
Remarks
Displays the Remap Intensity dialog box, and gets the options for the RemapIntensity method.
The layout and action of the dialog depends on the flags set in the UIFlags property. Possible options are:
|
Value |
Meaning |
|
REMAPINTENSITY_AUTOPROCESS |
[0x00000001] process the image on OK. The Common Dialog Bitmap property must be assigned a valid bitmap before calling this method. |
|
REMAPINTENSITY_SHOW_CONTEXTHELP |
[0x00000002] dialog should contain a context sensitive help icon. |
|
REMAPINTENSITY_SHOW_PREVIEW |
[0x00000004] show a preview of the image in the dialog. The Common Dialog Bitmap property must be assigned a valid bitmap before calling this method. |
|
REMAPINTENSITY_SHOW_TOOL_ZOOMLEVEL |
[0x00000008] show the "Zoom to fit" and "Zoom Normal" toolbar buttons. The REMAPINTENSITY_SHOW_PREVIEW flag must be set in order to show these buttons. |
If you include REMAPINTENSITY_AUTOPROCESS or REMAPINTENSITY_SHOW_PREVIEW in the UIFlags property, the Common Dialog Bitmap property must be assigned a valid bitmap before calling this method.
The following properties are associated with this dialog:
To include a Help button in the dialog, set the ShowHelpButton property to VARIANT_TRUE.
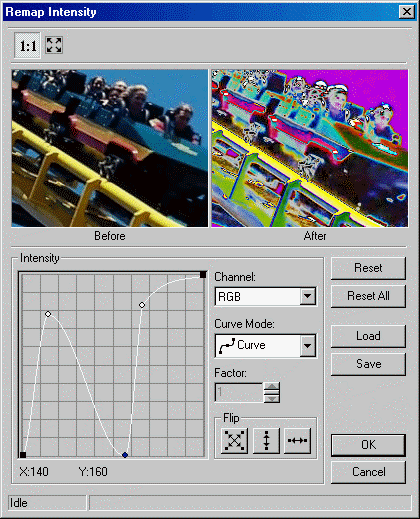
The Remap Intensity dialog can be seen below:

This dialog has the following fields:
Channel Drop-down list box:
Use this to select the channel to remap. There are four choices:
- RGB: remap all channels.
- Red: remap the red channel.
- Green: remap the green channel.
- Blue: remap the blue channel.
Curve Mode Drop-down list box:
Use this to select the curve mode to use when remapping. There are four choices:
-  Curve:
remaps the selected channel using curve data.
-  Linear:
remaps the selected channel using linear data.
-  Exponential:
remaps the selected channel using exponential data, which is affected
by the Factor value.
-  Logarithm:
remaps the selected channel using logarithmic data, which is affected
by the Factor value.
Factor Edit box:
Use this to set the factor of the Exponential/Logarithm curve. Enter the value directly in the edit box or use the arrows to set the desired value.
Flip Buttons:
Use these buttons to flip the curve if the Curve Mode is either Curve or Linear. The following options are available:
-  Both.
Flip the curve vertically and horizontally.
-  Vertically.
Flip the curve vertically.
-  Horizontally.
Flip the curve horizontally.
Reset Button:
Use the Reset button to set the curve of the current channel to default values.
Reset All Button:
Use the Reset All button to set the curve for all the channels to default values.
Load Button:
Use the Load button to load an "*.lri" file that contains Remap Intensity curve settings, using the Load dialog. The loaded file will set a new curve for each channel.
|
Note: |
Loading curve settings will overwrite all current settings for all channels. |
Save Button:
Use the Save button to save all the curve settings for all the channels into an "*.lri" file. This allows you set the same curve settings for other images by re-loading the file.
See Also
|
Elements |
RemapIntensity method, Channel property, RemapTable property, RemapTableSize property, ShowHelpButton property, EnableZoomToFit Property, UIFlags Property, EnableMethodErrors property |