1.
Start the demo by:
Selecting "Start" ? "Programs" ? "LEADTOOLS Raster Imaging Pro 14.0" ? "Extensions" ? "Barcode" ? "ActiveX" or "API" or "C++ Class Library" and click on the desired demo, as shown below.
Please note that your exact path may vary, depending on the toolkit you have installed.
or
Double clicking on the MFCBar32.exe file in the LEAD/BIN directory, where LEAD represents the directory in which you installed the LEADTOOLS toolkit. (If you used the default settings when you installed the toolkit, that path would be "C:\Program Files\LEAD Technologies, Inc\LEADTOOLS\Bin".)
2.
In the main window of the Bar Code Demo, select File ? Open.
3.
In the Open dialog, you can either set the path to the LEAD/Images directory in the "File" edit box or browse to this directory using the "Look in" drop box. (Please note that in the LEAD/Images directory mentioned above, "LEAD" represents the directory in which you installed the LEADTOOLS toolkit.) Select the barcode1.tif file and select Open.
4.
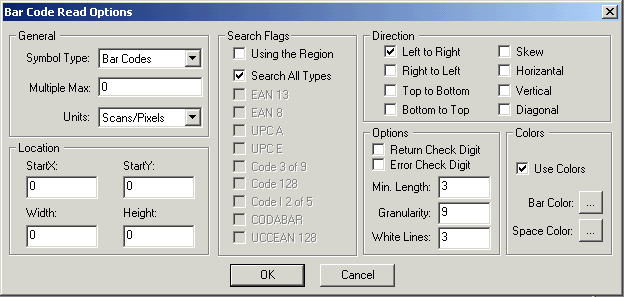
In the main window of the Bar Code Demo, select Actions ? Read …. The Bar Code Read Options dialog will appear, as shown below:

5.
Use the settings shown above. Notice that when the "Search All Types" box is checked, the boxes for the individual barcode types are disabled.
6.
Press OK in the Bar Code Read Options dialog.
7.
A "Notice!" message box will appear with information on the number of barcodes found. Click OK.
8.
Next a dialog will appear for each barcode found. Each dialog will display information about the barcode. Click OK on the dialog to display the dialog for the next barcode.