
Adding notes, arrows, measurements, shapes, and other annotations to DICOM files for storage is extremely important when it comes to the health care industry. LEADTOOLS offers a number of methods to manipulate DICOM graphic and text annotations.
This blog will go over how simple it is to add annotations programmatically to a DICOM dataset, export annotations while adhering to the DICOM standard by saving them to a presentation state file, and how to load and display annotations and pixel data in an image viewer.
Key Points
In the code below, the "AddAnnotationAndSave" method does the following:
- Loads a DICOM Dataset and extracts pixel data.
- Creates the annotation container and sets the resolution of the container mapper and the size of the container by converting the image coordinates of the pixel data to annotation coordinates using the AnnContainerMapper conversion methods. Then adds that annotation to a newly created DICOM dataset alongside the image we got from the loaded dataset.
- Creates sample annotations and adds them to the AnnContainer.Children collection. It then uses the helper functionality contained within the DicomAnnotationsUtilities to convert the AnnContainer to DICOM Annotations and stores them in the proper tags within a new DICOM Dataset which will hold all the Presentation State information.
- Output the Presentation State Dataset to a file with ‘.pre’ extension which can be reloaded and the annotation data extracted.
Code
private static void AddAnnotationAndSave(string imageFile)
{
 //The DicomEngine only needs to be called once in the code, then shutdowned when exiting the application
 DicomEngine.Startup();

 //This creates a new and loads the image3.dcm to use the image data from it
 using var imageDs = new DicomDataSet();
 imageDs.Load(imageFile, DicomDataSetLoadFlags.None);

 //This sets the DicomElement to the first PixelData element found from the loaded data set and gets the image from it
 DicomElement element = imageDs.FindFirstElement(null, DicomTag.PixelData, true);
 var image = imageDs.GetImage(element, 0, 0, RasterByteOrder.Gray,
         DicomGetImageFlags.AutoApplyModalityLut |
         DicomGetImageFlags.AutoApplyVoiLut |
         DicomGetImageFlags.AutoScaleModalityLut |
         DicomGetImageFlags.AutoScaleVoiLut |
         DicomGetImageFlags.AutoDetectInvalidRleCompression
         );

 //These next blocks will create the annotation objects that will be placed on the image
 var rectangle = new Leadtools.Annotations.Engine.AnnRectangleObject();
 rectangle.Rect = LeadRectD.Create(0, 0, 110, 100);
 rectangle.Stroke.Stroke = AnnSolidColorBrush.Create("red");

 var ruler = new Leadtools.Annotations.Engine.AnnPolyRulerObject();
 ruler.Points.Add(LeadPointD.Create(50, 50));
 ruler.Points.Add(LeadPointD.Create(170, 50));
 ruler.Stroke.Stroke = AnnSolidColorBrush.Create("red");
 ruler.Stroke.StrokeThickness = LeadLengthD.Create(2);

 var text = new Leadtools.Annotations.Engine.AnnTextPointerObject();
 text.Rect = LeadRectD.Create(170, 75, 50, 25);
 text.Text = "This is a sample text.\nThis would be useful for\nleaving notes";
 text.FixedPointer = false;
 text.PointerPosition = LeadPointD.Create(100, 50);

 annContainer.Children.Add(rectangle);
 annContainer.Children.Add(ruler);
 annContainer.Children.Add(text);
 //This sets default information for the DicomAnnotationsUtilities/PresentationStateIdentificationModule
 var dicomAnnUtils = new DicomAnnotationsUtilities
 {
  PresentationStateIdentification = new PresentationStateIdentificationModule
  {
   ContentCreatorName = "",
   ContentDescription = "",
   ContentLabel = "",
   CreationDate = new DicomDateValue(DateTime.Now),
   CreationTime = new DicomTimeValue(DateTime.Now),
   InstanceNumber = 1
  }
 };

 //This creates a new DicomDataSet to house the image with annotations and saves it out as a .pre file
 //so it can be used with a dcm file of the same name. For example, if we run image2.dcm in the DicomAnnotationDemo it will
 //autoload the new file, image2.pre, we create here
 using var preDs = new DicomDataSet();
 dicomAnnUtils.FromAnnContainerToDataSet(preDs, annContainer, imageDs, string.Empty, string.Empty);
 preDs.Save(Path.ChangeExtension(imageFile, ".pre"), DicomDataSetSaveFlags.None);

 //Shuts down the engine
 DicomEngine.Shutdown();
}
We call the AddAnnotationAndSave() inside the Main() with a couple of other declarations as shown. The key point we want to note here is to use the correct CDLLs in Platform.LibraryPath() since we are using .NET 6.
static void Main(string[] args)
{
 //Since we are using NET6 we want to make sure the correct CDLLS are being used
 Platform.LibraryPath = Path.GetDirectoryName(@"C:\LEADTOOLS22\Bin\CDLL\x64\");
 SetLicense();

 var ImagesDir = @"C:\LEADTOOLS22\Resources\Images";
 var imageFile = Path.Combine(ImagesDir, "DICOM", "image2.dcm");

 AddAnnotationAndSave(imageFile);
 Console.WriteLine("Finished applying annotations!");
}
Try for Yourself!
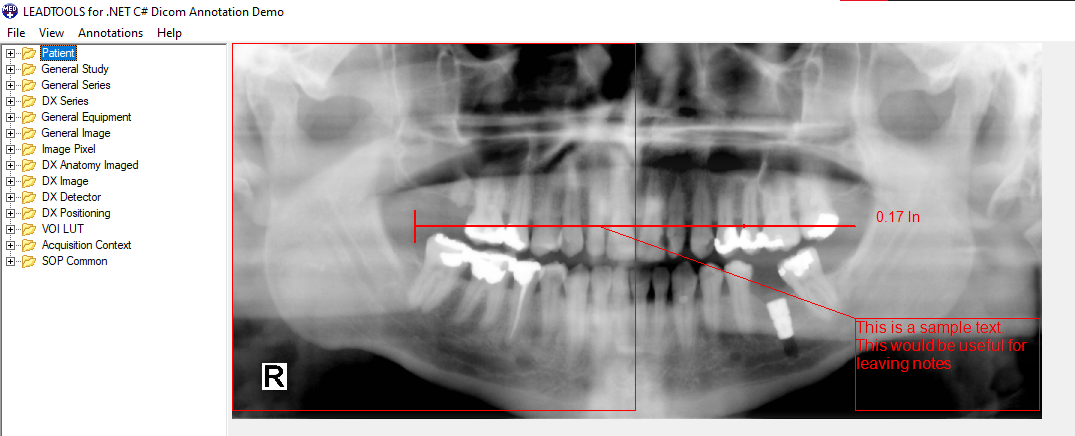
Using the code above and the LEADTOOLS DICOM Annotation Demo (found within our evaluation SDK), you will be able to see the annotations you created like so:
Want to learn more about DICOM Annotations? Stay Tuned!
We have more helpful posts coming your way regarding DICOM Annotations so stay tuned! In the meantime, don't forget to download our FREE 60-day evaluation SDK to test all of our features and actually program with LEADTOOLS before a purchase is even made.
Our support team is always here to help! Contact us for free technical support via live chat or email.
For pricing or licensing questions, contact our sales team via email or call us at 704-332-5532. Be sure to check out our product wizard and pricing estimator as well!
